
In the previous articles in this series, we’ve looked at two different approaches for creating an image with rounded corners. In this article, we’ll look at creating a speech bubble effect, similar to those used in some messaging apps such as WhatsApp.
The basic principle that we’re going to use to achieve this is based upon the BitmapShader technique that we covered in the previous article. The theory of what we’re going to do is draw a round cornered rectangle, as we did before, but pull the left edge inwards slightly to leave a margin on the left of the image. In this margin we’ll draw a triangle to represent the “stem” of the speech bubble – i.e the bit that points to the mouth of the person speaking in a comic strip.
We already know how to draw a round cornered rectangle, so half of the work is already done for us. So all that we need to do is to draw a triangle. However, if we look at Canvas, it doesn’t have a method to draw a triangle. So we need to use some of the drawing primitives to do it for us. Canvas supports moveTo() and lineTo() methods which enable us to draw simple shapes consisting of straight lines, but we cannot fill the area inside these lines using them alone. Instead we can use a Path object. Path also contains moveTo() and lineTo() methods, which enable us to create the same simple shapes, however we can then render the Path object which we have constructed using a BitmapShader which will fill the inside of the shape as well.
To draw our triangle we first create an empty Path:
Path triangle = new Path();
Next we use moveTo() to more the current point to the starting position. In this case we want to move to the point of the triangle at the left edge of the Canvas, and down a little from the top. This is the outermost point of the speech bubble triangle:
triangle.moveTo(0, TRIANGLE_OFFSET);
Now we use lineTo() to draw a line from the current position (which we set in the moveTo()) to the right edge of the margin area, sloping upwards:
triangle.lineTo(TRIANGLE_WIDTH, TRIANGLE_OFFSET - (TRIANGLE_HEIGHT / 2));
Now we use a second lineTo() to draw a second line from the current position (the lineTo() drew a line, but did not alter the current position). This time we want the line to slope downwards, in a mirror image of the first line:
triangle.lineTo(TRIANGLE_WIDTH, TRIANGLE_OFFSET + (TRIANGLE_HEIGHT / 2));
Finally, we want to draw the final line to be the final edge of the triangle. The obvious way would be to use a moveTo() to move to one of the endpoints of the previous two lines, and then do a lineTo to draw a line to the endpoint of the other line. However, there’s an easier way. If we call close() on the path it will automatically draw a line to close the two open ends of the current path, and this will draw precisely the line that we need:
triangle.close();
We now have the triangle shape that we need and all that remains is to actually draw it to the canvas using the Shader. Here’s the full method:
private static final float RADIUS_FACTOR = 8.0f;
private static final int TRIANGLE_WIDTH = 120;
private static final int TRIANGLE_HEIGHT = 100;
private static final int TRIANGLE_OFFSET = 300;

public Bitmap processImage(Bitmap bitmap) {
    Bitmap bmp;

    bmp = Bitmap.createBitmap(bitmap.getWidth(),
        bitmap.getHeight(), Bitmap.Config.ARGB_8888);
    BitmapShader shader = new BitmapShader(bitmap,
        BitmapShader.TileMode.CLAMP,
        BitmapShader.TileMode.CLAMP);

    float radius = Math.min(bitmap.getWidth(),
        bitmap.getHeight()) / RADIUS_FACTOR;
    Canvas canvas = new Canvas(bmp);
    Paint paint = new Paint();
    paint.setAntiAlias(true);
    paint.setShader(shader);

    RectF rect = new RectF(TRIANGLE_WIDTH, 0,
        bitmap.getWidth(), bitmap.getHeight());
    canvas.drawRoundRect(rect, radius, radius, paint);

    Path triangle = new Path();
    triangle.moveTo(0, TRIANGLE_OFFSET);
    triangle.lineTo(TRIANGLE_WIDTH,
        TRIANGLE_OFFSET - (TRIANGLE_HEIGHT / 2));
    triangle.lineTo(TRIANGLE_WIDTH,
        TRIANGLE_OFFSET + (TRIANGLE_HEIGHT / 2));
    triangle.close();
    canvas.drawPath(triangle, paint);

    return bmp;
}
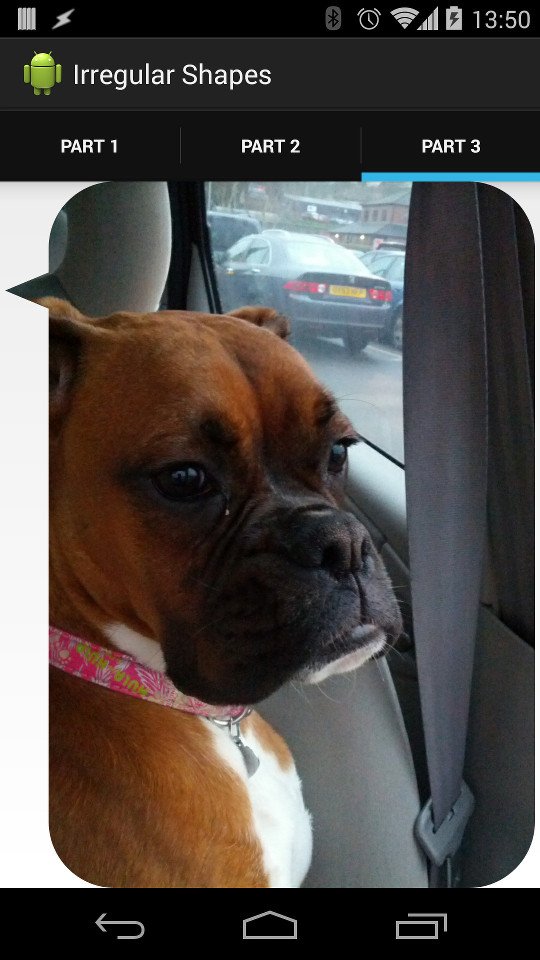
If we run this we can see the combination of the two simple shapes using the same Shader gives the speech bubble effect that we’re after:
In the final article in this series we’ll combine shapes in other ways to create what looks like quite a complex shape, but it pretty easy once we break it down in to its component parts.
The source code for this article is available here.
© 2014, Mark Allison. All rights reserved.
Copyright © 2014 Styling Android. All Rights Reserved.
Information about how to reuse or republish this work may be available at http://blog.stylingandroid.com/license-information.

good morning, I’m trying to create a hexagon can give me some clue how.
thank you
Very useful article!
It just reminds me that in my first time trying to fulfill this stem like feature, I used a real triangle picture and calculated pixel for the position. Not a beautiful way haha.
By the way, there may be a misspell in “Next we use moveTo() to more the…”. :p
Cool technique, I would also experiment with using a black/white 9-patch for the bubble shape, then drawing on the canvas with a MaskFilter. Might be more efficient if it looks as good.