
In a recent series of posts for the MidiPad app, there was a discussion regarding the use of a RadialGradiant to render each PadView and, for aesthetic reasons, this was done using a software layer rather than a hardware layer. In this concluding article we’ll explore a way of adapting things to use a hardware layer instead.
 Before we go any further, it’s confession time: I am an idiot.
The reason for this statement is that the horrible rendering we saw in the previous article is actually a result of how I constructed the RadialGradient. The hardware rendering on the GPU was much better at rendering my buggy implementation than the software one and that is why the software rendering looked so bad.
The cause of this was the end colour that I used for the RadialGradient:
var shaderFactory: (width: Float, height: Float) -> Shader = { viewWidth, viewHeight ->
    RadialGradient(
            viewWidth / 2f,
            viewHeight / 2f,
            Math.min(viewWidth, viewHeight) / 2f,
            defaultColour,
            Color.TRANSPARENT,
            Shader.TileMode.CLAMP
    )
}
While this may look perfectly innocent there is a problem. In order to achieve a smooth gradient we should only be altering the alpha channel. However the ARGB value of Color.TRANSPARENT has the red green and blue components all set to 0. The software renderer is interpolating these values as well as the alpha and because RGB of 0 red, 0 green, and 0 blue is actually black, that explains why there was this black halo appearing around the gradient.
We can easily change this so that we only change the alpha channel of the start and end colours:
var shaderFactory: (width: Float, height: Float) -> Shader = { viewWidth, viewHeight ->
    RadialGradient(
            viewWidth / 2f,
            viewHeight / 2f,
            Math.min(viewWidth, viewHeight) / 2f,
            defaultColour,
            defaultColour.setAlpha(0),
            Shader.TileMode.CLAMP
    )
}

@ColorInt fun Int.setAlpha(alpha: Int): Int =
        Color.argb(alpha, Color.red(this), Color.green(this), Color.blue(this))
If we now run this we can see there is much better visual parity between the hardware and software layer rendering:
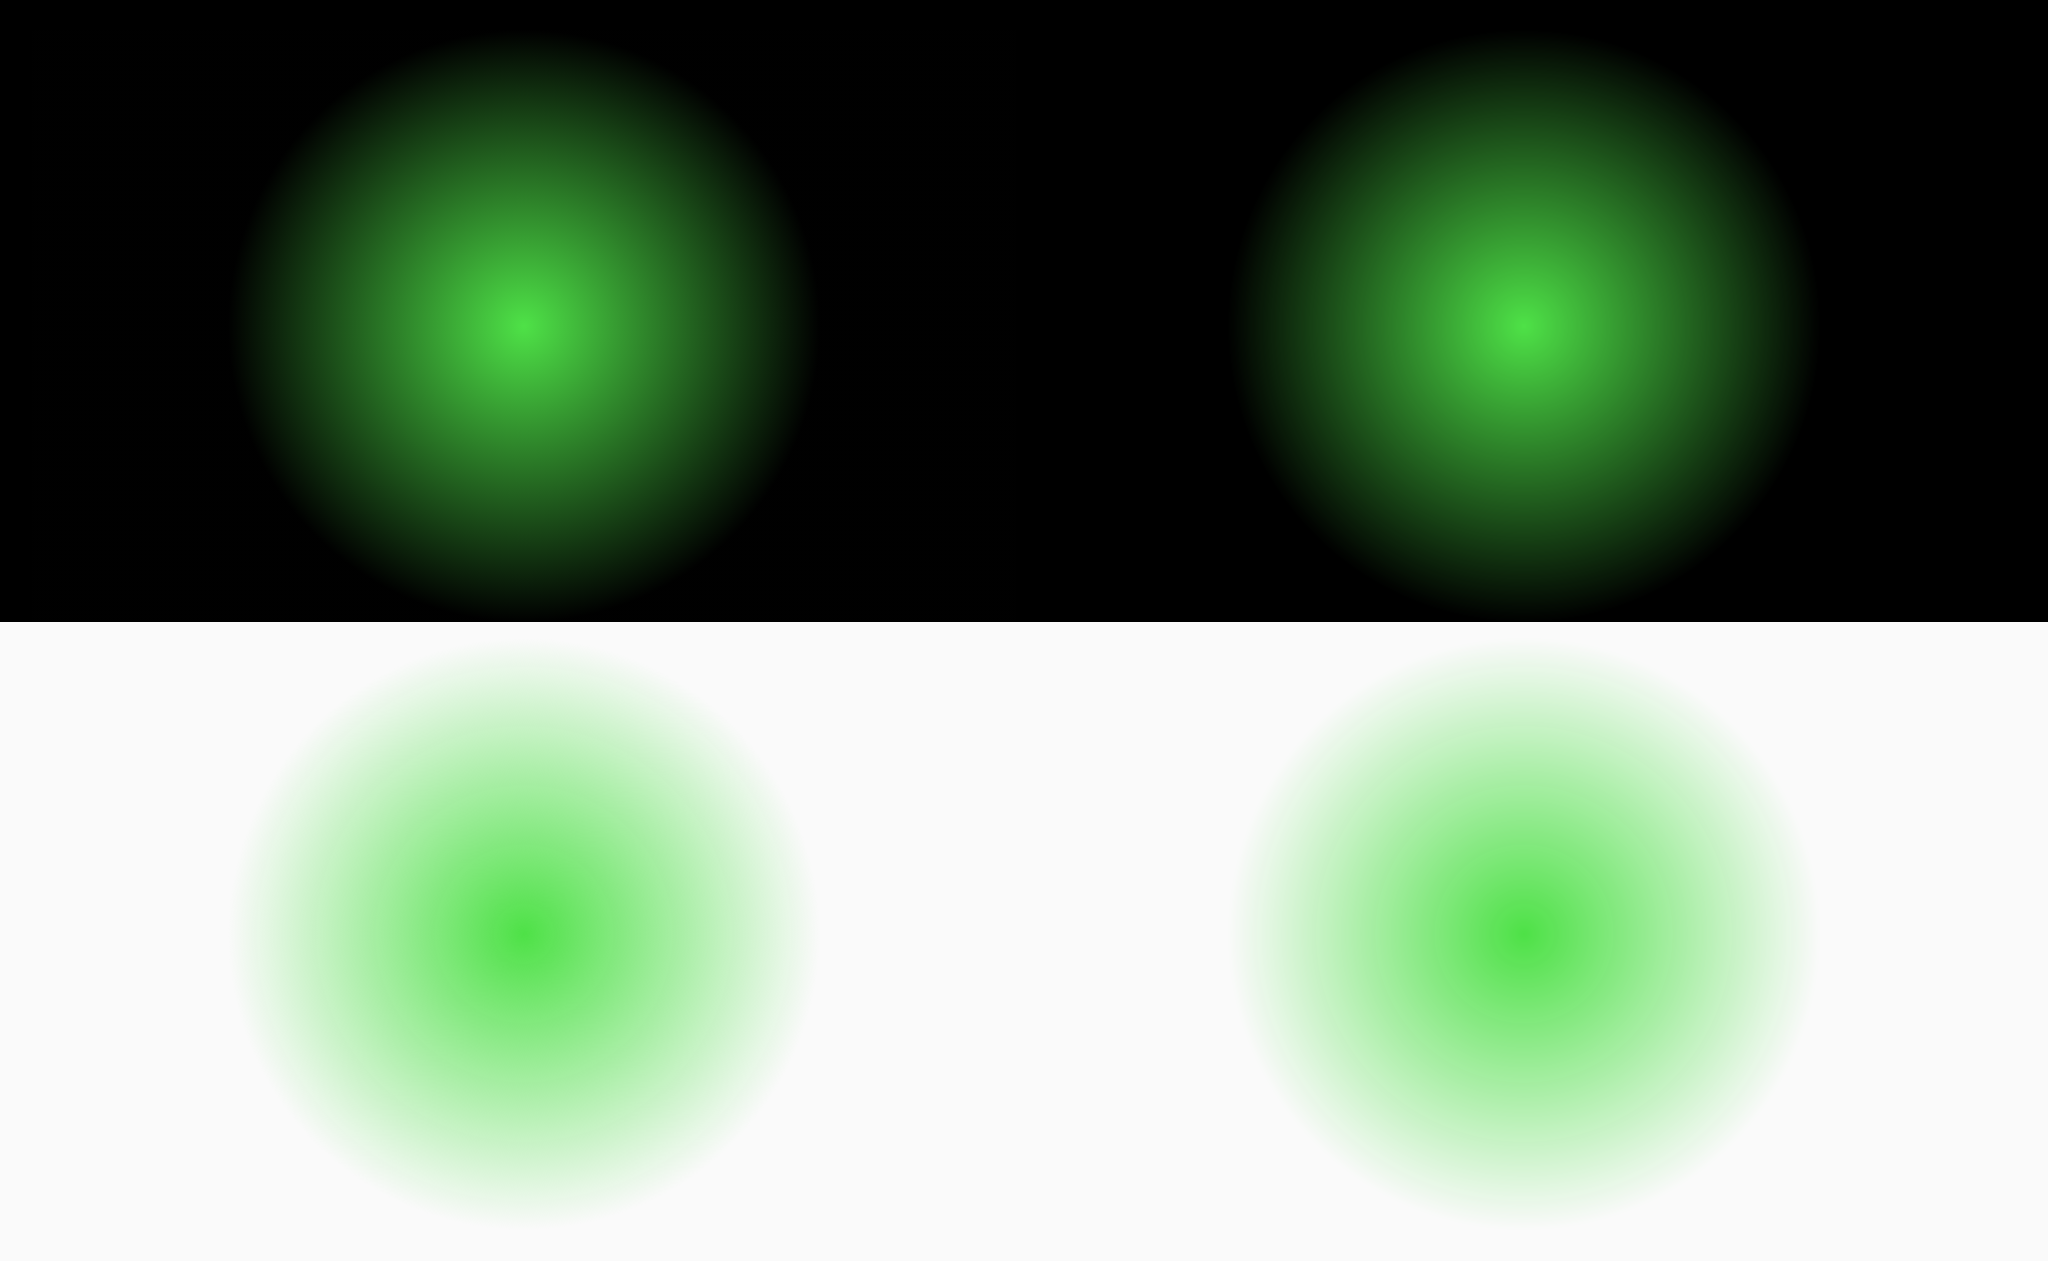
Did I mention that I’m an idiot?
I thought of re-writing the previous post, but elected to keep it intact as this is an easy mistake to make, and felt it worthy of proper explanation in case others have similar problems.
With this fix in place, the software layer rendering no longer provides the rendering against a dark background that I liked, so we now *have* to fix it to get things looking right.
Lets add a couple more GradientView instances to our layout:
<?xml version="1.0" encoding="utf-8"?>
<android.support.constraint.ConstraintLayout xmlns:android="http://schemas.android.com/apk/res/android"
  xmlns:app="http://schemas.android.com/apk/res-auto"
  xmlns:tools="http://schemas.android.com/tools"
  android:layout_width="match_parent"
  android:layout_height="match_parent"
  tools:context="com.stylingandroid.radialgradient.MainActivity">

  <View
    android:layout_width="0dp"
    android:layout_height="0dp"
    android:background="@android:color/black"
    app:layout_constraintBottom_toBottomOf="@+id/dark_hardware"
    app:layout_constraintEnd_toEndOf="parent"
    app:layout_constraintStart_toStartOf="parent"
    app:layout_constraintTop_toTopOf="parent" />

  <com.stylingandroid.radialgradient.GradientView
    android:id="@+id/dark_hardware"
    android:layout_width="0dp"
    android:layout_height="0dp"
    android:layout_margin="8dp"
    android:layerType="hardware"
    app:layout_constraintBottom_toTopOf="@+id/light_hardware"
    app:layout_constraintEnd_toStartOf="@+id/dark_custom"
    app:layout_constraintStart_toStartOf="parent"
    app:layout_constraintTop_toTopOf="parent" />

  <com.stylingandroid.radialgradient.GradientView
    android:id="@+id/dark_custom"
    android:layout_width="0dp"
    android:layout_height="0dp"
    android:layout_margin="8dp"
    android:layerType="none"
    app:layout_constraintBottom_toTopOf="@+id/light_custom"
    app:layout_constraintEnd_toStartOf="@+id/dark_software"
    app:layout_constraintStart_toEndOf="@+id/dark_hardware"
    app:layout_constraintTop_toTopOf="parent" />

  <com.stylingandroid.radialgradient.GradientView
    android:id="@+id/dark_software"
    android:layout_width="0dp"
    android:layout_height="0dp"
    android:layout_margin="8dp"
    android:layerType="software"
    app:layout_constraintBottom_toTopOf="@+id/light_software"
    app:layout_constraintEnd_toEndOf="parent"
    app:layout_constraintStart_toEndOf="@+id/dark_custom"
    app:layout_constraintTop_toTopOf="parent" />

  <com.stylingandroid.radialgradient.GradientView
    android:id="@+id/light_hardware"
    android:layout_width="0dp"
    android:layout_height="0dp"
    android:layout_margin="8dp"
    android:layerType="hardware"
    app:layout_constraintBottom_toBottomOf="parent"
    app:layout_constraintEnd_toStartOf="@+id/light_custom"
    app:layout_constraintStart_toStartOf="parent"
    app:layout_constraintTop_toBottomOf="@+id/dark_hardware" />

  <com.stylingandroid.radialgradient.GradientView
    android:id="@+id/light_custom"
    android:layout_width="0dp"
    android:layout_height="0dp"
    android:layout_margin="8dp"
    android:layerType="none"
    app:layout_constraintBottom_toBottomOf="parent"
    app:layout_constraintEnd_toStartOf="@+id/light_software"
    app:layout_constraintStart_toEndOf="@+id/light_hardware"
    app:layout_constraintTop_toBottomOf="@+id/dark_custom" />

  <com.stylingandroid.radialgradient.GradientView
    android:id="@+id/light_software"
    android:layout_width="0dp"
    android:layout_height="0dp"
    android:layout_margin="8dp"
    android:layerType="software"
    app:layout_constraintBottom_toBottomOf="parent"
    app:layout_constraintEnd_toEndOf="parent"
    app:layout_constraintStart_toEndOf="@+id/light_custom"
    app:layout_constraintTop_toBottomOf="@+id/dark_software" />

</android.support.constraint.ConstraintLayout>
We’ve set the layer type to none so these will be rendered directly on the GPU without using an off-screen buffer.
We can now override the shaderFactory of the software layer rendered GradientViews to use the buggy RadialGradient that we just fixed. This will enable us to compare the fix to what we’re trying to achieve:
class MainActivity : AppCompatActivity() {

    private val defaultColour: Int by lazyFast {
        theme.getColour(R.attr.colorAccent)
    }

    private var buggyShaderFactory: (width: Float, height: Float) -> Shader = { viewWidth, viewHeight ->
        RadialGradient(
                viewWidth / 2f,
                viewHeight / 2f,
                Math.min(viewWidth, viewHeight) / 2f,
                defaultColour,
                Color.TRANSPARENT,
                Shader.TileMode.CLAMP
        )
    }

    override fun onCreate(savedInstanceState: Bundle?) {
        super.onCreate(savedInstanceState)
        setContentView(R.layout.activity_main)

        dark_software?.shaderFactory = buggyShaderFactory
        light_software?.shaderFactory = buggyShaderFactory
    }
}
We can get much finer control of how the RadialGradient will be rendered if we use the other constructor for RadialGradient. The constructor that we’ve used thus far enables us to specify the start and end colours, and the intermediate values will be interpolated from these values. The other constructor allows as to give an array of colour values, and an option array of “stops”.
If we just supply a list of colours with no stops, the RadialGradient will create a sequence of gradients between these colours. For example, if we were to include three distinct colours, then the the generated gradient would begin with the first colour, smoothly transition to the second colour from the start to mid points of the gradient, and then transition between the middle and last colour between the mid and end points of the gradient.
We can then use the array of “stops” to further refine this. The number of stops must match the number of colours, and each stop corresponds to where the corresponding colour will appear within the gradient. Each stop is a value between 0.0 and 1.0 and represents a specific position within the gradient. The default behaviour for the thee colour example we just saw would consist of three stops at 0.0, 0.5, and 1.0. But we could, for example, shift where the middle colour appears by altering the middle value.
To try and mimic the rendering that I wanted, I have applied some custom alpha values at some custom stops:
class MainActivity : AppCompatActivity() {

    private val defaultColour: Int by lazyFast {
        theme.getColour(R.attr.colorAccent)
    }

    private val colours: IntArray by lazyFast {
        arrayOf(defaultColour,
                defaultColour.setAlpha(0xA7),
                defaultColour.setAlpha(0x60),
                defaultColour.setAlpha(0x34),
                defaultColour.setAlpha(0x00)).toIntArray()
    }

    private val stops = listOf(0.0f, 0.2f, 0.42f, 0.6f, 0.75f).toFloatArray()

    private val shaderFactory: (width: Float, height: Float) -> Shader = { viewWidth, viewHeight ->
        RadialGradient(
                viewWidth / 2f,
                viewHeight / 2f,
                Math.min(viewWidth, viewHeight) / 2f,
                colours,
                stops,
                Shader.TileMode.CLAMP
        )
    }

    private var buggyShaderFactory: (width: Float, height: Float) -> Shader = { viewWidth, viewHeight ->
        RadialGradient(
                viewWidth / 2f,
                viewHeight / 2f,
                Math.min(viewWidth, viewHeight) / 2f,
                defaultColour,
                Color.TRANSPARENT,
                Shader.TileMode.CLAMP
        )
    }

    override fun onCreate(savedInstanceState: Bundle?) {
        super.onCreate(savedInstanceState)
        setContentView(R.layout.activity_main)

        dark_custom?.shaderFactory = shaderFactory
        dark_software?.shaderFactory = buggyShaderFactory
        light_custom?.shaderFactory = shaderFactory
        light_software?.shaderFactory = buggyShaderFactory
    }
}
The actual values that I settled upon were the result of lots of trial and error until I found values which resulted in a smooth gradient which was close to the buggy rendering against a dark background that I was after.
Here is what this looks like (the hardware layer is on the left, my custom stops is in the middle, and the buggy software layer rendering is on the right:
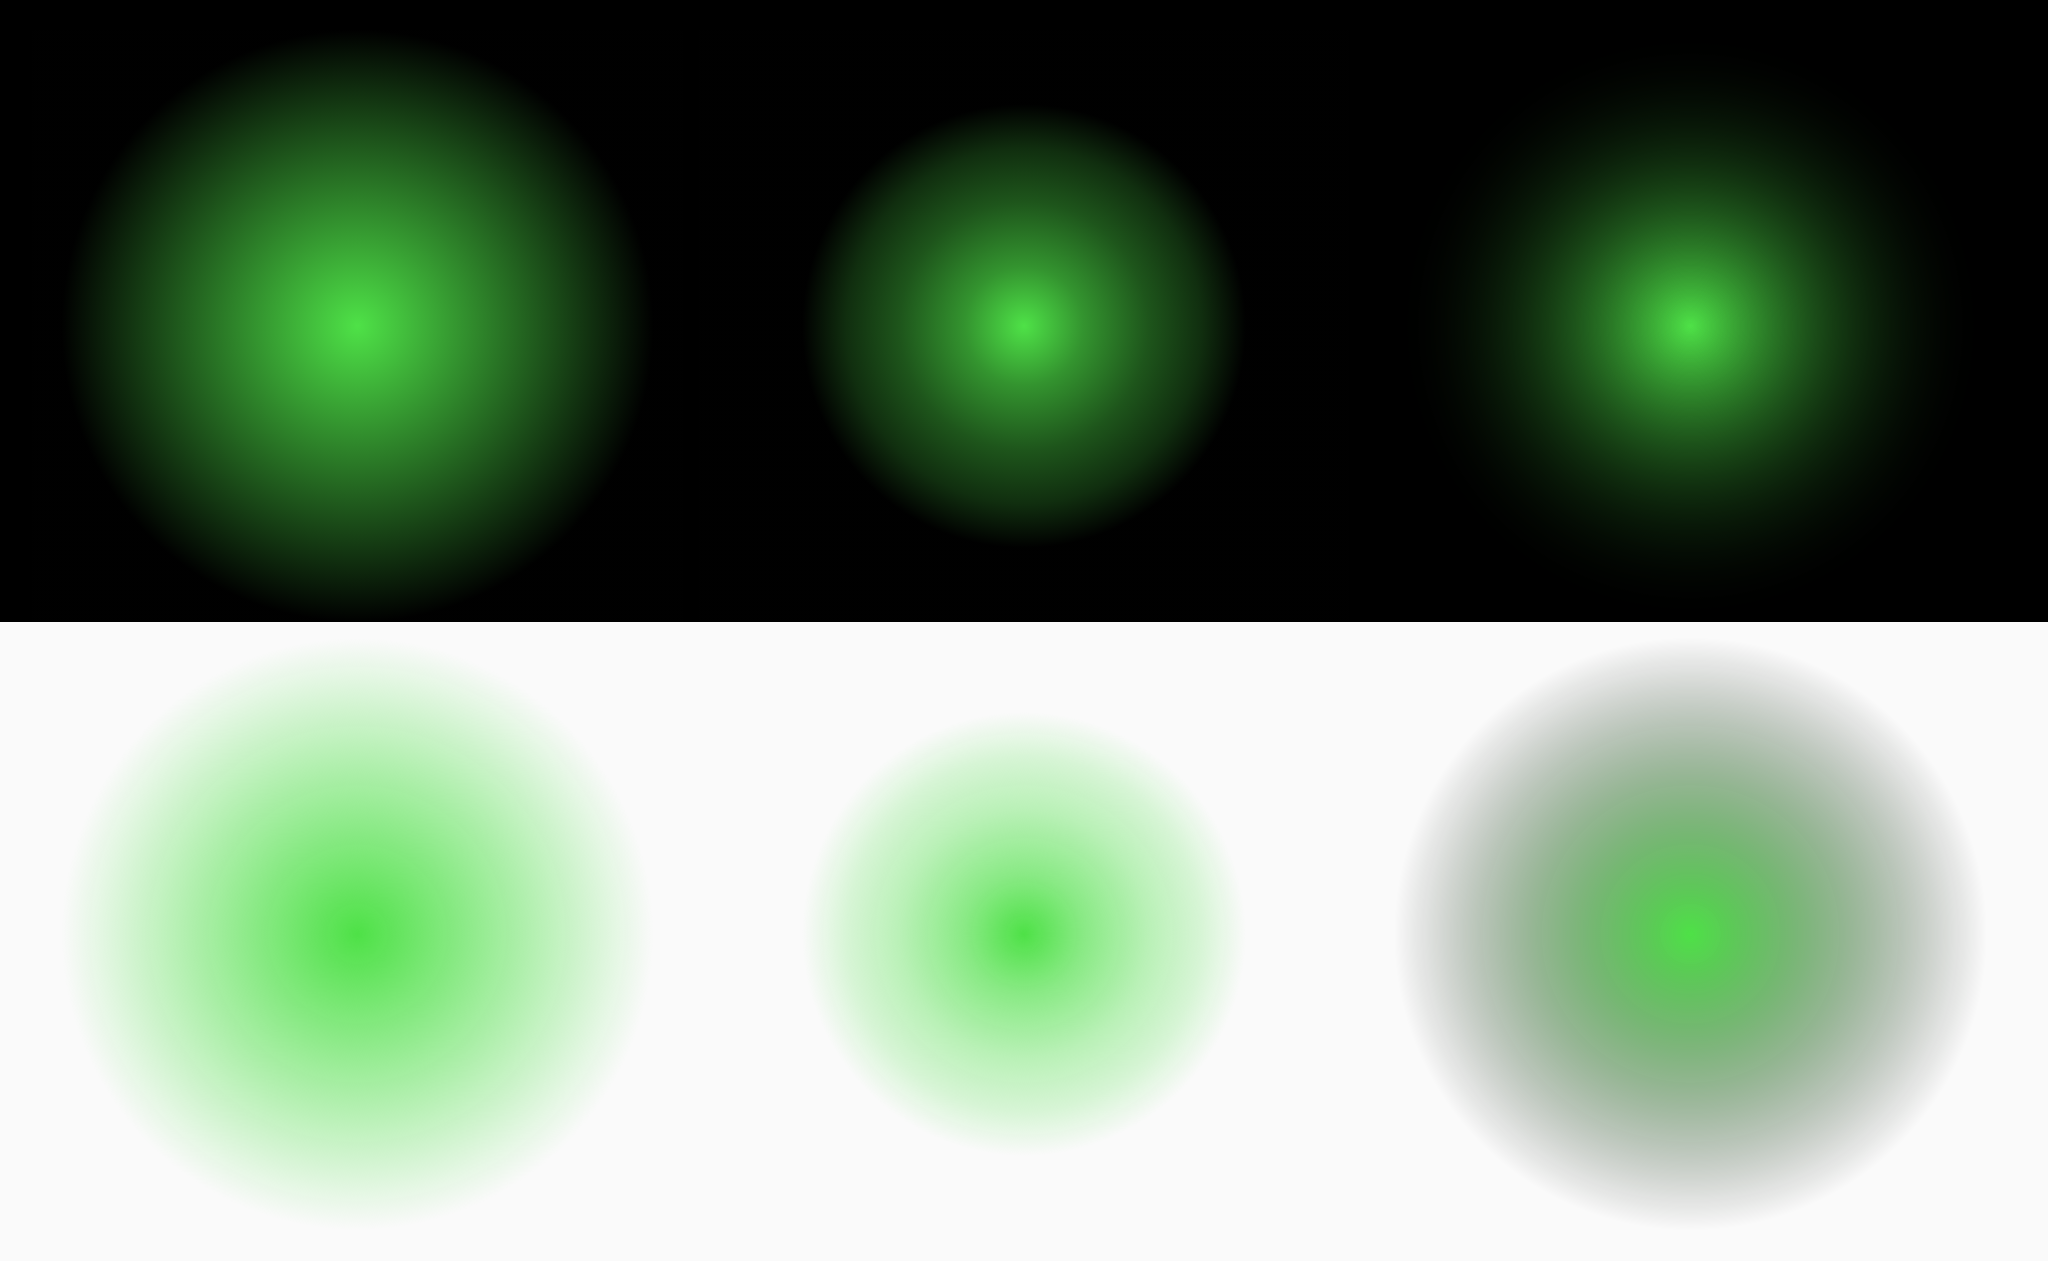
The rendering of my custom stops gradient against a dark background it actually fairly close to the buggy software layer one. But the interesting thing here is how this renders against a light background – it looks much nicer, with no dark haloes.
Making this change means that the rendering is much nicer, and we no longer have the overhead of first rendering to an off-screen buffer – we now render directly.
I am indebted to Sebastiano Poggi for his incredible proof reading skills. Any errors or typos which remain in this article are all mine!
The source code for this article is available here.
© 2017, Mark Allison. All rights reserved.
Copyright © 2017 Styling Android. All Rights Reserved.
Information about how to reuse or republish this work may be available at http://blog.stylingandroid.com/license-information.
