
In a recent series of posts for the MidiPad app, there was a discussion regarding the use of a RadialGradiant to render each PadView and, for aesthetic reasons, this was done using a software layer rather than a hardware layer. In this short series we’ll first take a look at what the differences are, and then explore a way of adapting things to use a hardware layer instead.
 In the MidiPad article, I stated that I preferred how the RadialGradient rendered to a software layer, so let’s begin by comparing how the same RadialGradient appears when rendered using both hardware and software layers. Let’s begin by defining a really simple custom View which is a much simplified version of ViewPad which was used in the MidiPad articles.
It uses the same techniques – we create a new RadialGradient when the size of the View changes, but the RadialGradient itself is very similar to the use used in PadView. The use of shaderFactory is a mechanism we’ll use later on to substitute in a different RadialGradient factory.
class GradientView @JvmOverloads constructor(
        context: Context,
        attrs: AttributeSet? = null,
        defStyleAttr: Int = 0,
        defStyleRes: Int = 0,
        private val bounds: RectF = RectF()
) : View(context, attrs, defStyleAttr, defStyleRes) {

    private val defaultColour: Int by lazyFast {
        context.theme.getColour(R.attr.colorAccent)
    }

    private val paint: Paint =
        Paint().apply {
            isAntiAlias = true
            style = Paint.Style.FILL
        }

    var shaderFactory: (width: Float, height: Float) -> Shader = { viewWidth, viewHeight ->
        RadialGradient(
                viewWidth / 2f,
                viewHeight / 2f,
                Math.min(viewWidth, viewHeight) / 2f,
                defaultColour,
                Color.TRANSPARENT,
                Shader.TileMode.CLAMP
        )
    }

    override fun onSizeChanged(newWidth: Int, newHeight: Int, oldWidth: Int, oldHeight: Int) =
            super.onSizeChanged(newWidth, newHeight, oldWidth, oldHeight).run {
                adjustBounds(newWidth.toFloat(), newHeight.toFloat())
            }

    private fun adjustBounds(width: Float, height: Float) {
        bounds.set(0f, 0f, width, height)
        paint.shader = shaderFactory(width, height)
    }

    override fun onDraw(canvas: Canvas?) {
        super.onDraw(canvas)
        canvas?.drawRect(bounds, paint)
    }
}
We can now create a layout which contains 4 instances of this view, two of them on a dark background, and two on a light background. Each pair on the same background consist of one rendered using a hardware layer, and one rendered using a software layer:
<?xml version="1.0" encoding="utf-8"?>
<android.support.constraint.ConstraintLayout xmlns:android="http://schemas.android.com/apk/res/android"
  xmlns:app="http://schemas.android.com/apk/res-auto"
  xmlns:tools="http://schemas.android.com/tools"
  android:layout_width="match_parent"
  android:layout_height="match_parent"
  tools:context="com.stylingandroid.radialgradient.MainActivity">

  <View
    android:layout_width="0dp"
    android:layout_height="0dp"
    android:background="@android:color/black"
    app:layout_constraintBottom_toBottomOf="@+id/dark_hardware"
    app:layout_constraintEnd_toEndOf="parent"
    app:layout_constraintStart_toStartOf="parent"
    app:layout_constraintTop_toTopOf="parent" />

  <com.stylingandroid.radialgradient.GradientView
    android:id="@+id/dark_hardware"
    android:layout_width="0dp"
    android:layout_height="0dp"
    android:layout_margin="8dp"
    android:layerType="hardware"
    app:layout_constraintBottom_toTopOf="@+id/light_hardware"
    app:layout_constraintEnd_toStartOf="@+id/dark_software"
    app:layout_constraintStart_toStartOf="parent"
    app:layout_constraintTop_toTopOf="parent" />

  <com.stylingandroid.radialgradient.GradientView
    android:id="@+id/dark_software"
    android:layout_width="0dp"
    android:layout_height="0dp"
    android:layout_margin="8dp"
    android:layerType="software"
    app:layout_constraintBottom_toTopOf="@+id/light_software"
    app:layout_constraintEnd_toEndOf="parent"
    app:layout_constraintStart_toEndOf="@+id/dark_hardware"
    app:layout_constraintTop_toTopOf="parent" />

  <com.stylingandroid.radialgradient.GradientView
    android:id="@+id/light_hardware"
    android:layout_width="0dp"
    android:layout_height="0dp"
    android:layout_margin="8dp"
    android:layerType="hardware"
    app:layout_constraintBottom_toBottomOf="parent"
    app:layout_constraintEnd_toStartOf="@+id/light_software"
    app:layout_constraintStart_toStartOf="parent"
    app:layout_constraintTop_toBottomOf="@+id/dark_hardware" />

  <com.stylingandroid.radialgradient.GradientView
    android:id="@+id/light_software"
    android:layout_width="0dp"
    android:layout_height="0dp"
    android:layout_margin="8dp"
    android:layerType="software"
    app:layout_constraintBottom_toBottomOf="parent"
    app:layout_constraintEnd_toEndOf="parent"
    app:layout_constraintStart_toEndOf="@+id/light_hardware"
    app:layout_constraintTop_toBottomOf="@+id/dark_software" />

</android.support.constraint.ConstraintLayout>
If we now compare the two on a dark background we can see there is a significant difference in how they both appear:
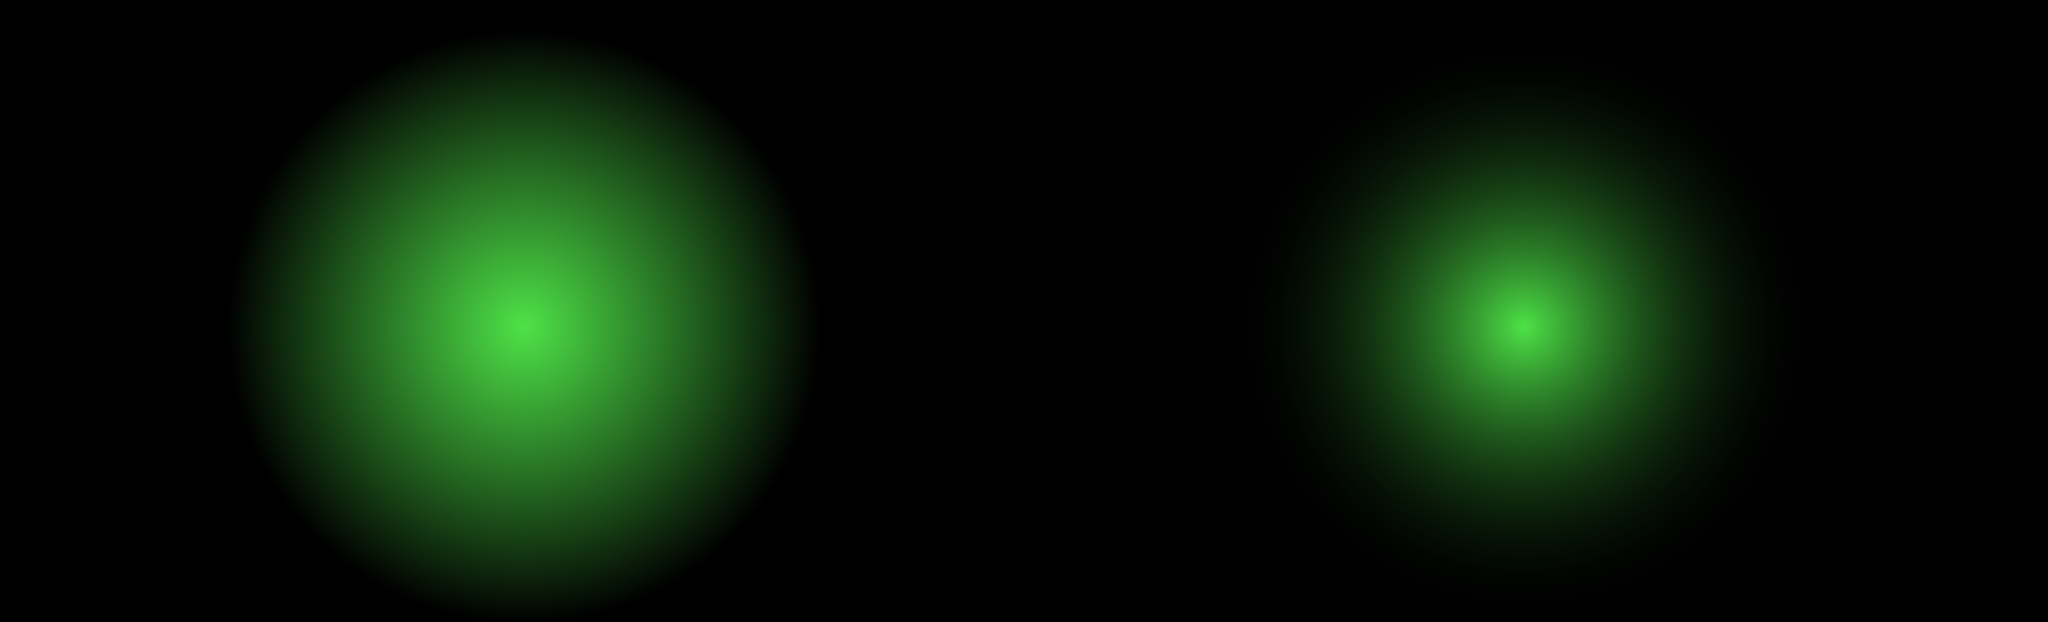
The one rendered using the software layer is on the right, and this one looked better for what I was trying to achieve. It fades slightly quicker, and just looked nicer. However, if I had opted to use a light background instead, I’m sure that I would have chosen the one rendered using a hardware layer:
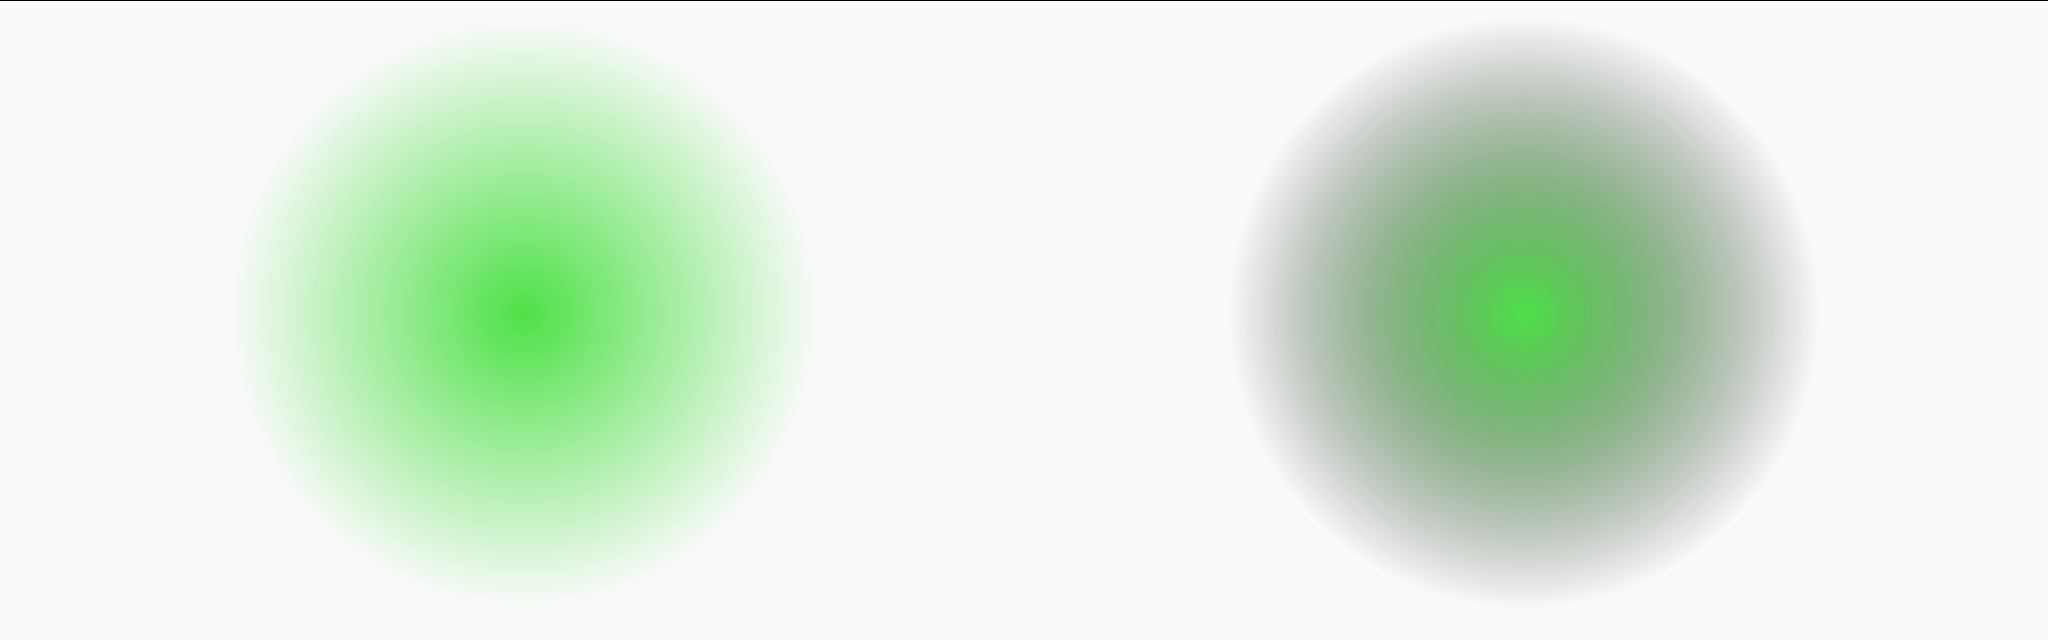
Once again, the one rendered using a software layer is the one on the right, and this now has a dark halo which does not look at all nice.
To understand why this difference is occurring, let’s first take a step back and understand a little more about what hardware and software layers actually do.
Since Android 4.0 (Ice Cream Sandwich) hardware accelerated Canvas was enabled by default. What this means is that an internal library named OpenGLRenderer translates all Canvas operations to OpenGL operations which can execute on the GPU for faster rendering. This means that any device running Android 4.0 or later must contain a hardware GPU which supports OpenGL ES 2.0. So the PadView instances in MidiPad were rendered via the GPU because, although it is possible to disable hardware rendering, I did not do this in MidiPad.
A layer is an off-screen buffer which can improve performance, and allow us to provide composition effects. By default, the layer type for any View is LAYER_TYPE_NONE which does not render to an off-screen buffer, but is rendered directly. On 4.0 and later devices this will be via the GPU.
A layer of type LAYER_TYPE_SOFTWARE is rendered to a Bitmap by onDraw(). Having this off-screen buffer means that we can apply things like alpha composition when rendering this Bitmap to the FrameBuffer. Meaning we don’t have to re-draw the View each time we change the alpha value. The Bitmap will only get re-drawn when invalidate() on the View is called.
A layer of type LAYER_TYPE_HARDWARE is very similar in concept to a software layer, with the difference being that instead of onDraw() rendering to a Bitmap, it is instead rendered to a hardware texture (provided the application is hardware accelerated) by the GPU. The benefits are similar to a software layer, but rendering a to a hardware texture, and then rendering that hardware texture to the FrameBuffer is much more efficient as it is all done on the GPU which is designed to do specifically that.
So the important difference between a hardware and software layer is that a hardware layer will render the RadialGradient on the GPU and the software layer will render it on the CPU. Therefore there are different rendering algorithms being used and there are certain performance optimisations being done in the software layer which means that it doesn’t render as a smooth gradient even though it looks fine on a dark background. Actually this isn’t entirely true. While there are some difference in rendering algorithms, there is actually an issue with the RadialGradient that is being constructed. There will be a full explanation of this in the next article.
In actuality, using either a software or hardware layer would not offer any real performance benefits to PadView because each time the pressure value changes invalidate() is called which will trigger the layer to be redrawn. For the sake of getting some working code and given that the entire layout really is not that complex, I felt that the performance hit of using a software layer was acceptable. However, as we’re now looking at this stuff, let’s think about how we could improve this.
The obvious solution would be to not use an off-screen buffer at all, and use LAYER_TYPE_NONE. This will render the RadialGradient directly to the FrameBuffer using the GPU. The problem with this is that the appearance of the gradient will be the same as the the one where we used a hardware layer.
In the concluding article in this short series we’ll look at RadialGradient itself and see how we can get finer-grained control of how the gradient is rendered to enable us to use the improved performance we’ll get by not using a layer.
I am indebted to Sebastiano Poggi for his incredible proof reading skills. Any errors or typos which remain in this article are all mine!
The source code for this article is available here.
© 2017, Mark Allison. All rights reserved.
Copyright © 2017 Styling Android. All Rights Reserved.
Information about how to reuse or republish this work may be available at http://blog.stylingandroid.com/license-information.
