In the past on Styling Android we have covered a variety of topics which make use of Adapters. In the series’ on ListView, ViewPager and ActionBar (to name but a few) we’ve used Adapters but kept the Adapter implementation really simple so that we may focus on the subject in question. However, on a few of these articles there are comments asking how to do different behaviours which actually require changes to the Adapter being used rather than the feature being covered in that particular article. In this series we’ll have a detailed look at Adapters, and the power and versatility that they provide us.
To understand what Adapters do, let’s think about a simple ListView. The ListView itself is a container for a number of items, and the data for these items may come from vastly different sources. For example one ListView may contain a list of static items which never change throughout the entire lifespan of the app, whereas another ListView may contain a list of items from a SQLite database. In order to keep ListView agnostic about the source of the data for its items an abstraction layer exists, and this is the Adapter. So the role of the Adapter is to keep the control (in this case the ListView) decoupled from the data that it requires to create its child elements.
Part of the flexibility of the Adapter architecture is that polymorphism is used to provide abstraction from the data source. Up until now we’ve only referred to Adapters in that abstract form, but in practise we’ll need to use a concrete Adapter implementation depending on the nature of the data and where it is sourced from. As far as our ListView is concerned the Adapter is simply a ListAdapter, but we can actually provide any concrete Adapter implemenation that we like provided it implements the ListAdapter interface.
An example would help here. We’ll put together a simple app which will allow us to demonstrate various Adapter implementations and uses, and we’ll use List Navigation in the ActionBar to enable us to switch between different fragments. We’re going to focus purely on the Adapter here, but if you require further information on List Navigation then take a look here.
Arguably the simplest for of Adapter that we can use is one which maps to simple, static values:
@Override
protected void onCreate(Bundle savedInstanceState)
{
	super.onCreate(savedInstanceState);
	setContentView(R.layout.activity_main);
	final String[] names = getResources()
		.getStringArray(R.array.nav_names);
	final String[] classes = getResources()
		.getStringArray(R.array.nav_classes);
	getActionBar().setNavigationMode(
		ActionBar.NAVIGATION_MODE_LIST);

	ArrayAdapter adapter =
		new ArrayAdapter(
			getActionBar().getThemedContext(),
			android.R.layout.simple_spinner_item, names);
	adapter.setDropDownViewResource(
		android.R.layout.simple_spinner_dropdown_item);

	getActionBar().setListNavigationCallbacks(adapter,
		new OnNavigationListener()
	{
		@Override
		public boolean onNavigationItemSelected(
			int itemPosition, long itemId)
		{
			FragmentTransaction tx =
				getSupportFragmentManager()
				.beginTransaction();
			tx.replace(R.id.main,
				Fragment.instantiate(MainActivity.this,
					classes[itemPosition]));
			tx.commit();
			return true;
		}
	});
}
All we are doing here is loading a String array from resources, and we build an ArrayAdapter from that.
ArrayAdapter is a generic class which provides an Adapter based upon a simple array of objects. In our case we’re wrapping a String array which we obtain from resources. The constructor that we’re using takes 3 parameters: The context in which the Adapter will be used, a layout to use (in this case we’re using a standard layout from the OS), and the array of objects to use.
What goes on under the bonnet is that ArrayAdapter will create a new layout (actually this is not strictly true, but we’ll return to this in a later article) for each item in the list objects, each layout will be inflated from the resource ID that we provided. It will then look for a TextView with the id “android:id/text1” (which exists in the layout – see here for proof) and set the text value of that text view to the value of the item in the list. In our case the items are all String values, but for other object classes ArrayAdapter will use the value returned by the toString() method.
To get this to work add a couple of String arrays to our resources (and define a class names ListViewFragment, which you can see in the source, but which we won’t discuss here):
- ListView
- com.stylingandroid.adapters.ListViewFragment
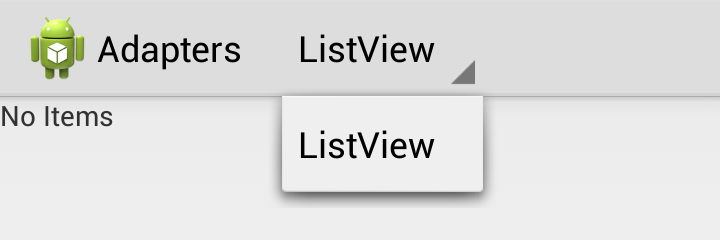
If we run this we can see that our navigation list gets populated accordingly:
Update: As per Jake Wharton’s comments, the source code has been updated accordingly. Thanks, Jake!
In the next article we’ll take this a little further and show some alternative approaches that we can use. The source code for this article is available here.
© 2013 – 2014, Mark Allison. All rights reserved.
Copyright © 2013 Styling Android. All Rights Reserved.
Information about how to reuse or republish this work may be available at http://blog.stylingandroid.com/license-information.


A few minor nits:
For adapters that are to be used inside of the action bar you should always use getActionBar().getThemedContext() rather than ‘this’. This will ensure that your text color is always appropriate for the action bar background rather than the activity background. Try both with Theme.Holo.Light.DarkActionBar and you’ll spot the different right away.
Despite being nearly identical, we should also be using android.R.simple_spinner_item for the layout. Spinners actually have two layouts they use, one for the selected layout displayed on the screen and one inside the dropdown (or popup on pre-HC). As such, we should call setDropDownViewResource(android.R.layout.simple_spinner_downdown_view) on our adapter as well.
Doing these two things will keep your colors always accurate and your list navigation’s always looking consistent with both the platform apps and others’ as well.
Many thanks, Jake. Your recommendations have been included.
Thank you, Mark. Great post. Also would like to know more about proper using drawables in spinner items.
Thanks for the feedback, Alex. Using drawables within views bound using Adapters will be covered by an upcoming article in this series.
Nice post.. i didn’t consider we could use Adapter in this way. Thanks for sharing.
Here’s a great video on Adapters (slanted a bit more towards ListView, but overall extremely relevant):
This is very instructive.
Thank you!