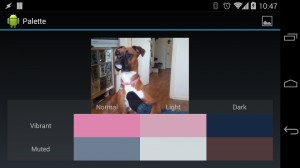
When originally written this series concluded at the end of the previous article but, on the day that article was published, the full Lollipop SDK was released which included the full release of the Palette library. The Palette API which shipped with Lollipop changed slightly from the one which was released as part of the Android-L developer preview, so in this article we’ll look at the changes and update the code from Palette – Part 2 to work with the full released library.
The first thing that we need to change is our build.gradle file to use the correct version of the library:
apply plugin: 'com.android.application'

android {
    compileSdkVersion 21
    buildToolsVersion "21.0.1"

    defaultConfig {
        applicationId "com.stylingandroid.palette"
        minSdkVersion 11
        targetSdkVersion 21
        versionCode 1
        versionName "1.0"
    }
    buildTypes {
        release {
            runProguard false
            proguardFiles getDefaultProguardFile('proguard-android.txt'), 'proguard-rules.pro'
        }
    }
}

dependencies {
    compile "com.android.support:palette-v7:21.0.0"
}
Most of the changes are to simply raise the compile and target SDK versions and to specify the correct version of the palette library. But one important change is the minSdkVersion: with the full release of Palette, it will work back to API level 7 and we no longer have the API 20 restriction in place. In this case, however, the UI is designed around an ActionBar and this is only properly supported from API 11 onwards hence the decision to go with minSdkVersion 11.
If we try and compile our code with these changes, we’ll get compiler errors for a missing PaletteItem class this is because this class has been renamed in the full release to Swatch.
We can easily fix things by updating the class name, however I previously named my views with the variable name ‘swatch’ so we’ll rename them to avoid confusion:
public void setPalette(Palette palette) {
    if (palette == null) {
        hidePalette();
        return;
    }
    paletteOverlay.setVisibility(View.VISIBLE);
    setSwatch(normalVibrant, palette.getVibrantSwatch());
    setSwatch(lightVibrant, palette.getLightVibrantSwatch());
    setSwatch(darkVibrant, palette.getDarkVibrantSwatch());
    setSwatch(normalMuted, palette.getMutedSwatch());
    setSwatch(lightMuted, palette.getLightMutedSwatch());
    setSwatch(darkMuted, palette.getDarkMutedSwatch());
}

private void setSwatch(View view, Palette.Swatch swatch) {
    if (swatch == null) {
        view.setVisibility(View.INVISIBLE);
    } else {
        view.setVisibility(View.VISIBLE);
        view.setBackgroundColor(swatch.getRgb());
    }
}
There are a couple of resource changes that I’ve made for backwards compatibility. They’re noting specific to Palette so I won’t bother explaining them here.
So with a few minor changes our app is now compatible back to API 11. Here it is running on API 19:
It may feel like we’re done now, but actually there are a couple more things worth looking at.
Firstly the getPopulation() method of Swatch (which briefly discussed in the previous article) now has some documentation which explains that it return the number of pixels which have the colour represented by the Swatch, so this can be used to identify the most common colours within the image.
Another point worth mentioning is that there are some additional methods in Swatch which will return title and body text colours which will provide sufficient contrast to the Swatch colour if the text is drawn over it. While this is certainly useful for creating text which contrasts with the background colour of the TextView, it would be inadvisable to simply draw text of this colour over the image itself. This is because there is no guarantee that your text will actually be positioned over an expanse of the Swatch colour, especially if the Swatch has a relatively low population.
As well as the additions to Swatch, there are also some useful additions to Palette itself. We previously discussed how Palette is not guaranteed to return all of the supported colour variants for any particular image, and so we perform some null checking on the Swatch which is returned. However there are also some new methods which will return an RGB int colour value and take a single argument of a default colour. These are guaranteed to always return a value – if the requested colour variant was found in the image, then the RGB value of that will be returned, otherwise the default colour value will be returned instead.
That concludes our look at Palette. The source code for this article is available here.
© 2014, Mark Allison. All rights reserved.
Copyright © 2014 Styling Android. All Rights Reserved.
Information about how to reuse or republish this work may be available at http://blog.stylingandroid.com/license-information.


Perfect, thanks for this. It helped me a lot to finally get to understand how the Palette works. I still have got some issues with it (I’m working on a music player, and I’m loading album arts using Universal Image Loader library – and when I want to get bitmaps with that library (to pass them to palette), things start to get seriously laggy), but I hope I’ll figure it out.
So thanks again.
Oh, by the way, fix the subtitle of your website – “A techical guide to to improving the UI and UX Android apps” doesn’t seem quite right.