RecyclerView is a really useful way of displaying content in list form, particularly when the content is dynamic and / or there are large numbers of items. One thing that can be really useful is that we get some really nice animations for free provided we implement our Adapter correctly. For those that have converted from ListView there is a tendency to follow the same usage patterns when updating the data, but this will not get the best out of RecyclerView. In this short series we’ll take a look at the right way to modify the contents of a RecyclerView.Adapter in order to get these animations for free.
 Previously in this series we looked at how, by carefully notifying the base Adapter of the precise changes when we add, remove, or move individual items within the list of data items we can get some nice transition animations for very little effort. But this principle extends even further: We can also get some neat transitions when we actually change data items, as well.
To demonstrate this let’s alter our item layout to include a second, longer text element:
<?xml version="1.0" encoding="utf-8"?>
<android.support.constraint.ConstraintLayout xmlns:android="http://schemas.android.com/apk/res/android"
  xmlns:app="http://schemas.android.com/apk/res-auto"
  android:layout_width="match_parent"
  android:layout_height="wrap_content"
  android:padding="16dp">

  <TextView
    android:id="@android:id/text1"
    android:layout_width="0dp"
    android:layout_height="wrap_content"
    android:layout_marginEnd="16dp"
    android:layout_marginRight="16dp"
    app:layout_constraintEnd_toStartOf="@+id/up"
    app:layout_constraintStart_toStartOf="parent"
    app:layout_constraintTop_toTopOf="parent" />

  <TextView
    android:id="@android:id/text2"
    android:layout_width="0dp"
    android:layout_height="wrap_content"
    android:layout_marginTop="16dp"
    android:maxLines="3"
    android:text="@string/lorem"
    android:visibility="gone"
    app:layout_constraintEnd_toEndOf="parent"
    app:layout_constraintStart_toStartOf="parent"
    app:layout_constraintTop_toBottomOf="@android:id/text1"
    app:layout_goneMarginTop="0dp" />

  <ImageView
    android:id="@+id/up"
    android:layout_width="wrap_content"
    android:layout_height="wrap_content"
    android:layout_marginEnd="16dp"
    android:layout_marginRight="16dp"
    android:contentDescription="@null"
    app:layout_constraintBottom_toBottomOf="@android:id/text1"
    app:layout_constraintEnd_toStartOf="@+id/down"
    app:layout_constraintTop_toTopOf="@android:id/text1"
    app:srcCompat="@drawable/ic_up" />

  <ImageView
    android:id="@+id/down"
    android:layout_width="wrap_content"
    android:layout_height="wrap_content"
    android:layout_marginEnd="16dp"
    android:layout_marginRight="16dp"
    android:contentDescription="@null"
    app:layout_constraintBottom_toBottomOf="@android:id/text1"
    app:layout_constraintEnd_toStartOf="@+id/add"
    app:layout_constraintTop_toTopOf="@android:id/text1"
    app:srcCompat="@drawable/ic_down" />

  <ImageView
    android:id="@+id/add"
    android:layout_width="wrap_content"
    android:layout_height="wrap_content"
    android:layout_marginEnd="16dp"
    android:layout_marginRight="16dp"
    android:contentDescription="@null"
    app:layout_constraintBottom_toBottomOf="@android:id/text1"
    app:layout_constraintEnd_toStartOf="@+id/remove"
    app:layout_constraintTop_toTopOf="@android:id/text1"
    app:srcCompat="@drawable/ic_add" />

  <ImageView
    android:id="@+id/remove"
    android:layout_width="wrap_content"
    android:layout_height="wrap_content"
    android:contentDescription="@null"
    app:layout_constraintBottom_toBottomOf="@android:id/text1"
    app:layout_constraintEnd_toEndOf="parent"
    app:layout_constraintTop_toTopOf="@android:id/text1"
    app:srcCompat="@drawable/ic_remove" />

</android.support.constraint.ConstraintLayout>
This is positioned below the other elements, but has visibility GONE by default, so as it stands this will render exactly the same as before.
Next we need to alter our Adapter so that the data contain a list of Pair items. The String will be the same as before and specify the text for the first TextView, but the Boolean will dictate whether the second TextView should be visible:
package com.stylingandroid.recyclerviewanimations

import android.support.v7.widget.RecyclerView
import android.view.LayoutInflater
import android.view.View
import android.view.ViewGroup
import android.widget.TextView

class MyAdapter(private val string: String) : RecyclerView.Adapter<MyAdapter.ViewHolder>() {
    private val items: MutableList<Pair<String, Boolean>> = mutableListOf()

    override fun onCreateViewHolder(parent: ViewGroup, viewType: Int): ViewHolder =
            LayoutInflater.from(parent.context)
                    .inflate(R.layout.list_item, parent, false)
                    .run {
                        ViewHolder(this)
                    }

    override fun getItemCount(): Int = items.size

    fun appendItem(newString: String) =
            items.add(uniqueString(newString) to false).also {
                notifyItemInserted(itemCount - 1)
            }

    override fun onBindViewHolder(holder: ViewHolder, position: Int) {
        with(holder) {
            bind(items[position])
        }
    }

    private fun uniqueString(base: String) =
            "$base ${(Math.random() * 1000).toInt()}"

    inner class ViewHolder(
            itemView: View,
            private val textView1: TextView = itemView.findViewById(android.R.id.text1),
            private val textView2: TextView = itemView.findViewById(android.R.id.text2),
            upButton: View = itemView.findViewById(R.id.up),
            downButton: View = itemView.findViewById(R.id.down),
            addButton: View = itemView.findViewById(R.id.add),
            removeButton: View = itemView.findViewById(R.id.remove)
    ) : RecyclerView.ViewHolder(itemView) {

        init {
            addButton.setOnClickListener(insert())
            removeButton.setOnClickListener(remove())
            upButton.setOnClickListener(moveUp())
            downButton.setOnClickListener(moveDown())
            textView1.setOnClickListener(toggleText())
        }

        private fun insert(): (View) -> Unit = {
            layoutPosition.also { currentPosition ->
                items.add(currentPosition, uniqueString(string) to false)
                notifyItemInserted(currentPosition)
            }
        }

        private fun remove(): (View) -> Unit = {
            layoutPosition.also { currentPosition ->
                items.removeAt(currentPosition)
                notifyItemRemoved(currentPosition)
            }
        }

        private fun moveUp(): (View) -> Unit = {
            layoutPosition.takeIf { it > 0 }?.also { currentPosition ->
                items.removeAt(currentPosition).also {
                    items.add(currentPosition - 1, it)
                }
                notifyItemMoved(currentPosition, currentPosition - 1)
            }
        }

        private fun moveDown(): (View) -> Unit = {
            layoutPosition.takeIf { it < items.size - 1 }?.also { currentPosition ->
                items.removeAt(currentPosition).also {
                    items.add(currentPosition + 1, it)
                }
                notifyItemMoved(currentPosition, currentPosition + 1)
            }
        }

        private fun toggleText(): (View) -> Unit = {
           items[layoutPosition] = items[layoutPosition].let {
               it.first to !it.second
           }
            notifyItemChanged(layoutPosition)
        }

        fun bind(data: Pair<String, Boolean>) {
            textView1.text = data.first
            textView2.visibility = if (data.second) View.VISIBLE else View.GONE
        }
    }
}
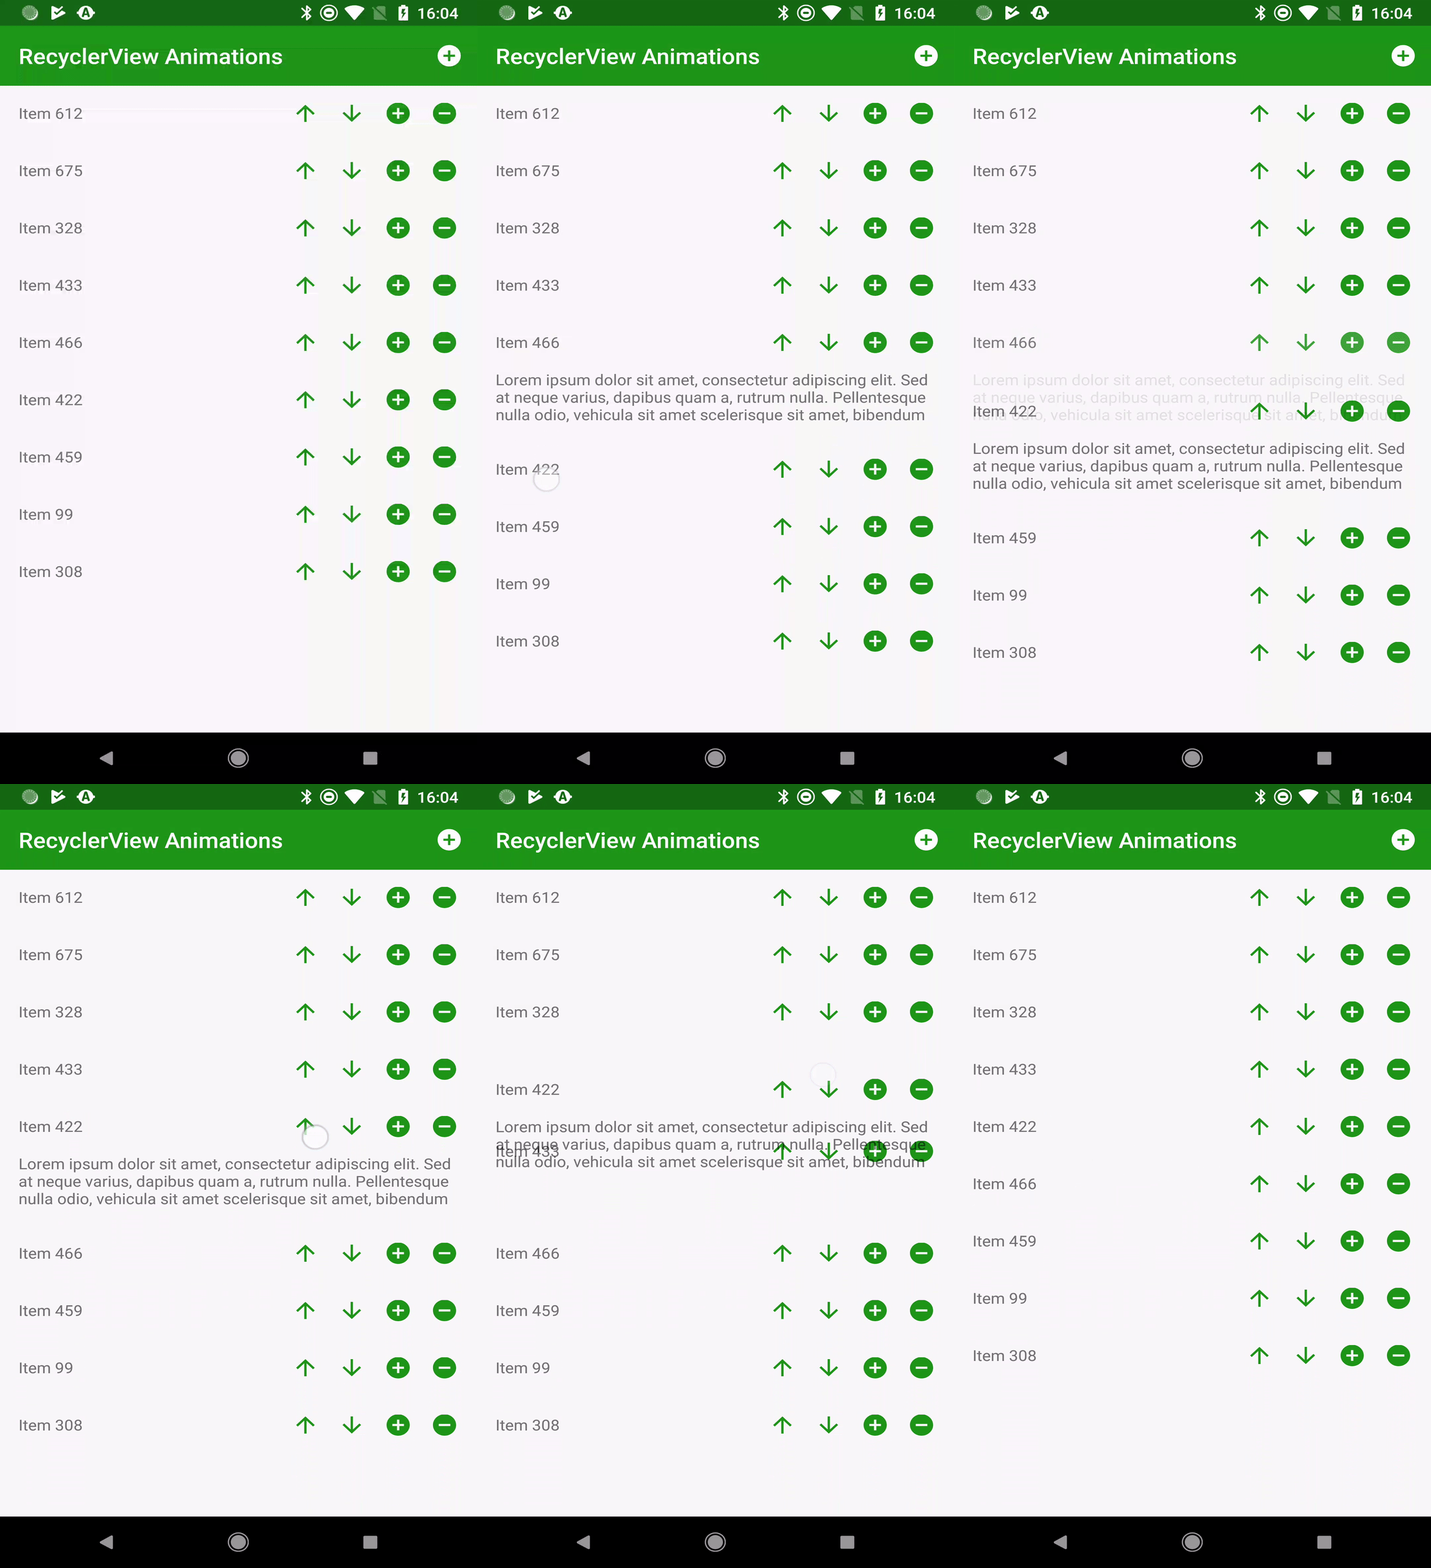
The magic happens in the toggleText() and bind() functions. toggleText() toggles the value of the Boolean, which is the second item of the Pair, and then calls notifyItemChanged(). This triggers a re-bind of the ViewHolder and the bind() method will be called and the visibility of the second TextView will be changed according to the value of the Boolean part of the Pair. But all of this is done after the RecyclerView determines the delta between the two states and animates the transition between the two states. As a result we get this behaviour:
All in all, by layering up the different aspects for selective notification of changes that we’ve covered in this series gives us some really nice smooth transitions animations to our RecyclerView and we haven’t had to touch any animation code!
The source code for this article is available here.
© 2018, Mark Allison. All rights reserved.
Copyright © 2018 Styling Android. All Rights Reserved.
Information about how to reuse or republish this work may be available at http://blog.stylingandroid.com/license-information.


Great post on RecyclerView Animation. I’m a beginner in Android and I want to learn it as an intermediate level. Thanks for providing the helpful post indeed.
good content
Mark, are you sure that RecyclerView uses TransitionManager under the hood?
I think this animation is handled by DefaultItemAnimator and view translation animation.
You’re right, it doesn’t use TransitionManager. I’ve updated the article accordingly.