In the previous article we got tab-based navigation working. Tab-based navigation works well when you have two or three navigation options, but does not work as well when there are more. Dropdown-based navigation is better suited when we a slightly larger number number of navigation options, and in this article we’ll cover how to create dropdown-based navigation within our ActionBar.
An example of dropdown-based navigation can be found in Google Maps:

The navigation appears as a Spinner within the ActionBar, and the dropdown of the Spinner contains the navigation options. Fitting all of these options in to tab-based navigation would be extremely difficult.
To use dropdown navigation we first need to set the navigation mode of the ActionBar and remove the title text to allow more space for the spinner:
[java] actionBar.setNavigationMode(ActionBar.NAVIGATION_MODE_LIST);actionBar.setTitle( “” );
[/java]
Next we need to create a SpinnerAdapter:
[java] final Listnew ArrayList
Map
map.put( “title”, getString( R.string.frag1 ) );
map.put( “fragment”, Fragment.instantiate( this,
Fragment1.class.getName() ));
data.add( map );
map = new HashMap
map.put( “title”, getString( R.string.frag2 ) );
map.put( “fragment”, Fragment.instantiate( this,
Fragment2.class.getName() ));
data.add( map );
SimpleAdapter adapter = new SimpleAdapter( this, data,
android.R.layout.simple_spinner_dropdown_item,
new String[] { “title” },
new int[] { android.R.id.text1 } );
[/java]
This creates a list of Map objects. Each map contains two entries: “title” which is the text that will be displayed in the spinner; and “fragment” which is the Fragment to display when that spinner item is selected. From this we create a SimpleAdapter instance which uses a standard Android Spinner dropdown layout (which can be seen here – don’t you just love open source?), and maps the “title” entry from each Map in the List to the single TextView widget which appears in the layout.
SimpleAdapter is a subclass of SpinnerAdapter and is a useful way of binding to static content. In a real-world app you will probably want to use a different kind of Adapter. I’m only using it here to keep things simple and easy to understand.
Now that we have our SpinnerAdapter we need to set this on the ActionBar with a OnNavigationListener to handle the navigation callback. i.e. This gets call when the user changes the selection:
[java] actionBar.setListNavigationCallbacks( adapter,new OnNavigationListener()
{
@Override
public boolean onNavigationItemSelected(
int itemPosition,
long itemId )
{
Map
data.get( itemPosition );
Object o = map.get( “fragment” );
if( o instanceof Fragment )
{
FragmentTransaction tx =
getFragmentManager().beginTransaction();
tx.replace( android.R.id.content,
(Fragment )o );
tx.commit();
}
return true;
}
}
);
[/java]
The onNavigationItemSelected method will be called whenever the user selects an item from the Spinner dropdown. It gets the Fragment instance that we added to the data from which the SpinnerAdapter was created, and then replaces the Content area of our Activity with the appropriate Fragment.
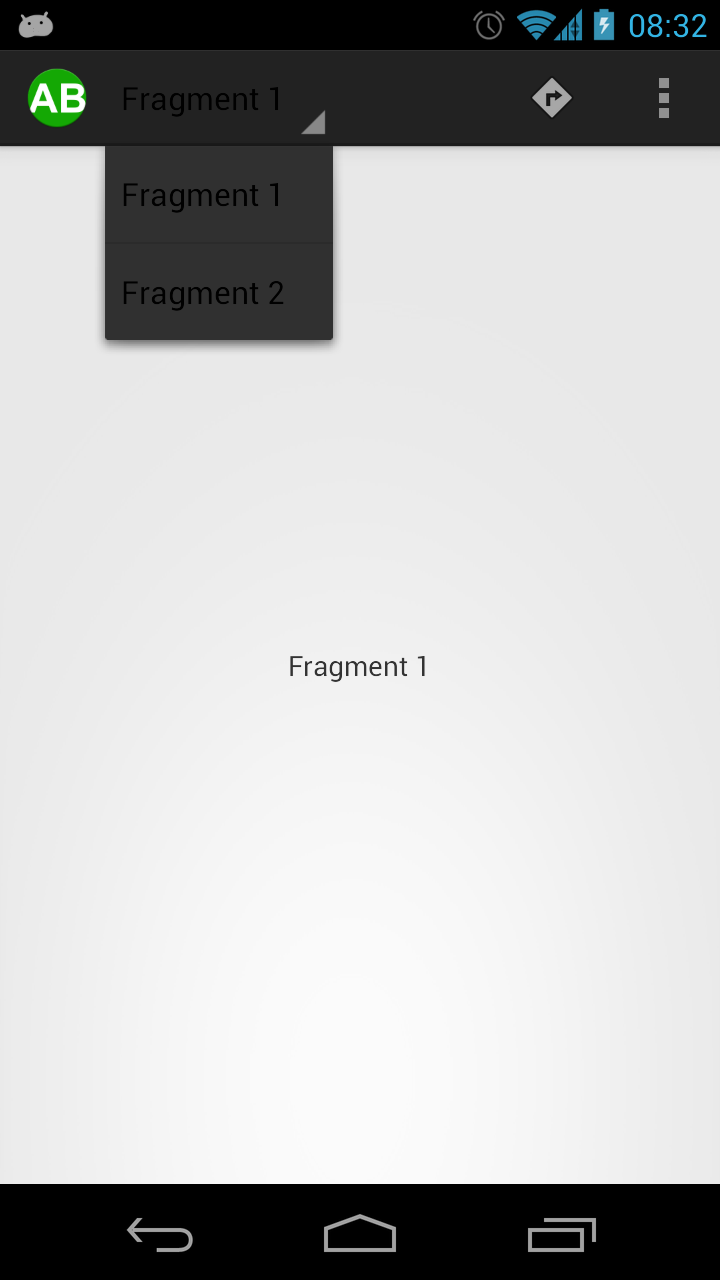
If we run this we see the following:

This works, but the text is rather dark on the Spinner. The reason for this is the default theme that was created by ADT 20 new project wizard for Android 4.0 and later. Themeing and styling the ActionBar can be a little tricky and will be the subject of a future article. For now we’ll just change the theme to use standard Holo.Light. So we’ll change res/values-v14/styles.xml:
[xml][/xml]
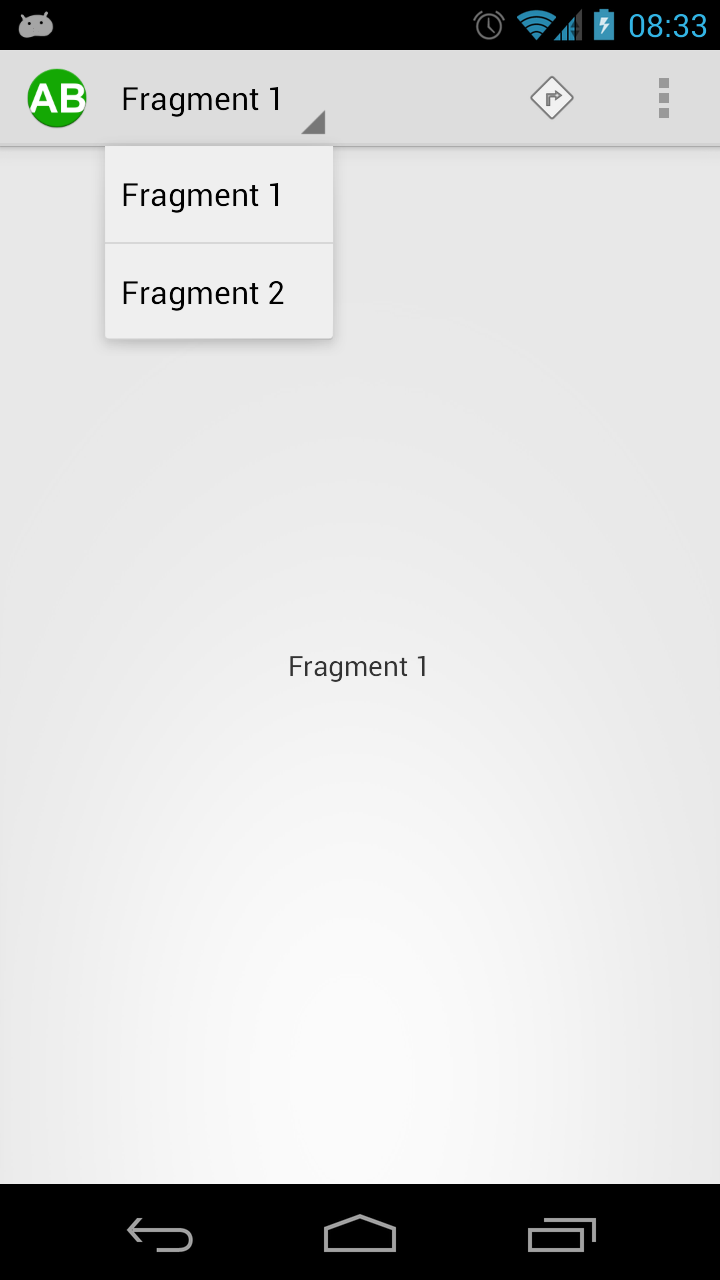
Now, with a lighter ActionBar, everything looks good:

One thing worth remembering is that the ActionBar also offers Home or Up functionality by clicking on the logo on the left hand side. The "back" key offers navigation through the user's history in the app, but Home / Up offers a coarser-grained navigation back up your app's hierarchical structure. The official documentation offers some excellent information about this.
In the next article we'll turn our attention to ways that we can use the ActionBar when the standard actions and navigation don't provide the UI that we require.
The source code for this article can be found here.
© 2012, Mark Allison. All rights reserved.
Copyright © 2012 Styling Android. All Rights Reserved.
Information about how to reuse or republish this work may be available at http://blog.stylingandroid.com/license-information.


If you pass getActionBar().getThemedContext() the drop down items will display properly when using the Light.DarkActionBarTheme. In practice you should always use this method for obtaining the context for things in the action bar rather than ‘this’ for the activity context.
Another option for hiding the title is to call getActionBar().setDisplayShowTitle(false).
These articles are great. I am constantly referring new action bar users to them. Looking forward to more.
Thanks Jake. I’ll update the article when I get a chance to include your suggestions.
Nice post, Mark!
I have a question: How to make action bar and this spinner work on Android 2.1? I mean, only I need to do is use the compatibility package?
Thank you for the post and sorry for my bad english! Your blog is amazing! 😀
I would suggest using Jake Wharton’s ActionBarSherlock which I mentioned in Part 1 of this series. I haven’t had the opportunity to use it in a real project myself, but those that have say it’s really good, and pretty much the same as using the native Android APIs that I’m covering.
Hi,
can you show this example with an ArrayAdapter? I am having a hard time getting to trigger.
How to set image in List?
That’s done in the Adapter that you use. You can do lots of different things by using different Adapters, but they are separate from the AcrtionBar (they work with other things as well such as ListView) which is why I didn’t focus on them too much in this article. Watch this space though, I’m planning to cover Adapters in future posts.
Do you mind if I quote a few of your posts as long as I provide
credit and sources back to your blog? My blog
site is in the very same niche as yours and my users would certainly benefit from some of the information you provide here.
Please let me know if this ok with you. Thanks a lot!
The license for the articles on the site can be found here. Provided your site is non-commercial, your articles are published under the same licence terms, and you provide correct attribution then please feel free to quote my articles.
Thank you sooo much for this tutorials !… Hope that on July I buy a new computer and start programming in Android… Meanwhile I am collecting jewells like your site !… Cheers from Córdoba, Argentina (a province from the center of the country)…