
In Android Weekly issue # 297 there was a link to a library named ColorPickerPreference which I found interesting. One aspect of it was a colour picker which included a colour wheel but I was mildly disappointed to see that it did not include a mechanism of adjusting the brightness value, and was implemented using a bitmap resource which was only provided at a single density, meaning that it will not necessarily scale well on different devices. In this short series we’ll look at how we can actually render a colour wheel dynamically.
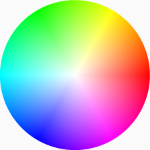 A colour wheel is a common UI model for allowing a user to select a colour, and is often used in graphics applications. It looks much like this image and is based upon the Hue Saturation Value or HSV colour model. This is also referred to as the Hue Saturation Brightness (HSB) model, but should not be confused with the Hue Saturation Lightness (HSL) model which is slightly different. In a colour wheel the hue value is represented as the angle from the centre of the circle, the saturation is the distance from the centre, and the value, or brightness (which is the z-axis of the HS{B|V} cylinder) is controlled externally – often by a slider.
If one follows an imaginary path around the outside of the colour wheel it effectively steps through all of the hue values before returning to the starting colour. Moving anti-clockwise around the edge of the wheel traverses smoothly through the colours of the rainbow red, orange, yellow, green, blue, indigo, violet before returning back to red. This models how colours can be mixed together.
If one follows an imaginary path from a point on the outside of the colour wheel to the centre it effectively steps through the possible saturation values for that hue. At the rim it is fully saturated, but at the centre is is unsaturated and is a shade of grey.
As the value (or brightness) is adjusted it will control the overall brightness of the entire colour wheel. If one focuses on the centre point as the brightness changes it will change from white at maximum brightness and go smoothly through the greys to black at minimum brightness.
So we need to re-generate the colour wheel each time the brightness value changes. Let’s look at the code to do this:
private fun draw(bitmap: Bitmap) {
    val centreX = bitmap.width / 2.0
    val centreY = bitmap.height / 2.0
    val radius = Math.min(centreX, centreY)
    var xOffset: Double
    var yOffset: Double
    var centreOffset: Double
    var rawAngle: Double
    var centreAngle: Double
    @ColorInt var colour: Int
    val hsv = floatArrayOf(0f, 0f, 0f)
    hsv[2] = brightness.toFloat() / Byte.MAX_VALUE.toFloat()
    for (x in 0 until bitmap.width) {
        for (y in 0 until bitmap.height) {
            xOffset = x - centreX
            yOffset = y - centreY
            centreOffset = Math.hypot(xOffset, yOffset)
            colour = if (centreOffset <= radius) {
                centreAngle = (Math.toDegrees(Math.atan2((yOffset), (xOffset))) + 360.0) % 360.0
                hsv[0] = centreAngle.toFloat()
                hsv[1] = (centreOffset / radius).toFloat()
                Color.HSVToColor(hsv)
            } else {
                Color.TRANSPARENT
            }
            bitmap.setPixel(x, y, colour)
        }
    }
}
Initially we determine the centre x and y coordinates (lines 2 & 3) and the radius of the wheel based upon the smallest dimension (line 4). We also declare a number of vars which will be used throughout the image generation (lines 5-11). The hsv array (line 11) stores the HSV components and, although this will be used for every pixel, the value component will be fixed so we can set it once (line 12) and just adjust the hue and saturation components.
All of the work is done within the two nested loops which iterate through all of the possible x and y pixels within the image (lines 13 & 14).
For the calculations that we need to perform, the following diagram may help a little in understanding them:
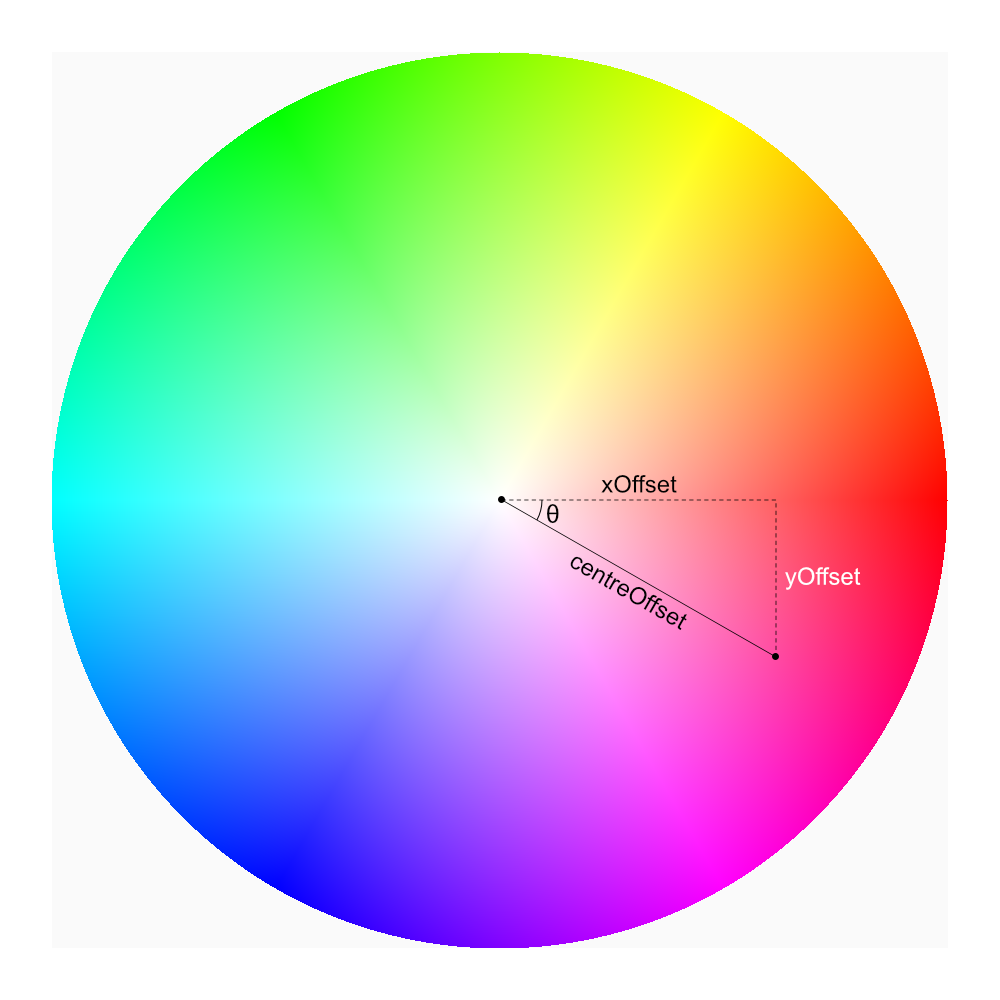
For a given pixel we determine the offsets from the centre in both x and y dimensions (lines 15 & 16) which we’ll refer to as xOffset and yOffset. These offsets may be both positive and negative.
Next we need to calculate the distance from the centre. We use Math.hypot() to het the hypotenuse given that we know the xOffset (the adjacent) and yOffset (the opposite) (line 17):
If the distance from the centre is less than the radius we calculated earlier then the pixel falls within the colour wheel and we need to calculate its value (lines 19-22), but if it is greater than the radius then we can just make it transparent (line 24).
For pixels within the colour wheel we first need to calculate the angle from the centre, ? in the diagram. For this we use a bit of trigonometry: Tangent = opposite / adjacent. The opposite and adjacent are yOffset and xOffset respectively, so we get the arctan (using Math.atan2())to determine the angle in radians, then convert it to degrees (using Math.toDegrees()). Then we add 360, and get the modulus with a divisor of 360 to obtain an angle between 0° and 360° (line 19).
We now have everything we need. The hue is the angle ?, and the saturation is centreOffset divided by the radius to obtain a value 0.0 (the centre) and 1.0 (the rim).
We now convert the hsv values to rgb (line 22), and we can paint the pixel (line 26).
If we run this we get the following colour wheel:
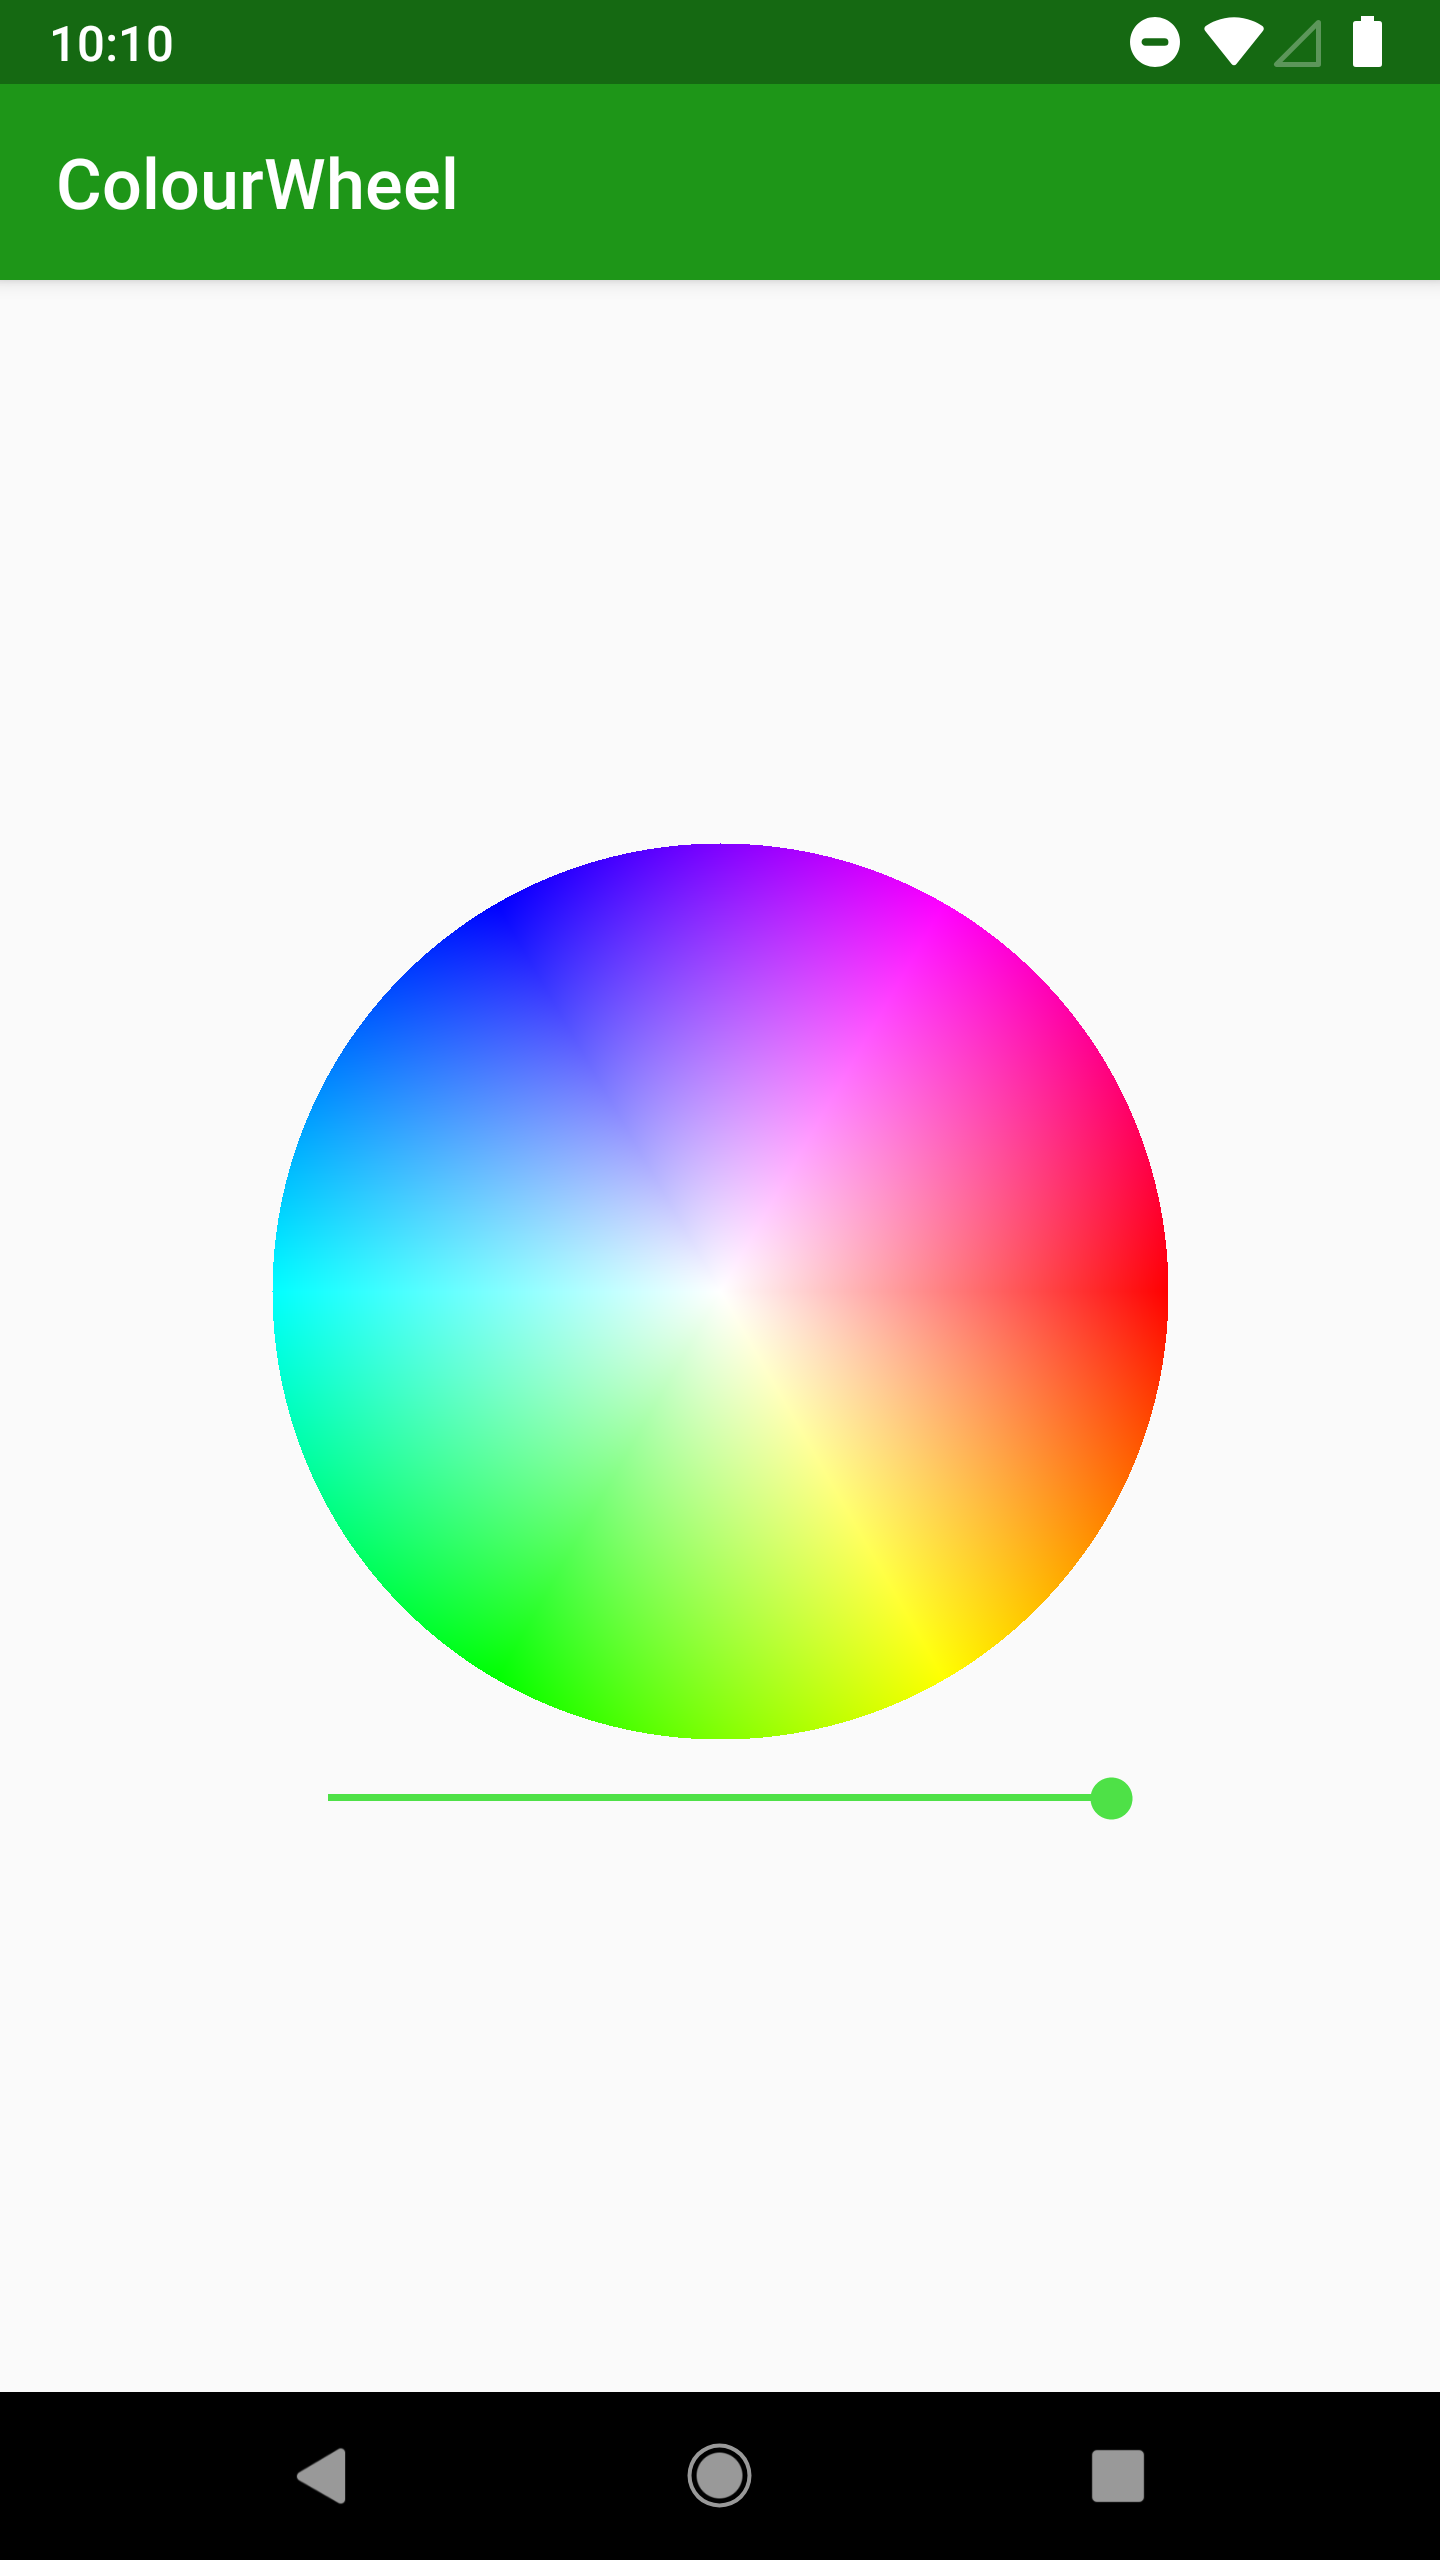
That looks really nice, and will scale beautifully on all devices. But there is a slight problem: it actually takes around 2 seconds to generate the image (on a Pixel XL running P preview) which is far too long. The cause of this is quite obvious: the cost of calculating each pixel is quite expensive and for a 896 x 896 pixel image (which this is), we’re having to do this over eight hundred thousand times.
While we could try and optimise the algorithm there is actually another approach that we can take with the same algorithm, and in the next article in this series we’ll explore that further.
The source code for this article is available here.
My thanks go to Sebastiano Poggi for proof reading, and suggesting the use of hypot() instead of performing a Pythagoras calculation manually. Any errors and typos which remain are entirely mine.
© 2018, Mark Allison. All rights reserved.
Copyright © 2018 Styling Android. All Rights Reserved.
Information about how to reuse or republish this work may be available at http://blog.stylingandroid.com/license-information.
