Recently in my day job for Byte Squared I wanted to have an ImageButton in which a part of the image should change colour to match the a value selected by the user. In other words the icon needed to change dynamically. In this series of articles we’ll look at a method of achieving this.
When the requirement first became apparent, the graphic designer had provided an image in which the afre that needed to change colour was a simple rectangle, so my initial thought was to simply use a canvas to draw a filled rectangle on top of the bitmap. While this would have certainly worked, it would have been made more complex by having to adapt the dimensions of the rectangle based upon different screen densities, and subtle differences in the image assets provided for mdpi, hdpi, xhdpi etc. The graphic designer then started working on some alternative assets where there was a non-uniform shape which needed the colour applying, and this new non-uniform shape would be difficult to mimic accurately by drawing directly to a canvas.
The solution which sprang to mind was to use a mask in much the same way as you would in and image manipulation package whereby you create a mask corresponding to the areas that you want to apply the colour to, and apply the appropriate colour to these areas.
So, let’s begin by setting up an basic Android 4.2 project with a package name of com.stylingandroid.dynamicicon, and a main activity named DynamicIconActivity. Next we’ll create a layout in res/layout/main.xml consisting of three SeekBars corresponding to the red, green, and blue components of the colour that we wish to apply, as well as an ImageView to hold the image that will be our dynamic icon:
There are some string definitions required also in res/values/strings.xml:
    Dynamic Icon
    Red
    Green
    Blue
    Drawable Holder
This is all pretty standard stuff, so we won’t go in to details.
The next thing that we need to look at is the image that we want to transform. As a simple example, I’ll use one of the standard menu icons within Android: ic_menu_play_clip and the mask that corresponds to the areas that we intend to fill with colour:
Although it is difficult to determine by comparing the two images, the mask corresponds to the area inside the dark border on the left hand image. This means that the dark border will always be drawn, but we’ll control the colour inside that border.
The key advantage of this approach is that the mask can be any shape that the graphic designer wants. As long as he provides an appropriate mask, we can apply it. Also this still works when we have different image drawables for different pixel densities because we can have a separate mask for each, as well.
For the sake of simplicity, I’ve only included xhdpi versions in the example project as I am only targeting my Galaxy Nexus for screen shots. However in a production app, you would provide more coverage for different screen densities.
Next we need to add some basci wiring to our Activity:
    private float red = 1.0f;
    private float green = 1.0f;
    private float blue = 1.0f;

    private ImageView image = null;
    private Bitmap background = null;
    private Bitmap foreground = null;

    private Paint paint = new Paint();

    @Override
    protected void onCreate(Bundle savedInstanceState)
    {
        super.onCreate(savedInstanceState);
        setContentView(R.layout.main);
        background = BitmapFactory.decodeResource( getResources(), R.drawable.ic_menu_play_clip );
        foreground = BitmapFactory.decodeResource(getResources(), R.drawable.ic_menu_play_clip_mask);
        SeekBar redSeek = (SeekBar) findViewById(R.id.redSeek);
        SeekBar greenSeek = (SeekBar) findViewById(R.id.greenSeek);
        SeekBar blueSeek = (SeekBar) findViewById(R.id.blueSeek);
        image = (ImageView) findViewById(R.id.image);

        image.setBackgroundColor( Color.WHITE );
        image.setImageResource( R.drawable.ic_menu_play_clip );

        redSeek.setMax(0xFF);
        redSeek.setProgress(0xFF);
        redSeek.setOnSeekBarChangeListener(new SeekBar.OnSeekBarChangeListener()
        {

            @Override
            public void onStopTrackingTouch(SeekBar arg0)
            {
            }

            @Override
            public void onStartTrackingTouch(SeekBar arg0)
            {
            }

            @Override
            public void onProgressChanged(SeekBar arg0, int pos, boolean arg2)
            {
                red = (float) pos / (float) 0xFF;
                updateImage();
            }
        });
        .
        .
        .
        updateImage();
    }
}
For the sake of brevity I have removed pretty much duplicate code for the OnSeekBarChangeListener implementation for the green and blue SeekBars. So what we have is three SeekBars which will each update a respective colour value when the position changes.
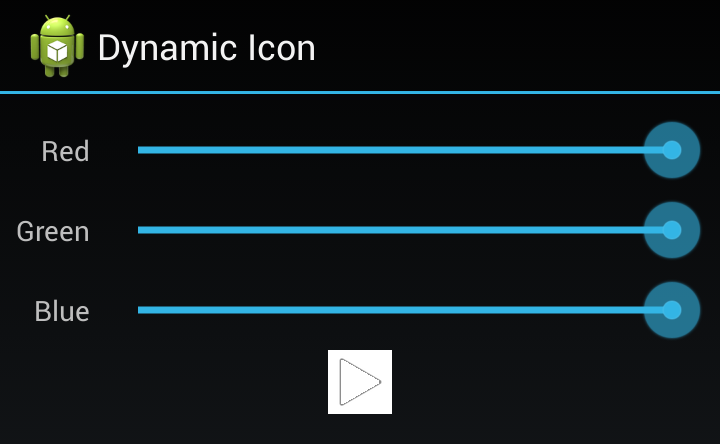
If we run this we can see the basic test app, but nothing yet happens when we move the SeekBars:
Note how the dark border makes the icon visible when it is displayed on top of a white background.
So we have our basic test app in place, but we don’t yet have an implementation for the updateImage() method which is going to perform the transformation of our image. In the concluding article in this series we’ll look at this code.
The source code for this article is available here.
© 2013 – 2014, Mark Allison. All rights reserved.
Copyright © 2013 Styling Android. All Rights Reserved.
Information about how to reuse or republish this work may be available at http://blog.stylingandroid.com/license-information.


I would like to know who the mask was generated.
How is this done? I mean, the pixel for pixel accuracy for the icon which is provided by the SDK. How did you make it?
I opened the image in GIMP (an open-source image editor) and created the mask manually from the source image. Normally you would get your graphic designer to provide this, but because I was using a stock icon, I did it myself.