
Following on from last week’s minor detour, we’ll resume this series by adding another new feature that was introduced in Android 4.2 (Jelly Bean): Daydreams.
A PC-style screensaver is not practical on a mobile device much of the time because on a mobile device you want to power down the display when the device is idle to conserve power. However, from 4.2 onwards Android supports a Daydream which is a screensaver mode which becomes active when the device is connected to an external power source, and typically the Daydream is displayed rather than powering down the display as power is not so much of an issue. This can be useful for having a night mode, or providing custom behaviours when the device is docked. In this article we’ll add a Daydream to our Text Clock app.
A Daydream is actually a rather curious beast as it is a hybrid between a Service and a View. More precisely it is a Service (DreamService extends Service) which has a UI. It has its own lifecycle which is covered more fully here, but we’ll discuss it as we go.
First off, let’s create a layout in res/layout/daydream.xml:
We’ll also add the styles to res/values/styles.xml:
. . .
and we’ll also tweak the font usage on 4.2+ by adding to res/values-v16/styles.xml:
. . .
Let’s start with the basic DreamService implementation to handle the UI:
public class TextClockDaydream extends DreamService
{
    private static final String TAG = "TextClockDaydream";
    private static final DateFormat dateFormat = new SimpleDateFormat( "yyyy-MM-dd HH:mm:ss.SSS" );

    private TextView hours;
    private TextView tens;
    private TextView minutes;

    @Override
    public void onAttachedToWindow()
    {
        super.onAttachedToWindow();
        setInteractive( false );
        setFullscreen( true );
        setScreenBright( false );
        setContentView( R.layout.daydream );
        hours = (TextView) findViewById( R.id.hours );
        tens = (TextView) findViewById( R.id.tens );
        minutes = (TextView) findViewById( R.id.minutes );
    }

    private void updateTime( Calendar date )
    {
        String[] words = TimeToWords.timeToWords( date );

        hours.setText( words[0] );
        tens.setText( words[1] );
        if ( words.length == 2 )
        {
            minutes.setVisibility( View.INVISIBLE );
        }
        else
        {
            minutes.setVisibility( View.VISIBLE );
            minutes.setText( words[2] );
        }
    }
}
onAttachedToWindow() is a lifecycle event which will get called when our Daydream is attached to the WindowManager. This is typically where we should initialise our UI, which we do using the standard technique that we would use in an Activity by calling setContentView(). We specify our layout, and get references to the TextView objects within our layout. This is all standard stuff.
The thing that is specific to a Daydream is that we’re setting some behaviour for our Daydream. In our case, the Daydream is non-interactive (i.e. we don’t process any input events), we want it fullscreen (hiding the status bar), and we don’t want it to prevent the device from dimming the screen (even dimmed it will be perfectly visible).
We then have our updateTime() method which will use our TimeToWords class and set the time accordingly.
Next we need to get our Daydream to update the time every minute. For simplicity we’ll use a delayed Handler call here:
public class TextClockDaydream extends DreamService
{
    .
    .
    .
    private final Runnable timerTask = new Runnable()
    {
        @Override
        public void run()
        {
            scheduleTimer();
        }
    };

    private Handler handler = new Handler();

    @Override
    public void onDreamingStarted()
    {
        super.onDreamingStarted();
        scheduleTimer();
    }

    @Override
    public void onDreamingStopped()
    {
        super.onDreamingStopped();
        handler.removeCallbacks( timerTask );
    }

    private void scheduleTimer()
    {
        Calendar date = Calendar.getInstance();
        updateTime( date );
        date.set( Calendar.SECOND, 0 );
        date.set( Calendar.MILLISECOND, 0 );
        date.add( Calendar.MINUTE, 1 );
        Log.d( TAG, String.format( "Next update: %s", dateFormat.format( date.getTime() ) ) );
        handler.postDelayed( timerTask, date.getTimeInMillis() - System.currentTimeMillis() );
    }
}
onDreamingStarted() and onDreamingStopped() are two more lifecycle events which will get called as our Daydream is starting and stopping respectively.
scheduleTimer() will update the current time, and set a new timer to fire on the next minute boundary, which will cause scheduleTimer() to be run again.
Our code is written, so all that’s left is to add it to our manifest:
    .
    .
    .

        .
        .
        .
This is a pretty standard Service declaration with a couple of small exceptions. Firstly, we must include the intent filter for the action android.service.dreams.DreamService as the OS uses this to identify that it is a Daydream rather than a standard service. We must also give a config file for our Daydream which is similar to what we had to do for our App widget previously. In this case we have no specific configuration, so the body of res/xml/dream_info.xml is empty:
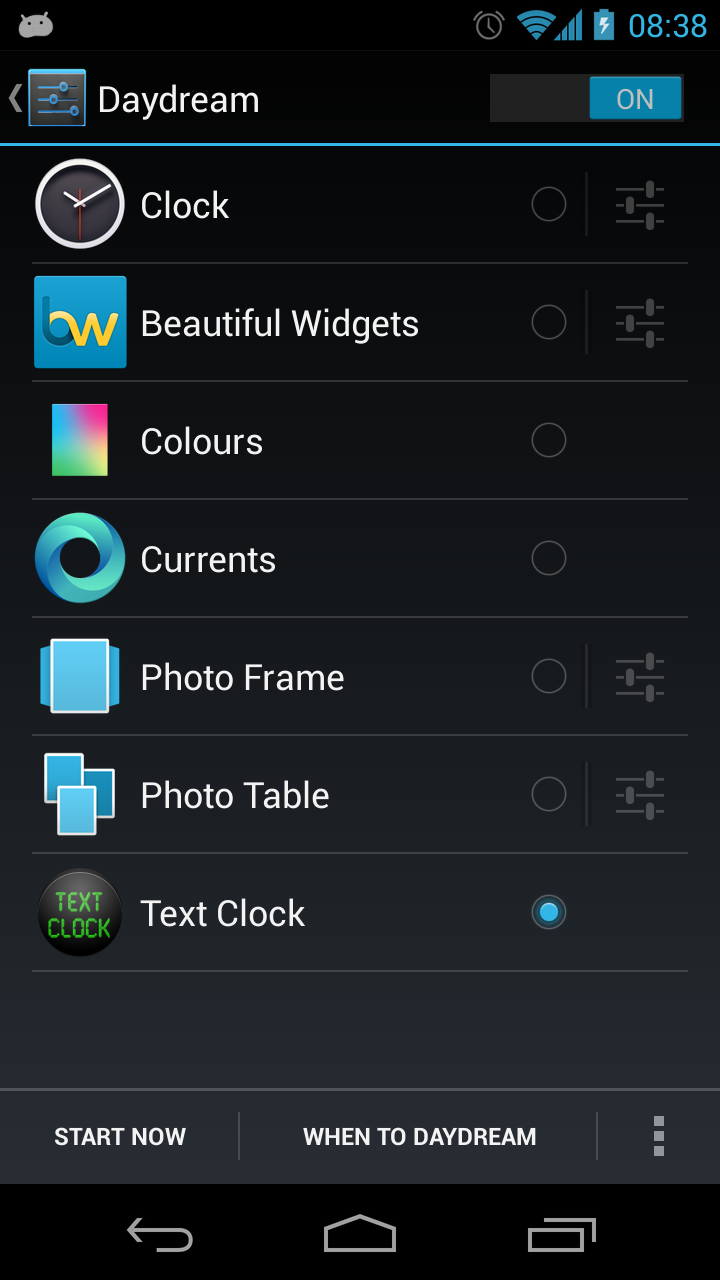
That’s it! Our Daydream is now complete. All that remains is to activate it. This is done by going in to Settings->Display->Daydream and selecting Text Clock:
When the Daydream is active it looks like this:

One final word about app security. I have set an attribute on the service declarations in the manifest: android:exported="false". The reason for this is it will ensure that these services can only be invoked by code within our package. In some cases when we want to provide services to other apps on the device, however exporting our services could allow other apps to trigger widget updates outside of our control, so we’re better off keeping them private.
While we’ll certainly revisit Text Clock in the future and add more nice features, we’ll give it a rest for now and move on to some other topics. Even though Text Clock is really rather simple, it has taken us 8 articles to cover some of the detail required to get an app in to a state ready for publication.
The source code for this article can be found here, and TextClock is available from Google Play.
© 2013 – 2014, Mark Allison. All rights reserved.
Copyright © 2013 Styling Android. All Rights Reserved.
Information about how to reuse or republish this work may be available at http://blog.stylingandroid.com/license-information.
