Indeterminate ProgressBars are a useful tool for communicating to our users that an operation is in progress when we cannot predict how long it is likely to take. Previously on Styling Android we’ve covered how to create a backwardly compatible approximation of the material styled horizontal indeterminate ProgressBar but we haven’t looked at the circular form – in this series we’ll create an approximation of the material circular indeterminate ProgressBar which will be backwardly compatible to API 11 (Honeycomb).
Previously we looked at the AOSP implementation of the material circular indeterminate ProgressBar drawable and saw how an AnimatedVectorDrawable is used to animate the trimPath* of a VectorDrawable path in order to get the “sweep” animation. In this article we’ll turn our attention to the Interpolators which will control the positions of the start and end points of the sweep arc over time.
Let’s begin by diving straight in to the AOSP code and look at these. First we’ll look at the Interpolator which controls the trimPathStart value:
<?xml version="1.0" encoding="utf-8"?>
<!--
 Copyright (C) 2014 The Android Open Source Project
     Licensed under the Apache License, Version 2.0 (the "License");
     you may not use this file except in compliance with the License.
     You may obtain a copy of the License at
          http://www.apache.org/licenses/LICENSE-2.0
     Unless required by applicable law or agreed to in writing, software
     distributed under the License is distributed on an "AS IS" BASIS,
     WITHOUT WARRANTIES OR CONDITIONS OF ANY KIND, either express or implied.
     See the License for the specific language governing permissions and
     limitations under the License.
-->
<pathInterpolator xmlns:android="http://schemas.android.com/apk/res/android"
    android:pathData="L0.5,0 C 0.7,0 0.6,1 1, 1" />
There’s nothing much there, but what the %$@& is a PathInterpolator? A PathInterpolator is actually an extremely powerful way of describing an interpolation function which was introduced in API 21 Lollipop. Don’t despair though, there is also PathInterpolatorCompat which we’ll look at later in the series.
A PathInterpolator takes an SVG pathData parameter which describes a mapping function of the form y = f(x). That sounds rather complex, but it is actually much simpler than it sounds. Effectively it is a square canvas which is one unit in each direction from 0,0 to 1,1. The PathInterpolator works by returning the y value for any given x value. The input values range from 0.0-1.0, so there only stipulation is that each possible value for x can only map to a single value of y – the path cannot double back on itself in the horizontal plane in other words.
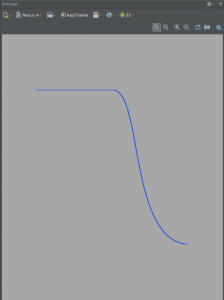
If we were to draw a straight line from 0,0 to 1,1 we would effectively create a LinearInterpolator because each value of x would map to an identical value for y. So what does the pathData in the above code actually do? A interesting trick that we can use here is to actually create a VectorDrawable using this path and use the preview within Android Studio to actually view it:
<?xml version="1.0" encoding="utf-8"?>
<vector xmlns:android="http://schemas.android.com/apk/res/android"
  xmlns:tools="http://schemas.android.com/tools"
  android:width="72dp"
  android:height="72dp"
  android:viewportWidth="1"
  android:viewportHeight="1"
  tools:ignore="UnusedResources">

  <path
    android:strokeColor="#0000FF"
    android:strokeWidth="0.005"
    android:pathData="L0.5,0 C 0.7,0 0.6,1 1, 1" />

<vector>
So 0,0 is the top left of the path and 1,1 is the bottom right. So for values of x up to 0.5 a y value of 0 will be returned. So the value of zero will be returned. From 0.5-1.0 there will be a gradual acceleration then quickly through the mid-values, and decelerating as we get towards 1.0. This will be pretty similar to a standard AccelerateDecelerateInterpolator. But these two distinct phases create something rather more complex than is easily achievable using more traditional Interpolators. If we next look at the Interpolator which is applied to the trimPathEnd value:
<?xml version="1.0" encoding="utf-8"?>
<!--
 Copyright (C) 2014 The Android Open Source Project
     Licensed under the Apache License, Version 2.0 (the "License");
     you may not use this file except in compliance with the License.
     You may obtain a copy of the License at
          http://www.apache.org/licenses/LICENSE-2.0
     Unless required by applicable law or agreed to in writing, software
     distributed under the License is distributed on an "AS IS" BASIS,
     WITHOUT WARRANTIES OR CONDITIONS OF ANY KIND, either express or implied.
     See the License for the specific language governing permissions and
     limitations under the License.
-->
<pathInterpolator xmlns:android="http://schemas.android.com/apk/res/android"
    android:pathData="C0.2,0 0.1,1 0.5, 1 L 1,1" />
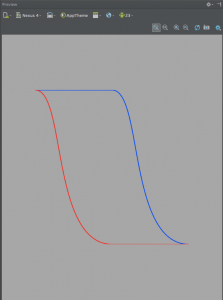
This is similar but the pathData is different. Let’s plot this on top of the other Interpolator in our VectorDrawable visualisation:
This is displayed in red and shows that we do the accelerate, fast through the middle, then decelerate phase first and then remain static at 1.0 until the end. Essentially we have reversed the phases.
The trimPathEnd will (perhaps a little confusingly) control the leading edge of the sweep while the trimPathStart will control the trailing edge. So with these Interpolators applied to the Animators the leading edge accelerates away from the trailing edge, and the trailing edge makes the same transition only a little later in the animation. The trimPathOffset is used to avoid the leading edge from actually touching the trailing edge as it reaches 1.0. Then with the entire thing then being rotated we get the circular indeterminate animation that we’ve become familiar with:
Now that we have an understanding of how this is implemented it’s pretty clear that we can’t simply back-port this because of AnimatedVectorDrawable support pre-Lollipop (and VectorDrawableCompat isn’t really an option at the time of writing). However we can apply the knowledge that we’ve learned from understanding this to actually create a pretty good implementation that works back to API 11 (Honeycomb) without a VectorDrawable in sight! In the next article we’ll begin looking at how we can do this.
As this series is initially an exploration of AOSP code there is no accompanying source code. Yet. It will come later in the series, I promise!
© 2016, Mark Allison. All rights reserved.
Copyright © 2016 Styling Android. All Rights Reserved.
Information about how to reuse or republish this work may be available at http://blog.stylingandroid.com/license-information.


