
Previously in this series we’ve looked at how to display images with irregular outlines, beginning with simply rounding the corners, but also displaying them in a speech bubble. In this final article of the series we’ll look at displaying an image with a love heart outline.
I know that software developers are a very romantic bunch(!) so I toyed with the idea of leaving this post to coincide with Valentines’ Day, but I decided that publishing it now would give people a whole six months to work on some new and interesting variations upon this theme 😉
Drawing a love heart is really quite simple – it just requires a few different steps. I took inspiration for the various options from this page which details various mathematical formulae for drawing heart curves. In the end I quite likes the style of method 4 listed on that page, and have adapted it slightly for our needs.
Before we start drawing the heart curve, we need to set up our BitmapShader, Canvas, and Paint objects:
Bitmap bmp;

bmp = Bitmap.createBitmap(bitmap.getWidth(),
    bitmap.getHeight(), Bitmap.Config.ARGB_8888);
BitmapShader shader = new BitmapShader(bitmap,
    BitmapShader.TileMode.CLAMP,
    BitmapShader.TileMode.CLAMP);

Canvas canvas = new Canvas(bmp);
Paint paint = new Paint();
paint.setAntiAlias(true);
paint.setShader(shader);
Next we need to store the bitmap width and height, as we’ll need these in some of the calculations which follow:
float width = bitmap.getWidth();
float height = bitmap.getHeight();
We also need to create Path, Matrix, and Region objects which will all be required to draw our heart curve (We’ll cover the details of these individually when we need to use them):
Path oval = new Path();
Matrix matrix = new Matrix();
Region region = new Region();
So we’re now ready to begin drawing our heart curve. The first thing that we need to do is define a rectangle which will hold the oval that we need to draw. This rectangle is the full height of our bitmap, but only three quarters the width, and is centred horizontally:
RectF ovalRect = new RectF(width / 8, 0,
    width - (width / 8), height);
Now we draw an oval to the dimensions of that rectangle:
oval.addOval(ovalRect, Path.Direction.CW);
If we were to render this Path as is we’d see that Betty is now within an oval shape:
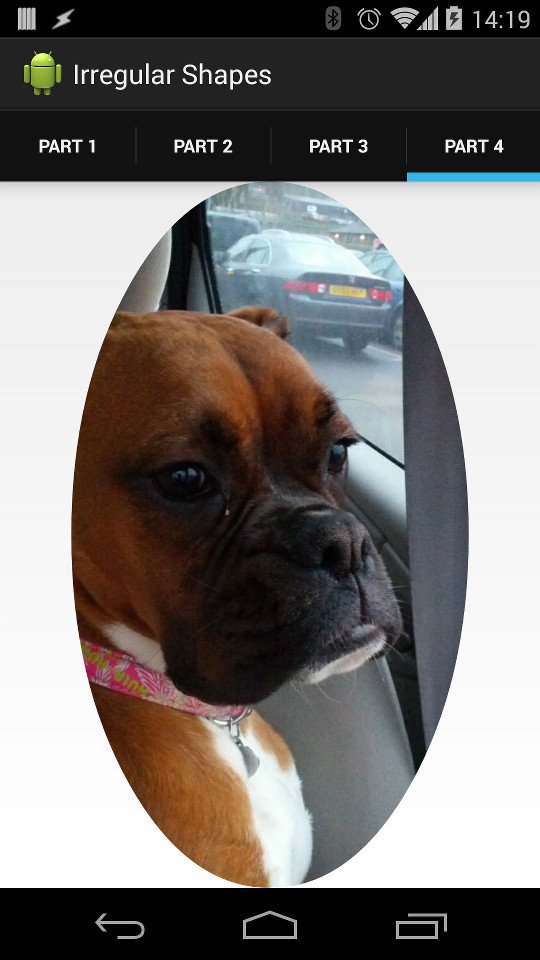
The next this that we need to do is rotate this oval through 30° and for this we need the Matrix object which we created earlier. Matrix allows us to perform various transformations on objects, and exposes some of the underlying functionality via some helper methods. In this case we want to perform a rotation of 30° of our oval around its centre point:
matrix.postRotate(30, width / 2, height / 2);
oval.transform(matrix, oval);
This would display Betty in a rotated oval:
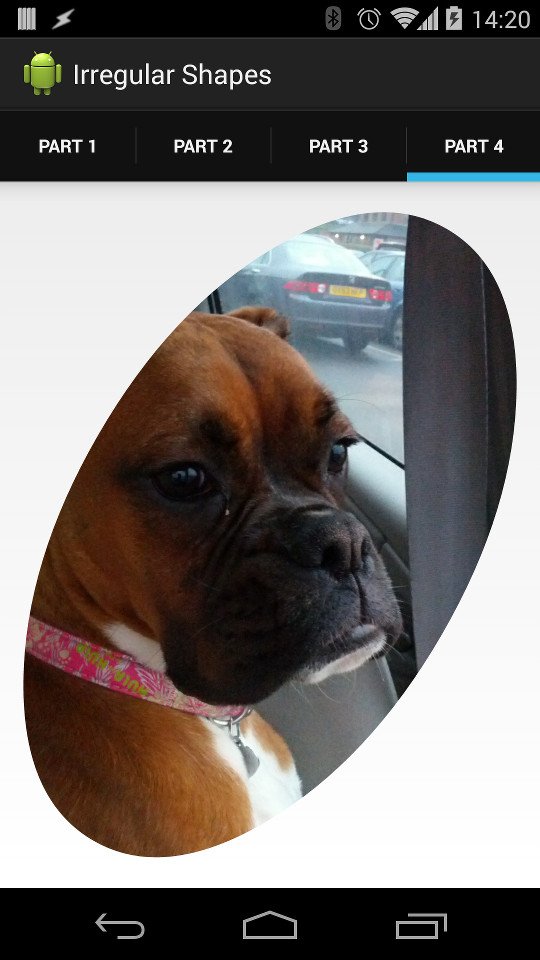
Now comes the clever bit: We’re not interested in all of this oval, we only want the bit that covers the left hand side of the image. So we need to crop the oval, and we do this using the Region that we created earlier. A Region simply represents a rectangular area. We’re going to combine the Path object (which is the rotated oval) with a Region which covers the left side of the Canvas area to effectively crop the oval, and then draw the Path inside the region on to the Canvas:
region.setPath(oval, new Region((int)width / 2, 0,
    (int)width, (int)height));
canvas.drawPath(region.getBoundaryPath(), paint);
This results in Betty appearing inside half of a love heart shape:

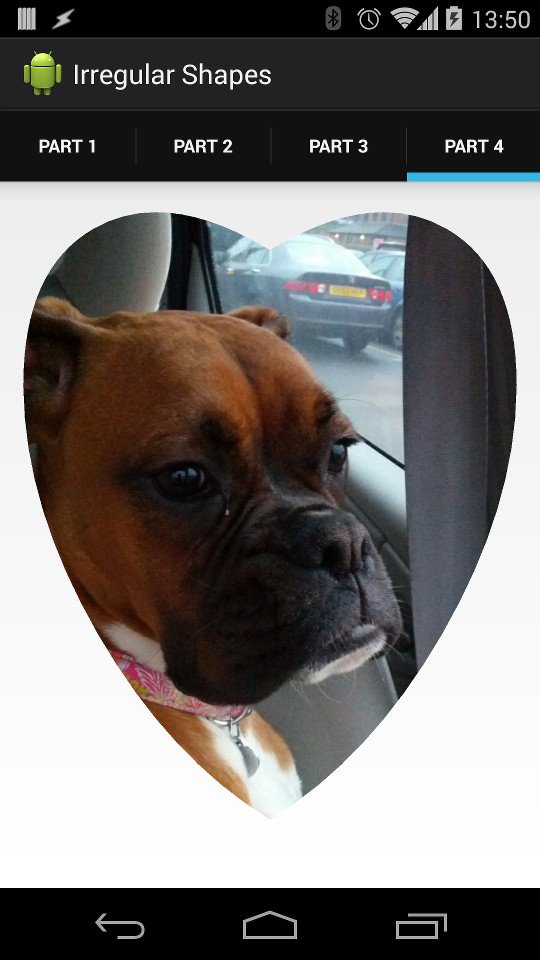
Now we need to draw the other half, and we can be eco-friendly by recycling the Path and Matrix objects that we created earlier:
matrix.reset();
oval.reset();
Now we repeat the entire process with two small changes: First we want to rotate the oval by 30° in the opposite direction, and we want our crop operation to retain only the right side of the Canvas area:
oval.addOval(ovalRect, Path.Direction.CW);
matrix.postRotate(-30, width / 2, height / 2);
oval.transform(matrix, oval);
region.setPath(oval,
    new Region(0, 0, (int)width / 2, (int)height));
canvas.drawPath(region.getBoundaryPath(), paint);
This draws the other half of the love heart shape, and we have the final effect that we want:
It is worth noting that the cropping operation could have been achieved quite easily by simply using Path objects and removing the Region objects altogether. However this would rely on methods introduced in API 19, so I have elected to use a more backwardly compatible approach.
That concludes our look at irregular outlines but please remember that the techniques that we’ve covered in the series are not limited only to images. We can also use them with solid colours, gradients, etc, etc. However, it is worth pointing out that all of the techniques covered in this series should be used sparingly as they are certainly not lightweight operations.
The source code for this article is available here.
© 2014, Mark Allison. All rights reserved.
Copyright © 2014 Styling Android. All Rights Reserved.
Information about how to reuse or republish this work may be available at http://blog.stylingandroid.com/license-information.

Hi Mark, at least the screenshots/images of part 2 and 4 (this part) are broken… 🙁
Can you confirm what browser you’re using? It’s fine for me in Chrome, but is broken using Link Bubble.I think I have found the problem. Could you please retry?
HI, i want to make dashboard like this http://i.imgur.com/G8f9ZjO.jpg . Any idea will be appreciated greatly. Clickable region should be exactly as shapes shown.