
A common use-case when we’re designing a layout containing a RecyclerView (or, if you’re a glutton for punishment: ListView) is that we may have to display data that is either generated or obtained at runtime. For example, we retrieve the data for the list items from a cloud API. This can make it difficult to properly visualise the data during development so often we’ll find ourselves having to fire up the app to obtain real data each time we make a minor tweak to the item layout. There are actually some neat helpers build in to the tools: namespace which can help us quite considerably. In this short series we’ll take a look at these tools and see how they can speed up our layout development.
 The first problem that we have when working with either ListView or RecyclerView is that it can be somewhat difficult to visualise what our populated list is actually going to look like.
Let’s start by looking at the layout that we’ll use for each item within the RecyclerView. For our example we’ll consider a list of people. Each item in the list will contain a picture of the user, the city they live in, the date they joined a service, and some longer description text. The layout for such an item may be something similar to this:
<?xml version="1.0" encoding="utf-8"?>
<android.support.constraint.ConstraintLayout xmlns:android="http://schemas.android.com/apk/res/android"
  xmlns:app="http://schemas.android.com/apk/res-auto"
  xmlns:tools="http://schemas.android.com/tools"
  android:layout_width="match_parent"
  android:layout_height="wrap_content">

  <ImageView
    android:id="@+id/avatar"
    android:layout_width="0dp"
    android:layout_height="0dp"
    android:layout_marginStart="8dp"
    android:layout_marginEnd="8dp"
    android:contentDescription="@null"
    app:layout_constraintDimensionRatio="h,1:1"
    app:layout_constraintEnd_toStartOf="@id/name"
    app:layout_constraintHorizontal_chainStyle="packed"
    app:layout_constraintHorizontal_weight="1"
    app:layout_constraintStart_toStartOf="parent"
    app:layout_constraintTop_toTopOf="@id/name" />

  <TextView
    android:id="@+id/name"
    android:layout_width="0dp"
    android:layout_height="wrap_content"
    android:layout_margin="8dp"
    app:layout_constraintBottom_toTopOf="@+id/city"
    app:layout_constraintEnd_toEndOf="parent"
    app:layout_constraintHorizontal_weight="5"
    app:layout_constraintStart_toEndOf="@id/avatar"
    app:layout_constraintTop_toTopOf="parent"
    app:layout_constraintVertical_chainStyle="packed" />

  <TextView
    android:id="@+id/city"
    android:layout_width="wrap_content"
    android:layout_height="wrap_content"
    android:layout_margin="8dp"
    app:layout_constraintBottom_toTopOf="@id/description"
    app:layout_constraintEnd_toStartOf="@id/date"
    app:layout_constraintHorizontal_chainStyle="spread_inside"
    app:layout_constraintStart_toEndOf="@id/avatar"
    app:layout_constraintTop_toBottomOf="@+id/name" />

  <TextView
    android:id="@+id/date"
    android:layout_width="wrap_content"
    android:layout_height="wrap_content"
    android:layout_margin="8dp"
    android:gravity="end"
    app:layout_constraintBaseline_toBaselineOf="@id/city"
    app:layout_constraintEnd_toEndOf="parent"
    app:layout_constraintStart_toEndOf="@id/city" />

  <TextView
    android:id="@+id/description"
    android:layout_width="0dp"
    android:layout_height="wrap_content"
    android:layout_margin="8dp"
    android:ellipsize="end"
    android:maxLines="3"
    app:layout_constraintBottom_toBottomOf="parent"
    app:layout_constraintEnd_toEndOf="parent"
    app:layout_constraintStart_toEndOf="@id/avatar"
    app:layout_constraintTop_toBottomOf="@+id/city" />

</android.support.constraint.ConstraintLayout>
The big problem with this is that when we view this in the layout Design or Preview panels in Android Studio it looks like this:
![]()
Although the layout Design editor shows us the outlines of some of the views, if we look at the preview of our RecyclerView, then it really gives us no clue whatsoever what our populated RecyclerView will look like because a simple placeholder has been used for each item:
![]()
However there’s a little trick that we can use which will enable us to use the actual item layout in the preview:
<?xml version="1.0" encoding="utf-8"?>
<android.support.v7.widget.RecyclerView xmlns:android="http://schemas.android.com/apk/res/android"
  xmlns:tools="http://schemas.android.com/tools"
  android:id="@+id/recycler_view"
  android:layout_width="match_parent"
  android:layout_height="match_parent"
  tools:listitem="@layout/item_part1" />
The highlighted line tells Android Studio to use the correct layout when displaying the preview:
![]()
We can see a little more of the structure of each item, but it really doesn’t help us to visualise how the complete list will look.
Many people will already be familiar with how we can use the tools:text="..." attribute on a TextView to include some text for the preview:
<?xml version="1.0" encoding="utf-8"?>
<android.support.constraint.ConstraintLayout xmlns:android="http://schemas.android.com/apk/res/android"
  xmlns:app="http://schemas.android.com/apk/res-auto"
  xmlns:tools="http://schemas.android.com/tools"
  android:layout_width="match_parent"
  android:layout_height="wrap_content">

  <ImageView
    android:id="@+id/avatar"
    android:layout_width="0dp"
    android:layout_height="0dp"
    android:layout_marginStart="8dp"
    android:layout_marginEnd="8dp"
    android:contentDescription="@null"
    app:layout_constraintDimensionRatio="h,1:1"
    app:layout_constraintEnd_toStartOf="@id/name"
    app:layout_constraintHorizontal_chainStyle="packed"
    app:layout_constraintHorizontal_weight="1"
    app:layout_constraintStart_toStartOf="parent"
    app:layout_constraintTop_toTopOf="@id/name" />

  <TextView
    android:id="@+id/name"
    android:layout_width="0dp"
    android:layout_height="wrap_content"
    android:layout_margin="8dp"
    app:layout_constraintBottom_toTopOf="@+id/city"
    app:layout_constraintEnd_toEndOf="parent"
    app:layout_constraintHorizontal_weight="5"
    app:layout_constraintStart_toEndOf="@id/avatar"
    app:layout_constraintTop_toTopOf="parent"
    app:layout_constraintVertical_chainStyle="packed"
    tools:text="Mark Allison"/>
If we do this throughout, the preview begins to look a lot nicer:
We could do a similar trick to add a placeholder avatar image (by using tools:src"...") but then we might need to add the placeholder image to our resources which could bloat our APK so we should really add it only to the resources for debug builds to keep our APK clean. However there is actually a better way. In Android Studio 3.0 and later we now have some sample data which we can add without having to add the resources ourselves:
<?xml version="1.0" encoding="utf-8"?>
<android.support.constraint.ConstraintLayout xmlns:android="http://schemas.android.com/apk/res/android"
  xmlns:app="http://schemas.android.com/apk/res-auto"
  xmlns:tools="http://schemas.android.com/tools"
  android:layout_width="match_parent"
  android:layout_height="wrap_content">

  <ImageView
    android:id="@+id/avatar"
    android:layout_width="0dp"
    android:layout_height="0dp"
    android:layout_marginStart="8dp"
    android:layout_marginEnd="8dp"
    android:contentDescription="@null"
    app:layout_constraintDimensionRatio="h,1:1"
    app:layout_constraintEnd_toStartOf="@id/name"
    app:layout_constraintHorizontal_chainStyle="packed"
    app:layout_constraintHorizontal_weight="1"
    app:layout_constraintStart_toStartOf="parent"
    app:layout_constraintTop_toTopOf="@id/name"
    tools:src="@tools:sample/avatars" />
Using the avatars item from the sample resource will add a dummy avatar image for us. Not only that, but it will add a different image to each item. We can do the same thing with all of the text, as well. There are a number of sample text items and this fit well with our chosen user data:
<?xml version="1.0" encoding="utf-8"?>
<android.support.constraint.ConstraintLayout xmlns:android="http://schemas.android.com/apk/res/android"
  xmlns:app="http://schemas.android.com/apk/res-auto"
  xmlns:tools="http://schemas.android.com/tools"
  android:layout_width="match_parent"
  android:layout_height="wrap_content">

  <ImageView
    android:id="@+id/avatar"
    android:layout_width="0dp"
    android:layout_height="0dp"
    android:layout_marginStart="8dp"
    android:layout_marginEnd="8dp"
    android:contentDescription="@null"
    app:layout_constraintDimensionRatio="h,1:1"
    app:layout_constraintEnd_toStartOf="@id/name"
    app:layout_constraintHorizontal_chainStyle="packed"
    app:layout_constraintHorizontal_weight="1"
    app:layout_constraintStart_toStartOf="parent"
    app:layout_constraintTop_toTopOf="@id/name"
    tools:src="@tools:sample/avatars" />

  <TextView
    android:id="@+id/name"
    android:layout_width="0dp"
    android:layout_height="wrap_content"
    android:layout_margin="8dp"
    app:layout_constraintBottom_toTopOf="@+id/city"
    app:layout_constraintEnd_toEndOf="parent"
    app:layout_constraintHorizontal_weight="5"
    app:layout_constraintStart_toEndOf="@id/avatar"
    app:layout_constraintTop_toTopOf="parent"
    app:layout_constraintVertical_chainStyle="packed"
    tools:text="@tools:sample/full_names" />

  <TextView
    android:id="@+id/city"
    android:layout_width="wrap_content"
    android:layout_height="wrap_content"
    android:layout_margin="8dp"
    app:layout_constraintBottom_toTopOf="@id/description"
    app:layout_constraintEnd_toStartOf="@id/date"
    app:layout_constraintHorizontal_chainStyle="spread_inside"
    app:layout_constraintStart_toEndOf="@id/avatar"
    app:layout_constraintTop_toBottomOf="@+id/name"
    tools:text="@tools:sample/cities" />

  <TextView
    android:id="@+id/date"
    android:layout_width="wrap_content"
    android:layout_height="wrap_content"
    android:layout_margin="8dp"
    android:gravity="end"
    app:layout_constraintBaseline_toBaselineOf="@id/city"
    app:layout_constraintEnd_toEndOf="parent"
    app:layout_constraintStart_toEndOf="@id/city"
    tools:text="@tools:sample/date/ddmmyy" />

  <TextView
    android:id="@+id/description"
    android:layout_width="0dp"
    android:layout_height="wrap_content"
    android:layout_margin="8dp"
    android:ellipsize="end"
    android:maxLines="3"
    app:layout_constraintBottom_toBottomOf="parent"
    app:layout_constraintEnd_toEndOf="parent"
    app:layout_constraintStart_toEndOf="@id/avatar"
    app:layout_constraintTop_toBottomOf="@+id/city"
    tools:text="@tools:sample/lorem/random" />

</android.support.constraint.ConstraintLayout>
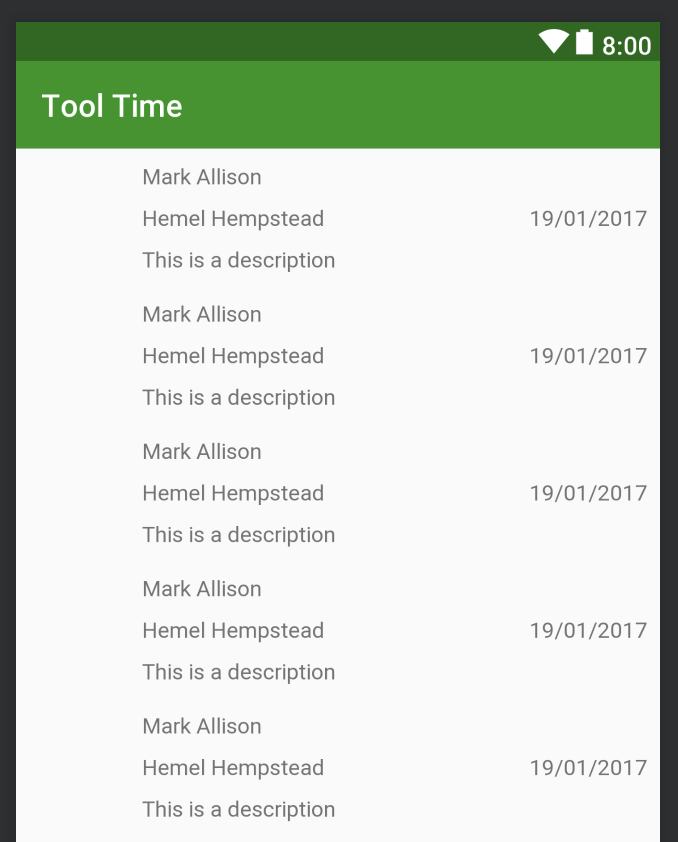
Now our layout preview begins to look a lot more realistic and gives us a much better idea of how the final layout will look:

Moreover, the sample data does not get added to our codebase so there’s no risk of accidentally bloating our APK. Also by using the sample lorem ipsum text in the description field we can check that our three line limit and ellipsis behaviour is working correctly in the preview.
Another thing worth noting is that Android Studio is doing all of this without using the RecyclerView.Adapter. The actual Adapter implementation will not actually populate anything. It is important to understand this so that you know that you can test your layout in isolation from your Adapter, and also know that no verification or validation of the Adapter itself is being performed using this technique.
A full list of the available types of sample data is in the official documentation.
As the more astute will have noticed, I deliberately chose an example of user info what works well with the available type of sample data. However, if the required data isn’t provided in the sample data, there is a way of using custom data instead and we’ll look at that in the concluding article in this series.
The source code for this article is available here.
© 2018, Mark Allison. All rights reserved.
Copyright © 2018 Styling Android. All Rights Reserved.
Information about how to reuse or republish this work may be available at http://blog.stylingandroid.com/license-information.

Hello Mark
thas what I need right now thank you so much.
Really useful, nice discovery!
Thanks, Mark great post!