
In the previous article we looked at getting our ListView scrolling smooth by optimising the operations that we are performing in the getView() method of our Adapter. In this article we’ll look at adding images to each ListView item and consider the performance implications of doing that.
Actually adding images to the list item is easy enough, but we’ll compound the problems we face by not only loading images (which is an expensive operation), but also retrieving them from the cloud (another expensive operation). Neither of these operations should be performed in our getView() method, or indeed on the UI thread. To demonstrate this we’ll create a ListView which loads all of the emoticon icons from the Android AOSP source on github.
First we create an item layout which contains an ImageView:
We’re also preempting something that we’ll require later on – a ProgressBar to display in place of the image while we’re loading it.
Our Adapter is pretty similar to what we’ve used previously, we’re just overriding getView() and doing the same view recycling and caching that we’ve done previously:
public class ArrayAdapterImageFragment extends ListFragment
{
public static final String TAG =
"ArrayAdapterImageFragment";
private static final List items =
new ArrayList();
private class ItemAdapter extends ArrayAdapter
{
public ItemAdapter(Context context)
{
super(context,
android.R.layout.simple_list_item_2, items);
}
@Override
public View getView(int position, View convertView,
ViewGroup parent)
{
View view = convertView;
ArrayAdapterImageViewHolder holder = null;
if (view == null)
{
view = LayoutInflater.from(getContext())
.inflate(R.layout.image_item, parent, false);
TextView text = (TextView) view
.findViewById(android.R.id.text1);
ImageView image = (ImageView) view
.findViewById(android.R.id.icon);
ProgressBar progress = (ProgressBar) view
.findViewById(android.R.id.progress);
view.setTag(new ArrayAdapterImageViewHolder(
getContext(), text, image, progress));
}
if (holder == null && view != null)
{
Object tag = view.getTag();
if (tag instanceof ArrayAdapterImageViewHolder)
{
holder =
(ArrayAdapterImageViewHolder) tag;
}
}
String item = getItem(position);
if (item != null && holder != null)
{
holder.setName(item);
}
return view;
}
}
static
{
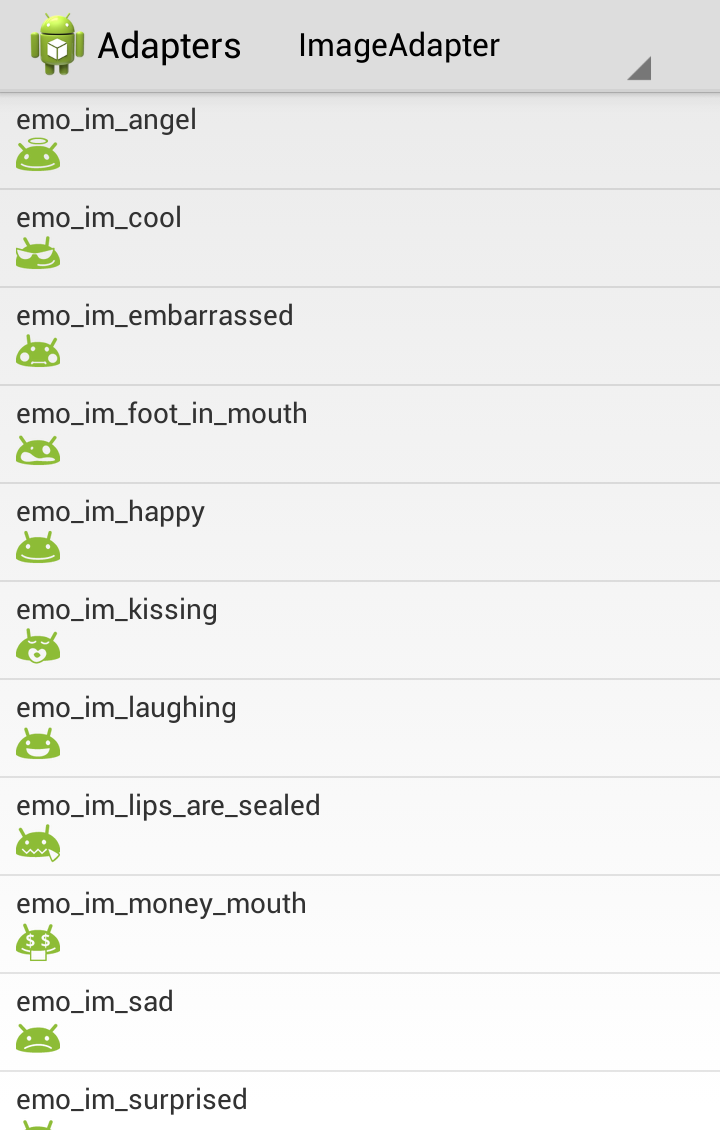
items.add("emo_im_angel");
items.add("emo_im_cool");
items.add("emo_im_embarrassed");
items.add("emo_im_foot_in_mouth");
items.add("emo_im_happy");
items.add("emo_im_kissing");
items.add("emo_im_laughing");
items.add("emo_im_lips_are_sealed");
items.add("emo_im_money_mouth");
items.add("emo_im_sad");
items.add("emo_im_surprised");
items.add("emo_im_tongue_sticking_out");
items.add("emo_im_undecided");
items.add("emo_im_winking");
items.add("emo_im_wtf");
items.add("emo_im_yelling");
}
@Override
public View onCreateView(LayoutInflater inflater,
ViewGroup container,
Bundle savedInstanceState)
{
return inflater.inflate(R.layout.listview,
container, false);
}
@Override
public void onActivityCreated(Bundle savedInstanceState)
{
super.onActivityCreated(savedInstanceState);
ListAdapter adapter = new ItemAdapter(getActivity());
setListAdapter(adapter);
}
}
One thing to note is that we’re not even attempting to bind anything to the ImageView control within our getView() method – we’re going to do this in a Loader to keep the heavy image download and decoding operations outside of our getView() method, and off of the UI thread. For a fuller discussion of this, please refer to the series on Background Tasks.
First let’s look at the ViewHolder, which does rather more than the simple state holder that we used previously:
public class ArrayAdapterImageViewHolder implements LoaderCallbacks{ private static final String TAG = ArrayAdapterImageFragment.TAG; private static int nextLoaderId = 0; private final int loaderId; private final Bundle bundle = new Bundle(); private final Context context; private String name = null; public final TextView text; public final ImageView image; public final ProgressBar progress; public ArrayAdapterImageViewHolder(Context context, TextView text, ImageView image, ProgressBar progress) { this.context = context; this.text = text; this.image = image; this.progress = progress; this.loaderId = nextLoaderId++; } @Override public Loader onCreateLoader(int id, Bundle args) { return new ArrayAdapterImageLoader( context, args.getString("name")); } @Override public void onLoadFinished( Loader loader, Bitmap bitmap) { if(bitmap != null) { image.setImageBitmap(bitmap); } image.setVisibility(View.VISIBLE); progress.setVisibility(View.GONE); } @Override public void onLoaderReset(Loader loader) { loader.abandon(); } public void setName(String name) { text.setText(name); image.setVisibility(View.GONE); progress.setVisibility(View.VISIBLE); if(!name.equals(this.name) && context instanceof FragmentActivity) { bundle.putString("name", name); ((FragmentActivity)context) .getSupportLoaderManager() .restartLoader(loaderId, bundle, this); Log.d(TAG, "Restarting loader: " + loaderId + " : " + name); } } }
The first thing to note is that this class implements our LoaderCallbacks interface, so this will handle the work which needs to be performed to set the Loader running, and also update the UI components (which needs to be performed on the UI thread) once the Loader‘ background operation is complete.
The entry point is the setName() method. This is called from our getView(), so needs to be really efficient. It sets the text in our TextViewProgressBar, hide the ImageView, and then restart the Loader (which will create it, if necessary). It is worth noting that we try and keep object creation to an absolute minimum – as these are expensive operations – so we reuse the Loader wherever possible, and also reuse the Bundle object that we use to pass parameters to our Loader.
The final component is the Loader implementation itself:
public class ArrayAdapterImageLoader extends AsyncTaskLoader{ private static final String TAG = ArrayAdapterImageFragment.TAG; private static String density = null; private final String name; private boolean cancelled = false; public ArrayAdapterImageLoader(Context context, String name) { super(context); this.name = name; if (density == null) { DisplayMetrics dm = context.getResources().getDisplayMetrics(); switch (dm.densityDpi) { case DisplayMetrics.DENSITY_LOW: density = "ldpi"; break; case DisplayMetrics.DENSITY_MEDIUM: density = "mdpi"; break; case DisplayMetrics.DENSITY_HIGH: density = "hdpi"; break; case DisplayMetrics.DENSITY_XHIGH: density = "xhdpi"; break; default: density = "mdpi"; break; } } } @Override public Bitmap loadInBackground() { URL url = null; Bitmap bitmap = null; HttpURLConnection http = null; try { url = new URL(getContext().getString( R.string.image_base_url, density, name)); URLConnection conn = url.openConnection(); if(conn instanceof HttpURLConnection) { http = (HttpURLConnection)conn; if(http.getResponseCode() == HttpURLConnection.HTTP_OK && http.getContentType() .startsWith("image")) { bitmap = BitmapFactory.decodeStream( http.getInputStream()); } } } catch (Exception e) { Log.e(TAG, "Error loading image", e); } finally { if(http != null) { http.disconnect(); } } return cancelled ? null : bitmap; } @Override protected void onStartLoading() { super.onStartLoading(); forceLoad(); } @Override protected void onAbandon() { super.onAbandon(); cancelled = true; } }
What we’re doing here is determining the device pixel density so that we can get the correct image for our device. Note that only ldpi, mdpi, hdpi, and xhdpi versions of these images are provided on AOSP, so we only support these.
We then load the image from github by constructing the URL, loading the content and decoding it to create a Bitmap object (all rather expensive operations) within the loadInBackground() method.
If we run this we see he following:
However, you’ll have to try it out for yourself to see how the ListView scrolling stays smooth.
It is worth pointing out that the code in this article is designed to demonstrate how to keep your ListView scrolling smooth, and your UI responsive, so I have tried to keep the code as simple as possible so that it is clear that the expensive operations are performed in the correct place. However, there are some omissions which should be addressed if you were to attempt to use it in a real app:
- The handling of pixel densities for which assets do not exist is a little crude (i.e. xxhdpi defaults to mdpi)
- There is no handling of network resources that are not found or not available
- There is no detection of whether a network connection is available
- Currently the images get pulled from the network each time they are loaded. An image cache would improve the user experience considerably
In the next article we’ll look at binding a ListView to a SQLite database.
The source code for this article is available here.
© 2013 – 2014, Mark Allison. All rights reserved.
Copyright © 2013 Styling Android. All Rights Reserved.
Information about how to reuse or republish this work may be available at http://blog.stylingandroid.com/license-information.

Mark, thank you for the another one part of Adapter’s topic. Actually I got more useful knowledges from how to work with loaders from this post, but this is so because I’ve been working with adapters for a long time, rather than with Loaders :).
And also there is one thing, that I don’t understand. Guys from Google, such as Romain Guy, suggest that when you work with populating ListView with items which have combinations of text and image, – not to use TextView and ImageView separately as it involve more time to instantiate one item, as if you would use one TextView with compound drawable in it. Do you use two separated views in your example for some specific purpose?
Hi Alex, thanks for the feedback – I’m glad that you find it useful, even if not for the intended reason!
The main reason that I’m not using a compound drawable is to keep the code simple and easy to understand for those unfamiliar with some of these techniques. I have covered compound drawable in the past in this article: http://blog.stylingandroid.com/archives/815