
There is a nice micro-animation library at useanimations.com which contains some useful animations which are particularly well suited for animated icons. These are all free to use and downloadable at Lottie animations. For those that already use Lottie they can use these animations as-is. However using them is apps which don’t use Lottie, or in cases where they may need tweaking and you don’t have a designer available that can perform the necessary tweaks in After Effects, it may not be possible to do this. In this occasional series we’ll look at how to create some of these animations as Animated Vector Drawables which will show some useful AVD techniques.

The animation that we’ll look at this time is an indefinite loading indicator that’s based upon the infinity symbol. The first thing to consider is the make up of the symbol itself. To make the animation possible, I have created this as a continuous line rather than compound filled shapes and that will be the enabler for the animation. So let’s break this line down in to the four components from which it is comprised. We begin drawing at the top of the left hand loop:
M16,20
Then we use an arc to draw an anti-clockwise semi-circle down to the bottom point of the left hand loop (full details of the SVG elliptical arc command can be found here):
A12,12 0 0 0 16,44
Next we draw a cubic Bézier curve from the bottom of the left hand loop to the top of the right hand loop (full details of the SVG cubic Bézier command can be found here):
C 26,44 38,20 48,20
We next draw a clockwise arc from the top of the right hand loop to the bottom point of the right hand loop:
A12,12 0 0 1 48,44
Finally we draw another cubic Bézier from the bottom point of the right hand loop to the top of the left hand loop:
C38,44 26,20 16,20
This completes the loop. This may be slightly easier to understand if we colour the two semi-circular arcs in dark green and the two cubic Béziers as light green:
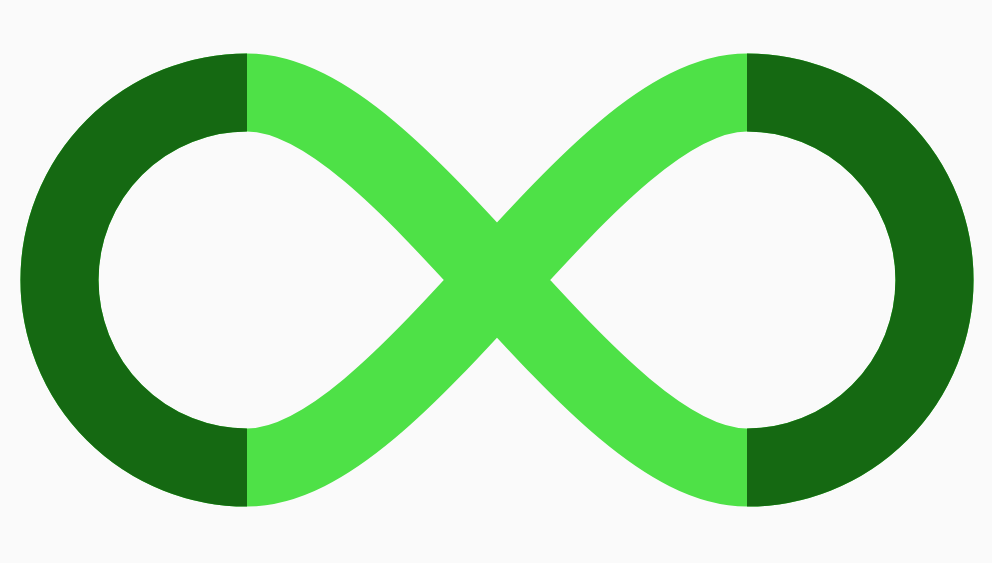
It is important to understand that this line starts and ends at the same point – the top of the left hand loop – where the dark and light segments meet at the top of the left hand loop.
The other thing worth noting in the animation is that we have an animated segment running around a lighter track. We use exactly the same path data for both the track and the animated segment (named “infinity_path”) and apply a strokeAlpha of 0.25. Using an alpha rather than an explicit colour value is important because it enables us to tint the entire icon:
The two <path> elements are identical except for the alpha, the fact that the second is named, and has rounded caps set.
We’ll create the animation using trim paths and that is the reason for creating the vector as a line rather than a filled compound shape. Trim paths are something we’ve used before in this series and enable us to draw only a subsection of a path. Setting trimPathStart controls where we begin rendering the line – by default this is 0.0 but by increasing this value we can omit the beginning of the line. If we set trimPathStart="0.1" we get the following:

The line both begins and ends at the top of the left hand loop, and the trim path omits the first 10% of the line which is the break that we see that allows the underlying “track” path to be seen. We can now see why we added the rounded caps to the line as it gives our line segment smoother ends.
Setting trimPathEnd is similar except that it controls the end of the line segment draw. By default this is 1.0 but if we set it to 0.1 (with a default trimPathStart="0.0") we get this:

This is the complement of the previous example whereas previously the line started an 0.1 and ended at 1.0 now it starts at 0.0 and ends at 0.1.
Setting trimPathOffset enables us to apply offset values to bot trimPathStart and trimPathEnd. If we add trimPathOffset="0.1" to the previous trimPathEnd="0.1" we get this:

The offset value has been applied to both the trimPathStart value of 0.0 and the trimPathEnd value of 0.1 to render the line from 0.1 to 0.2.
The animation is achieved by animating all three of these values. At the start of the animation a continuous line is drawn and the trimPathStart value rises fairly quickly to 0.9 so that it quickly shrinks a small segment of the line.
Throughout the animation the trimPathOffset animates from 0.0 to 5.0. This effectively loops the line segment around the “track” five times.
Towards the end of the animation, the trimPathEnd animates from 1.0 to 1.99 which causes the leading edge of the line segment to gradually catch up with the trailing edge – and causes the line to become complete once again.
We rest for a short while with the complete line showing, and then the animation repeats:
I have used key frames to control where these various phases start and end, as well as adding some key frames to the trimPathOffset to gradually speed it up slightly – this is barely noticeable because it is quite subtly, but it keeps the animation dynamic during the middle section which makes it slightly more fluid.
The key is to choreograph the three animations carefully in order to get the desired effect. I must confess to plenty of tinkering with these to get an animation that I was happy with:
The source code for this article is available here.
© 2020, Mark Allison. All rights reserved.
Copyright © 2020 Styling Android. All Rights Reserved.
Information about how to reuse or republish this work may be available at http://blog.stylingandroid.com/license-information.
