
There is a nice micro-animation library at useanimations.com which contains some useful icon animations. These are all free to use and downloadable at Lottie animations. For those that already use Lottie they can use these animations as-is. It may not be possible to use them in apps which don’t use Lottie, or if there’s no designer that can tweak things. In this occasional series we’ll look at how to create some of these animations as Animated Vector Drawables. We’ll also showcase some useful AVD techniques.
The icon that we’re going to look at is a new addition to useanimations.com (at the time of writing). It is a visibility toggle which transitions from an open eye to a closed one.
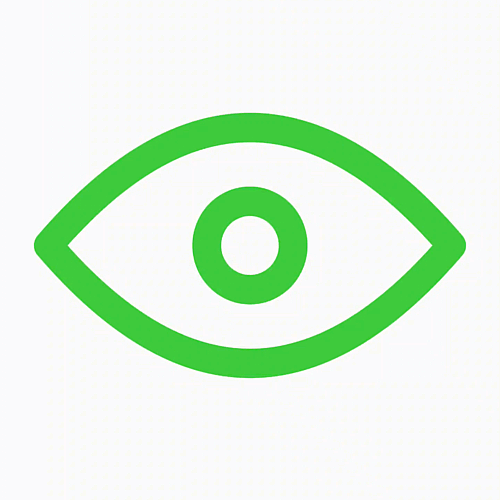
There are three distinct elements to the vector itself/ There is the iris which is the circle in the middle of the eye, here is the eye outline, and there are the lashes which appear below the eye. we’ll briefly go through them as each of them are drawn in a slightly different way.
The Vector Components
The iris is a simple circle. We’ve covered circles before in this series, so I won’t dwell on it here.
The line outline (or lids as they are named in the vectors) are a pair of quadratic Bezier curves, one for the top curve and the other for the bottom curve. We have covered cubic Bezier curves before, but not quadratic Bezier curves. But they are actually very similar. A cubic Bezier curve has two control points, one at the start point and another for the end point. A quadratic Bezier curve only has one control point but affects both the start and end points. It behaves like a cubic Bezier curve where the two control points share the same position. It is useful when working with symmetrical curves, as is the case here.
The lashes are 5 straight lines which are each drown away from the lids. That is to say: the start point of each line is the point closest to the lids, and the end point is the point furthest away from the lids. This is not vital, but at being consistent in the line directions make animating them much easier later on.
Animating the lids
To animate the lids we do a path transformation. To understand this, let’s first look at the pathData for the lids in their open state:
M4,32 Q32,0 60,32 Q32,64 4,32z
The M command moves to the start point which is the left point where the upper and lower lids meet. Two Q commands draw the quadratic Bezier curves for the upper and lower lids respectively. Each of these uses two separate points – the first is the control point for the curve and the second is the end point of the curve.
For the upper lid the control point is at 32,0 which is the middle of the top edge of the vector. This causes it to curve upwards through to the mid point, and then downwards towards the end point which is at the right centre (60,32).
For the lower lid, the control point is at 32,64 wghich is the middle of the bottom edge of the vector. This causes it to curve downwards through to the mid point and then upwards towards the end point which is back where we started (4,32).
For the closed state, we use this path data:
M4,32 Q32,64 60,32 Q32,64 4,32z
The only thing that has changed is the control point for the upper lid. This is now identical to that of the lower lid so the two curves are identical albeit drawn in different directions.
If we animate between these two pathData values then the curve of the upper lid will move from its open position to the closed position.
Animating the lashes
The lashes are pretty easy to animate given that we made sure to draw them all in the same direction. The animation runs after the closing of the lids, and we animate the trimPathEnd from 0 to 1. Again we have covered trim paths before in this series, so I won’t go into a long explanation here. Animating the trimPathEnd in this way effectively draws it from the position closest to the lower lid to the point furthest away from the lower lid. That’s why getting the drawing directions consistent makes life easier.
Animating the iris
The animation of the iris is slightly trickier because there are two separate things going on. The first is that the iris is moving down as the upper lid closes. This is achieved by doing another path data animation. Here is the path data for the open state:
M32,26 A6,6 0 1 1 31.99,26 z
Here is the path data for the closed state:
M32,32 A6,6 0 1 1 31.99,32 z
Only the two highlighted values have changed, and they have the effect of moving the iris down during the animation.
The second thing that is going on is that the iris gets hidden by the closing upper lid. At first this might see quite tricky, but we can use a clip path to achieve this. Once again, clip paths are a concept that we’ve looked at before. In this case we use a group to constrain the clip path so that it only affects the iris:
    .
    .
    .
If we animate this clip path in exactly the same way as the lids the clip path will cause the iris to be hidden as the upper lid closes.
Running the lids and iris animations in parallel, and then running the lashes drawing creates the open to closed animation. For the closed to open animation we do the entire thing but in reverse to get the following:
Conclusion
As is often the case with animations, combining a few simple animations can create a nice overall effect. This one is quite pleasing – there is a nice flow of the top lid closing and that motion being carried on through the drawing of the lashes.
The source code for this article is available here.
© 2021, Mark Allison. All rights reserved.
Copyright © 2021 Styling Android. All Rights Reserved.
Information about how to reuse or republish this work may be available at http://blog.stylingandroid.com/license-information.
