
Amazing things are possible with AnimatedVectorDrawable and regular readers of Styling Android will know that I’m a huge fan of them. Earlier this year I worked on a project for a UK TV broadcaster and produced an AnimatedVectorDrawable of the isometric company logo which went in to the app as an Easter Egg. Sadly I was unable to obtain permission to use the logo in question, but in this series of articles we’ll look at the entire process that I went through in order to create this animated logo.
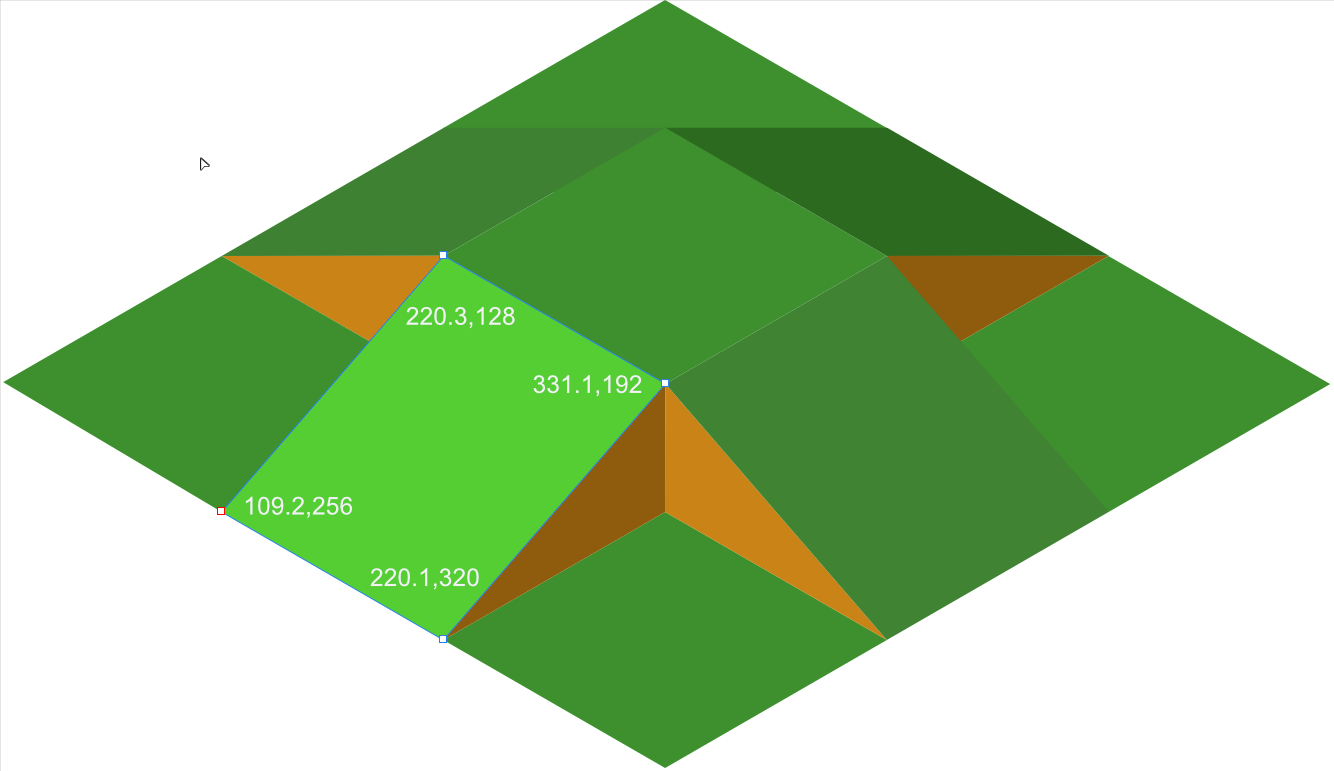
 Previously we looked at the construction of the SVH graphic that we’re using as the basis for our animation and now we’ll dive a litle deeper and explore the individual SVG paths as it will be these that we need to manipulate. At first glance SVG paths look pretty scary but they really consist of a series of commands which are executed to draw shapes. So let’s take a look at the VectorDrawable path element for just the south-west tile and the X & Y coordinates of each of the vertices is shown:
The element within the VectorDrawable is:
  <path
    android:fillColor="#22CF25"
    android:name="south_west"
    android:pathData="
      M109.2,256
      L220.1,320
      L331.1,192
      L220.1,128
      Z" />
The pathData attribute contains SVG path as defined in the SVG Paths specification. Going in to the full specification here is not necessary, we can analyse the components of the path which I have separated on to individual lines for clarity.
The first line moves to the start point 109.2,256 because M is the SVG path move to command – so that sets the start point of the path which is the left-most vertex of the parallelogram. Incidentally SVG coordinates can either be absolute values or relative to the current point and the case of the command dictates which is used. Uppercase means that absolute positioning (relative to the coordinates origin) is used; and lowercase means that relative positioning based on the current position is used. For consistency I have used absolute positioning throughout this example.
The next line draws a line from the current position to 220.1,320 – the bottom-most vertex of the parallelogram, and the current position is now that point. This is the first edge of the parallelogram.
The third line draws a line from the current position to 331.1,191.9 – the right-most vertex of the parallelogram, and the current position is now that point. This is the second edge of the parallelogram.
The fourth line draws a line from the current position to 220/3. 127.9 – the top-most vertex of the parallelogram, and the current position is now that point. This is the third edge of the parallelogram.
The final line contains ‘Z’ which is the closepath command. This will draw a straight line from the current position back to the first point in the current path – i.e. 22.1,320. This is the fourth edge of the parallelogram.
The fillColor attribute defines how the path is filled.
So although the pathData initially looks quite incomprehensible: M109.2,256L220.1,320L331.1,191.9L220.3,127.9Z, by breaking it down in to the individual commands, it becomes much easier to understand what it’s doing.
Now if we look at the pathData for the same south-west tile in the flattened version of the graphic:
  <path
    android:fillColor="#229025"
    android:name="south_west"
    android:pathData="
        M109.2,256
        L220.1,320
        L330.9,256
        L220.1,192
        Z" />
If we compare these commands to the previous ones, the left-most and bottom-most vertices are identical, but the coordinates for the other two vertices have identical X values, but different Y values. So all that we actually would need to change is the Y position of these two values.
However, we cannot directly changes these values – only the pathData as a whole. In the next article we’ll look at how we can do that with an objectAnimator.
There is no new source added to that of the previous article which is available here.
© 2016, Mark Allison. All rights reserved.
Copyright © 2016 Styling Android. All Rights Reserved.
Information about how to reuse or republish this work may be available at http://blog.stylingandroid.com/license-information.
