
Build speeds are an important issue when it comes to Android development. While things are certainly improving thanks to the work that the Android Tools team at Google are doing doing to the Android toolchain, and other changes such as incremental compilation in the Kotlin toolchain, there are still occasions where builds are slow. Any way that we can speed things up is always welcome. In this post we’ll look at how we can significantly improve build speeds by utilising a build executor machine with Mainframer or Mirakle.

My main development machine is an iMac 4Ghz Intel Core i7 with 32GB RAM and an SSD which looks to be a reasonable spec machine. However builds can still be slow at times. This isn’t helped by the fact that macOS uses a chunk of the available capacity, and having other apps running can also slow things down. The load average on my iMac with Android Studio and a few other apps running is around 3.0 even in an idle state. While this isn’t a problem on a quad core, 8 process CPU, it does demonstrate that a chunk of the system capacity is being used before we even start and Android build.
One approach that we can use is to keep our system really bare-bones and only have the necessary software required for Android development installed. But it is often completely impractical to do that if you are required to have work email, Slack and other such tools running.
An alternative approach is to actually have an executor machine which is kept as a bare-bones machine, and perform all builds on that. There are a couple of tools that allow you to do that quite easily, named Mainframer, and Mirakle.
The basic principle upon which they both operate is that they open an SSH connection to the build executor, perform an rsync of your development folder to copy across any changes (such as edited source files) to the executor, run the build, and then perform a second rsync to copy the changes (including the compiled APK) back to your development machine.
Before we continue, I should point out that I was unaware of both Mainframer and Mirakle until I started a contract with Babylon Health where Enrique Ramirez maintains a couple of build executors which the Android developers can use with either Mainframer or Mirakle. I learned from Enrique that he actually took this over from Balachandar Kolathur Mani. Many thanks to Enrique and Bala for introducing me to this!
Just to provide some clarity, during the rest of this article I will refer to both the development machine and the build executor. The development machine is the machine that you will work on directly which is running Android Studio; and the build executor is the bare bones machine upon which the builds will be run.
When I first set things up, I used a Zotac i7-4770R (Quad core) with 16Gb + 512Gb SSD box that I’d had for a couple years for the build executor and was so impressed I felt that a higher spec machine was justified, so I now have a 6 core i9 8950HK with 32Gb RAM, 512Gb SSD which I picked up for around GBP 600. This is running Debian Linux with no GUI. For comparison when no build is running, the load average on this box is 0.0 (or very close to it).
The first thing that needs doing is to get SSH login to the build executor. It is important to configure key-based authentication for the user account that you will be using to access the build executor using Mainframer or Mirakle. I won’t go in to the specifics here because there are many tutorials online if you Google “key-based authentication ssh“. When generating your keys, it is best not to use a passphrase for the key. Although this is less secure, you really don’t want to have to enter your pass phrase each time you run a build on the build executor.
You next need to set your development machine to login to the build executor:
Host mainframer
  Hostname spartacus
  IdentityFile ~/.ssh/id_rsa
  User mark
  ControlMaster auto
  ControlPath /tmp/%r@%h:%p
  ControlPersist 1h
The Host field defines the nickname used to connect to, Hostname is the hostname of the build executor, IdentityFile is the public key that you generated when setting up SSH login, User is the username of the account you set up on the build executor, and the Control* fields allow the same connection to be reused within one hour – this can speed up connection times. One word of warning with the connection reuse: If you’re tinkering with SSH settings, you might want to disable this because any changes in settings will not apply to a re-used connection – just set ControlMaster no while your trying the new settings, and set it back to auto once your tinkering is complete.
If everything is set up correctly, you should now be able to login to the build executor:
~$ ssh mainframer
Last login: Sun Aug 18 10:44:45 2019 from 192.168.2.23
mark@spartacus:~$
Now you need to install a JDK on the build executor. The process for this will vary between Linux distros so you may need to do something different to this, but for Debian:
sudo apt-get install openjdk-11-jre openjdk-11-jdk
Now you need to install the Android SDK on the build executor. The latest version can get found here. You’ll need to click on the relevant link there, and at the bottom of the license agreement click the checkbox to show that you accept the Ts & Cs, then you can right click the copy the necessary URL from there:
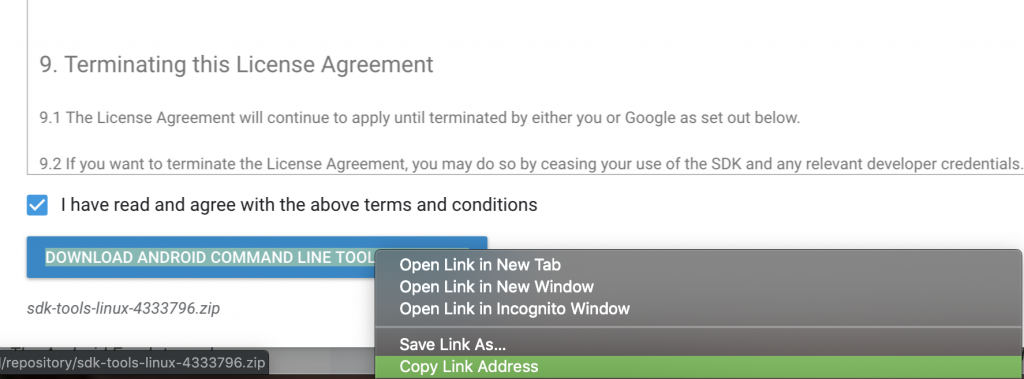
Next you’ll need to download this on the the build executor from the command line:
wget
You now need to unzip this somewhere – I went for /opt/android-sdk-linux, and then you need to run /opt/android-sdk-linux/tools/bin/sdkmanager --list to get a list of available packages and determine the latest version of build-tools:
$ /opt/android-sdk-linux/tools/bin/sdkmanager --list
...
Available Packages:
  Path                                                                                     | Version      | Description
  -------                                                                                  | -------      | -------
...
  build-tools;19.1.0                                                                       | 19.1.0       | Android SDK Build-Tools 19.1
  build-tools;20.0.0                                                                       | 20.0.0       | Android SDK Build-Tools 20
  build-tools;21.1.2                                                                       | 21.1.2       | Android SDK Build-Tools 21.1.2
  build-tools;22.0.1                                                                       | 22.0.1       | Android SDK Build-Tools 22.0.1
  build-tools;23.0.1                                                                       | 23.0.1       | Android SDK Build-Tools 23.0.1
  build-tools;23.0.2                                                                       | 23.0.2       | Android SDK Build-Tools 23.0.2
  build-tools;23.0.3                                                                       | 23.0.3       | Android SDK Build-Tools 23.0.3
  build-tools;24.0.0                                                                       | 24.0.0       | Android SDK Build-Tools 24
  build-tools;24.0.1                                                                       | 24.0.1       | Android SDK Build-Tools 24.0.1
  build-tools;24.0.2                                                                       | 24.0.2       | Android SDK Build-Tools 24.0.2
  build-tools;24.0.3                                                                       | 24.0.3       | Android SDK Build-Tools 24.0.3
  build-tools;25.0.0                                                                       | 25.0.0       | Android SDK Build-Tools 25
  build-tools;25.0.1                                                                       | 25.0.1       | Android SDK Build-Tools 25.0.1
  build-tools;25.0.2                                                                       | 25.0.2       | Android SDK Build-Tools 25.0.2
  build-tools;25.0.3                                                                       | 25.0.3       | Android SDK Build-Tools 25.0.3
  build-tools;26.0.0                                                                       | 26.0.0       | Android SDK Build-Tools 26
  build-tools;26.0.1                                                                       | 26.0.1       | Android SDK Build-Tools 26.0.1
  build-tools;26.0.2                                                                       | 26.0.2       | Android SDK Build-Tools 26.0.2
  build-tools;26.0.3                                                                       | 26.0.3       | Android SDK Build-Tools 26.0.3
  build-tools;27.0.0                                                                       | 27.0.0       | Android SDK Build-Tools 27
  build-tools;27.0.1                                                                       | 27.0.1       | Android SDK Build-Tools 27.0.1
  build-tools;27.0.2                                                                       | 27.0.2       | Android SDK Build-Tools 27.0.2
  build-tools;27.0.3                                                                       | 27.0.3       | Android SDK Build-Tools 27.0.3
  build-tools;28.0.0                                                                       | 28.0.0       | Android SDK Build-Tools 28
  build-tools;28.0.1                                                                       | 28.0.1       | Android SDK Build-Tools 28.0.1
  build-tools;28.0.2                                                                       | 28.0.2       | Android SDK Build-Tools 28.0.2
  build-tools;28.0.3                                                                       | 28.0.3       | Android SDK Build-Tools 28.0.3
  build-tools;29.0.0                                                                       | 29.0.0       | Android SDK Build-Tools 29
  build-tools;29.0.1                                                                       | 29.0.1       | Android SDK Build-Tools 29.0.1
  build-tools;29.0.2                                                                       | 29.0.2       | Android SDK Build-Tools 29.0.2
...
You can now install package-tools, and build tools:
/opt/android-sdk-linux/tools/bin/sdkmanager "platform-tools" "build-tools;29.0.2"
You now need to accept the licenses before you will be able to build anything:
/opt/android-sdk-linux/tools/bin/sdkmanager --licenses
The final thing that you need to do is set environment variable named ANDROID_SDK_ROOT and ANDROID_HOME. This is actually a little trickier over SSH because this is not typically set up as a login shell, so does not run the usual shell configuration scripts. However, it is possible to achieve this by adding them to /etc/environment where they will get picked up:
export ANDROID_SDK_ROOT=/opt/android-sdk-linux
export ANDROID_HOME=/opt/android-sdk-linux
But there is a gotcha: (On Debian, at least) you need to restart the machine for this to take effect. I spent a while struggling with this – I had done this without rebooting and couldn’t work out why it wasn’t working. Enrique Ramirez was able to point me in the right direction – thanks (agin) Enrique!
The build executor is now configured, so we can move back to the development machine.
You can now install the Mainframer client as detailed here, and you’ll need to set up a configuration file in the root folder of your project which specifies a remote machine using the alias that you set up earlier in the ~/.ssh/config file:
remote_machine=mainframer
We’re now good to go. Mainframer is quite a simple script which opens an SSH connection to the build executor, does an rsync, runs a supplied script, then performs a second rsync, so we can test it with a simple shell command:
$ mainframer.sh echo "Hello world"
:: mainframer v2.1.0

Sync local ? remote machine...
Sync done: took 0 seconds.

Executing command on remote machine…

echo Hello world

Hello world

Execution done: took 0 seconds.

Sync remote ? local machine…
Sync done: took 0 seconds.

Success: took 0 seconds.
You can now use this to run your project build on the build executor:
$ mainframer.sh ./gradlew clean assemble
:: mainframer v2.1.0

Sync local ? remote machine...
Sync done: took 0 seconds.

Executing command on remote machine…

./gradlew clean assemble

> Task :buildSrc:compileKotlin UP-TO-DATE
> Task :buildSrc:compileJava NO-SOURCE
> Task :buildSrc:compileGroovy NO-SOURCE
> Task :buildSrc:pluginDescriptors UP-TO-DATE
> Task :buildSrc:processResources NO-SOURCE
> Task :buildSrc:classes UP-TO-DATE
> Task :buildSrc:inspectClassesForKotlinIC UP-TO-DATE
> Task :buildSrc:jar UP-TO-DATE
> Task :buildSrc:assemble UP-TO-DATE
> Task :buildSrc:compileTestKotlin NO-SOURCE
> Task :buildSrc:pluginUnderTestMetadata UP-TO-DATE
> Task :buildSrc:compileTestJava NO-SOURCE
> Task :buildSrc:compileTestGroovy NO-SOURCE
> Task :buildSrc:processTestResources NO-SOURCE
> Task :buildSrc:testClasses UP-TO-DATE
> Task :buildSrc:test NO-SOURCE
> Task :buildSrc:validateTaskProperties UP-TO-DATE
> Task :buildSrc:check UP-TO-DATE
> Task :buildSrc:build UP-TO-DATE
> Task :clean
> Task :app:clean
> Task :app:preBuild UP-TO-DATE
> Task :app:preDebugBuild UP-TO-DATE
> Task :app:checkDebugManifest
> Task :app:compileDebugAidl NO-SOURCE
> Task :app:compileDebugRenderscript
> Task :app:generateDebugBuildConfig
> Task :app:mainApkListPersistenceDebug
> Task :app:generateDebugResValues
> Task :app:generateDebugResources
> Task :app:createDebugCompatibleScreenManifests
> Task :app:extractDeepLinksDebug
> Task :app:processDebugManifest
> Task :app:mergeDebugResources
> Task :app:processDebugResources
> Task :app:compileDebugKotlin
> Task :app:mergeDebugShaders
> Task :app:compileDebugShaders
> Task :app:generateDebugAssets
> Task :app:mergeDebugAssets
> Task :app:javaPreCompileDebug
> Task :app:compileDebugJavaWithJavac
> Task :app:compileDebugSources
> Task :app:processDebugJavaRes NO-SOURCE
> Task :app:desugarDebugFileDependencies
> Task :app:validateSigningDebug
> Task :app:signingConfigWriterDebug
> Task :app:checkDebugDuplicateClasses
> Task :app:dexBuilderDebug
> Task :app:mergeLibDexDebug
> Task :app:mergeDebugJniLibFolders
> Task :app:preReleaseBuild UP-TO-DATE
> Task :app:compileReleaseAidl NO-SOURCE
> Task :app:compileReleaseRenderscript
> Task :app:checkReleaseManifest
> Task :app:generateReleaseBuildConfig
> Task :app:mainApkListPersistenceRelease
> Task :app:generateReleaseResValues
> Task :app:generateReleaseResources
> Task :app:mergeDebugJavaResource
> Task :app:createReleaseCompatibleScreenManifests
> Task :app:extractDeepLinksRelease
> Task :app:processReleaseManifest
> Task :app:prepareLintJar UP-TO-DATE
> Task :app:checkReleaseDuplicateClasses
> Task :app:mergeProjectDexDebug
> Task :app:desugarReleaseFileDependencies
> Task :app:mergeReleaseShaders
> Task :app:compileReleaseShaders
> Task :app:generateReleaseAssets
> Task :app:mergeReleaseAssets
> Task :app:processReleaseJavaRes NO-SOURCE
> Task :app:signingConfigWriterRelease
> Task :app:mergeReleaseJniLibFolders
> Task :app:mergeDebugNativeLibs
> Task :app:stripDebugDebugSymbols
> Task :app:mergeReleaseResources
> Task :app:processReleaseResources
> Task :app:compileReleaseKotlin
> Task :app:mergeReleaseNativeLibs
> Task :app:stripReleaseDebugSymbols
> Task :app:javaPreCompileRelease
> Task :app:compileReleaseJavaWithJavac
> Task :app:compileReleaseSources
> Task :app:lintVitalRelease
> Task :app:dexBuilderRelease
> Task :app:mergeExtDexDebug
> Task :app:packageDebug
> Task :app:assembleDebug
> Task :app:mergeReleaseJavaResource
> Task :app:mergeExtDexRelease
> Task :app:mergeDexRelease
> Task :app:packageRelease
> Task :app:assembleRelease
> Task :app:assemble

BUILD SUCCESSFUL in 6s
60 actionable tasks: 59 executed, 1 up-to-date

Execution done: took 7 seconds.

Sync remote ? local machine…
Sync done: took 0 seconds.

Success: took 7 seconds.
For reference, the same build on my iMac takes 11 seconds – so the build executor is much faster even with the rsyncs. For more complex builds the build server performs comparatively better still.
Although this is quite nice, it is actually quite tricky to get working with Android Studio. There is a Mainframer plugin for AS, but I found it quite fiddly to get working. However there is an alternative that we can use named Mirakle.
Mirakle works in a very similar manner to Mainframer – doing rsyncs and running a script in the SSH session on the build executor. However rather than running as a shell wrapper as Mainframer does, Mirakle actually hooks in to the Gradle build framework. The setup for the build executor is identical to that of Mainframer, so that’s already ready to go. On the development machine we need to add a file to our gradle configuration. On a Mac this goes in to the global Gradle config for the current user:
initscript {
    repositories {
        jcenter()
    }
    dependencies {
        classpath "com.instamotor:mirakle:1.2.0"
    }
}

apply plugin: Mirakle

rootProject {
    mirakle {
        host "mainframer"
    }
}
What this does is applies the Mirakle plugin to every Gradle build that is run from this user account. So with this in place, all we need to do is run a build as normal, and Mirakle kicks in automagically:
./gradlew clean assemble

> Task :buildSrc:jar
:jar: No valid plugin descriptors were found in META-INF/gradle-plugins

> Configure project :
Here's Mirakle 1.2.0. All tasks will be executed on mainframer.

> Task :executeOnRemote
> Task :buildSrc:compileKotlin UP-TO-DATE
> Task :buildSrc:compileJava NO-SOURCE
> Task :buildSrc:compileGroovy NO-SOURCE
> Task :buildSrc:pluginDescriptors UP-TO-DATE
> Task :buildSrc:processResources NO-SOURCE
> Task :buildSrc:classes UP-TO-DATE
> Task :buildSrc:inspectClassesForKotlinIC UP-TO-DATE
> Task :buildSrc:jar UP-TO-DATE
> Task :buildSrc:assemble UP-TO-DATE
> Task :buildSrc:compileTestKotlin NO-SOURCE
> Task :buildSrc:pluginUnderTestMetadata UP-TO-DATE
> Task :buildSrc:compileTestJava NO-SOURCE
> Task :buildSrc:compileTestGroovy NO-SOURCE
> Task :buildSrc:processTestResources NO-SOURCE
> Task :buildSrc:testClasses UP-TO-DATE
> Task :buildSrc:test NO-SOURCE
> Task :buildSrc:validateTaskProperties UP-TO-DATE
> Task :buildSrc:check UP-TO-DATE
> Task :buildSrc:build UP-TO-DATE
> Task :clean
> Task :app:clean
> Task :app:preBuild UP-TO-DATE
> Task :app:preDebugBuild UP-TO-DATE
> Task :app:checkDebugManifest
> Task :app:compileDebugAidl NO-SOURCE
> Task :app:compileDebugRenderscript
> Task :app:generateDebugBuildConfig
> Task :app:mainApkListPersistenceDebug
> Task :app:generateDebugResValues
> Task :app:generateDebugResources
> Task :app:createDebugCompatibleScreenManifests
> Task :app:extractDeepLinksDebug
> Task :app:processDebugManifest
> Task :app:mergeDebugResources
> Task :app:processDebugResources
> Task :app:compileDebugKotlin
> Task :app:mergeDebugShaders
> Task :app:compileDebugShaders
> Task :app:generateDebugAssets
> Task :app:mergeDebugAssets
> Task :app:javaPreCompileDebug
> Task :app:compileDebugJavaWithJavac
> Task :app:compileDebugSources
> Task :app:processDebugJavaRes NO-SOURCE
> Task :app:desugarDebugFileDependencies
> Task :app:checkDebugDuplicateClasses
> Task :app:dexBuilderDebug
> Task :app:validateSigningDebug
> Task :app:signingConfigWriterDebug
> Task :app:mergeLibDexDebug
> Task :app:mergeDebugJavaResource
> Task :app:mergeDebugJniLibFolders
> Task :app:preReleaseBuild UP-TO-DATE
> Task :app:compileReleaseAidl NO-SOURCE
> Task :app:compileReleaseRenderscript
> Task :app:checkReleaseManifest
> Task :app:generateReleaseBuildConfig
> Task :app:mainApkListPersistenceRelease
> Task :app:generateReleaseResValues
> Task :app:generateReleaseResources
> Task :app:createReleaseCompatibleScreenManifests
> Task :app:extractDeepLinksRelease
> Task :app:processReleaseManifest
> Task :app:mergeProjectDexDebug
> Task :app:prepareLintJar UP-TO-DATE
> Task :app:checkReleaseDuplicateClasses
> Task :app:mergeDebugNativeLibs
> Task :app:stripDebugDebugSymbols
> Task :app:desugarReleaseFileDependencies
> Task :app:mergeReleaseShaders
> Task :app:compileReleaseShaders
> Task :app:generateReleaseAssets
> Task :app:mergeReleaseAssets
> Task :app:processReleaseJavaRes NO-SOURCE
> Task :app:signingConfigWriterRelease
> Task :app:mergeReleaseJniLibFolders
> Task :app:mergeReleaseResources
> Task :app:processReleaseResources
> Task :app:compileReleaseKotlin
> Task :app:mergeExtDexRelease
> Task :app:javaPreCompileRelease
> Task :app:compileReleaseJavaWithJavac
> Task :app:compileReleaseSources
> Task :app:lintVitalRelease
> Task :app:dexBuilderRelease
> Task :app:mergeExtDexDebug
> Task :app:packageDebug
> Task :app:assembleDebug
> Task :app:mergeReleaseNativeLibs
> Task :app:stripReleaseDebugSymbols
> Task :app:mergeReleaseJavaResource
> Task :app:mergeDexRelease
> Task :app:packageRelease
> Task :app:assembleRelease
> Task :app:assemble

BUILD SUCCESSFUL in 6s
60 actionable tasks: 59 executed, 1 up-to-date
Total time : 7.412 secs
Task uploadToRemote took: 0.036 secs
Task executeOnRemote took: 6.278 secs
Task downloadFromRemote took: 0.814 secs
4 actionable tasks: 4 executed
We get equivalent performance to the Mainframer build, but this just happens for every build. This includes builds initiated by Android Studio, so by enabling Mirakle, our AS builds will automatically be run on the build executor!
There are occasions where you may want to run a build locally (for example when running an Android Test suite which need to be run on a device connected to the development machine. From the command line we can disable Mirakle by adding -x mirakle and Mirakle will be disabled for that build. To do the same for builds triggered by AS, it will be necessary to move the mirakle_init.gradle file out of ~/.gradle/init.d temporarily.
The only problem I’ve encountered is that build errors report the location on the file system of the build executor machine, and not the development machine. That means it is not possible to click on those links in AS and it opens the relevant source file. However this could easily be rectified by mimicking the file system hierarchy of the development machine on the build executor. Actually this is working correctly – mirakle performs automatic mapping of paths on the build executor back to those of the development machine. I’ve seen this issue in the past, not sure what was going wrong.
The one thing worth mentioning is that both Mainframer and Mirakle require good network connectivity. If the network is slow, then the rsyncs may end up taking longer than the saving to the build speed. That said, I get really impressive performance improvements when I’m using my Pixel Slate for development. I have a 4G MiFi which usually gets me pretty good speeds, and even over this I’m seeing local builds taking over a minute, while builds on the build executor (which is being accessed over the cellular network) similar to those above – less than 10 seconds. That makes software development on the Slate a much more practical proposition , and I am now doing a lot of the dev work for the code supporting my blog posts on the Slate. When I’m, next considering upgrading my laptop, I may not go for the highest spec, most expensive model as I usually do because I can achieve better build speeds using the build executor.
Now that I’ve been using a build executor for a while, I find going back to running local builds really hard. On the occasions that I’ve had to do it (when running an Android Test suite), I have found the slower local builds really noticeable. So I’m sticking with my build executor, and would recommend it to all Android devs.
© 2019, Mark Allison. All rights reserved.
Copyright © 2019 Styling Android. All Rights Reserved.
Information about how to reuse or republish this work may be available at http://blog.stylingandroid.com/license-information.

Is anyone facing this issue using Mirakle:
Parallel execution is an incubating feature.
Mainframer config is applied, Mirakle config is ignored.
Here’s Mirakle 1.2.0. All tasks will be executed on mainframer.
:uploadToRemote
/usr/bin/env: ‘bash\r’: No such file or directory
:executeOnRemote
:downloadFromRemote
:mirakle FAILED
4 actionable tasks: 4 executed
Total time : 2.733 secs
Task uploadToRemote took: 1.2 secs
Task executeOnRemote took: 0.035 secs
Task downloadFromRemote took: 1.455 secs
Have you got `bash` installed on your build executor machine?
Interesting, but it would be really nice if the development machine can connect to the exceutor via wifi instead of internet data.
It will do that automatically if they are both on the same subnet and you have the appropriate local DNS set up on the local network.
The issue was with files in my repo…some of them were using CRLF line ending. So i modified my Git configuration , checked out all my files to my local machine having linux friendly LF line ending and retried building and it was successful. Both mainframer as well as Mirakle work.
Wow…My build speeds are now reduced to half by offloading build task to a nuc build server running Ubuntu. Thanks again for this amazing post..
I’m happy you got it working, and that you saw such positive results!
You noticed that build errors report points the location on the file system of the build executor machine, and not the development machine.
Is this really true for mirakle? It has a hack for replacing remote file paths by local machine paths.
https://github.com/Instamotor-Labs/mirakle/blob/development/plugin/src/main/kotlin/Mirakle.kt#L244
If it doesn’t work for you please file an issue.
Yes, you’re right. I had problems with it in the past, but it all appears to be working now. Not sure why.