
Many commercial image processing applications have various effects which are achieved using convolution matrices. These are actually pretty easy to implement on Android and enable us to apply some quite interesting effects to images. In this short series we’ll look a little at the theory behind them, look at some examples of what we can achieve, and, of course, see how we can implement this in our apps.
Previously we looked at the theory behind convolution matrices and saw how we can achieved some quite varied effects by applying different matrices to our images. In this article we’ll turn our attention to how to perform these transformations on Android. The maths itself that we need to calculate the value of each pixel is relatively simple. We obtain the 3×3 or 5×5 grid of pixels surrounding the target pixel, multiply each value by the value of the corresponding position within the matrix, and then add them all together. This becomes a little more complex when the target pixel is on one of the edges of the image because we need to guard against out of bounds issues if we try and access pixel values outside of the image. But actually none of this is necessary if we take the right approach.
Regular readers of Styling Android will now that we’ve tackled image processing before and on each occasion we’ve looked at performance and found that it is relatively slow if we do this in Java or Kotlin because the CPU isn’t optimised for performing large numbers of floating point calculations in quick succession. Modern devices all have a dedicated processor called the Graphics Processing Unit (or GPU) which is designed for this very thing. Whereas a CPU is a bit of a jack-of-all-trades and can perform a lot of varied tasks, a GPU is specifically designed to speed up and parallelise floating point calculations. A GPU consists of a number of Arithmetic Logic Units (or ALUs) each of which is designed specifically to perform floating point calculations. These ALUs are much simpler than the multiple cores of a CPU because they are designed for this single purpose, therefore it is possible to pack many more of them in to a single GPU. For example, the soon to be announced Pixel 4 XL (and one of the worst kept secrets ever) is expected to have the Adreno 640 GPU which consists of 384 ALUs running at a clock speed of 855 MHz. There is some serious number crunching power there! Each of the ALUs can be used to perform the calculation for a single pixel.
It should be no surprise therefore that we’re going to use the GPU to apply our convolution filters to the image. This sounds like a job for Renderscript!
Once again, regular readers will have seen that we’ve used Renderscript for image processing before, and may be expecting that we’ll write a custom chunk of C99 code to perform the calculation for each pixel. But that is not necessary because there are some ready rolled scripts that will do exactly what we need. When we looked at image blurring using Renderscript we used an in-built script named ScriptIntrinsicBlur to performing the blurring. There are also two scripts named ScriptIntrinsicConvolve3x3 and ScriptIntrinsicConvolve5x5 and these allow us to apply 3×3 and 5×5 convolution matrices respectively.
The class responsible for performing the transformations is named ImageProcessor:
class ImageProcessor(
    context: Context,
    lifecycleOwner: LifecycleOwner,
    private val imageView: ImageView
) : CoroutineScope, LifecycleObserver {

    init {
        lifecycleOwner.lifecycle.addObserver(this)
    }

    private val job = Job()

    override val coroutineContext: CoroutineContext
        get() = job + Dispatchers.Main

    private val renderScript: RenderScript = RenderScript.create(context)
    var image: Bitmap? = null
        set(value) {
            field = value
            imageUpdated()
        }
    var coefficients: FloatArray? = null
        set(value) {
            field = value
            if (::inputAllocation.isInitialized) {
                process()
            }
        }

    private lateinit var inputAllocation: Allocation
    private lateinit var outputAllocation: Allocation
    private lateinit var script3x3: ScriptIntrinsicConvolve3x3
    private lateinit var script5x5: ScriptIntrinsicConvolve5x5

    private fun imageUpdated() {
        destroyAllocations()
        inputAllocation = Allocation.createFromBitmap(renderScript, image).apply {
            copyFrom(image)
        }
        outputAllocation = Allocation.createFromBitmap(renderScript, image)
        script3x3 = ScriptIntrinsicConvolve3x3.create(renderScript, inputAllocation.element)
        script5x5 = ScriptIntrinsicConvolve5x5.create(renderScript, inputAllocation.element)
    }

    private fun destroyAllocations() {
        if (::inputAllocation.isInitialized) {
            inputAllocation.destroy()
        }
        if (::outputAllocation.isInitialized) {
            outputAllocation.destroy()
        }
        if (::script3x3.isInitialized) {
            script3x3.destroy()
        }
        if (::script5x5.isInitialized) {
            script5x5.destroy()
        }
    }

    fun process() {
        launch {
            imageView.setImageBitmap(withContext(Dispatchers.Default) {
                processImage()
            })
        }
    }

    private fun processImage(): Bitmap? {
        return image?.let { input ->
            val output = Bitmap.createBitmap(input)
            when (coefficients?.size ?: 0) {
                MATRIX_3X3 -> script3x3.apply {
                    setInput(inputAllocation)
                    setCoefficients(coefficients)
                    forEach(outputAllocation)
                }
                MATRIX_5X5 -> script5x5.apply {
                    setInput(inputAllocation)
                    setCoefficients(coefficients)
                    forEach(outputAllocation)
                }
                else ->
                    @Suppress("UseCheckOrError")
                    throw IllegalStateException("Invalid coefficients")
            }
            outputAllocation.copyTo(output)
            output
        }
    }

    @OnLifecycleEvent(Lifecycle.Event.ON_DESTROY)
    @Suppress("Unused")
    fun onDestroy() {
        job.cancel()
        destroyAllocations()
        renderScript.destroy()
    }

    private companion object {
        private const val MATRIX_3X3 = 9
        private const val MATRIX_5X5 = 25
    }
}
The majority of this class is much the same as the processor that we did for the recent series on rendering the Mandelbrot set. For a description of what Allocation is and how we use it with Renderscript then please check out this article. That article also explains the use of CoroutineScope and LifecycleObserver to perform processing off of the UI thread, and to properly clean things up when the lifecycleOwner is destroyed. Although it was in a later article that this logic was actually moved to the MandelbrotRenderer class, the principle is still the same.
It is the processImage() method that varies from stuff that we’ve covered before, so we’ll focus on that. The size coefficients field is used to decide whether to use a 3×3 or 5×5 matrix. It is a FloatArray containing either 9 or 25 elements – any other size will throw an exception. this array is our matrix flattened to a single dimension – each element corresponds to the order in which the values of the matrix were numbered in the previous article (albeit in a zero-based order of 0-8 than the 1-9 used in the initial 3×3 matrix listed).
For both cases, the input for the script is set to the inputAllocation (the source image), the coefficients for the script are set to the coefficients field, and forEach() is called which runs the script outputting to the outputAllocation. Once processing is complete, the outputAllocation is copied to the Bitmap named output and we are done.
With this all we need to do is provide different values within the coefficients FloatArray and we can apply all of the filters we looked at previously, and many more.
The rest of the code in the sample project is dedicated to providing a UI to select different images and filters. I am actually defining the values for the coefficients FloatArray as <array> resources, and there’s a Spinner which allows different arrays to be set on the ImageProcessor. I won’t give a explanation of that code here as it’s out of scope for the subject of this article, but the source is available for those that want to study it.
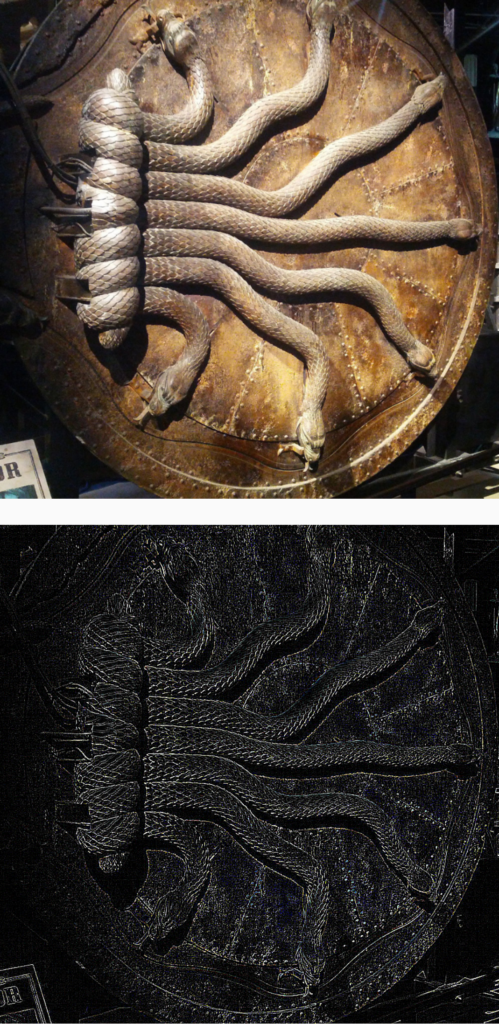
Once thing worth mentioning is that there is the option to specify a background colour which will be applied to the ImageView which will show the transformed image. The reason for this is that the edge detector filter actually produces transparent pixels if the target pixel is identical to those around it. For the chamber of secrets door image, the edges were showing up as white and when displayed against the default light coloured window background of the were not visible. By setting the background colour of the ImageView to black, they can be clearly seen:
One final thing worth discussing is performance. Obviously this will vary from device to device based upon the GPU that each uses. I benchmarked the transformation within the app on both the low res Styling Android and higher res chamber of secrets door images and was getting render times of around 6ms on a Pixel 3a XL (Adreno 615 GPU with 128 ALUs @ 700 MHz). This is more than acceptable, but may not be as good on older or lower powered devices.
That concludes this short series. Image convolution is an extremely powerful tool which, as we have seen, is actually fairly straightforward to implement. While it is not something that most devs will need to use very often, it is a useful tool to know about for those occasions where it can come in handy.
The source code for this article is available here.
© 2019, Mark Allison. All rights reserved.
Copyright © 2019 Styling Android. All Rights Reserved.
Information about how to reuse or republish this work may be available at http://blog.stylingandroid.com/license-information.
